
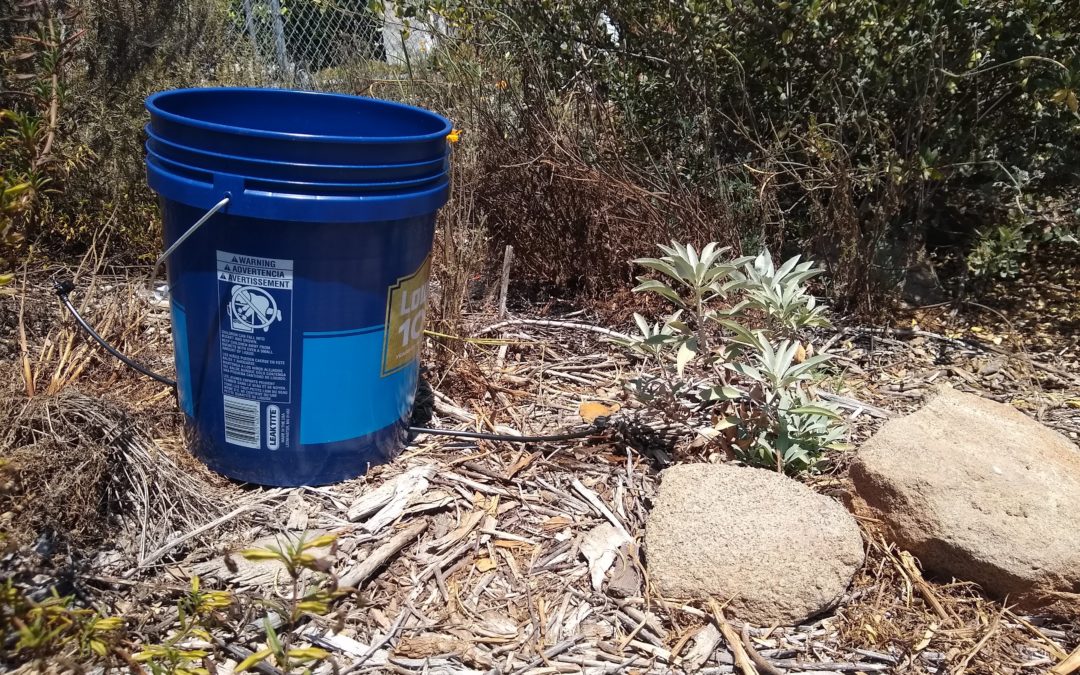
This is a white sage plant that I put in the ground in late winter. We haven’t had much rain since then so I’ve needed to water it about once a month. Instead of using a watering can or a hose, I find that this drip-irrigation bucket is the best method.
In this post I’ll tell you why I sometimes prefer to water with this bucket, and then I’ll tell you how I make one.
Why water with a drip-irrigation bucket?
I could drag a hose down to the sage plant, but then I’d have to drag it back up the hill and coil it when done. Not only is carrying the bucket less work, but also with the bucket I can know how much water I’m delivering whereas it’s much more of a guessing game with the hose. Today, for example, I filled the bucket up a little over halfway so I know that I gave the sage about three gallons.
Further, I get to leave the bucket in place until it empties. With a hose I would have to stand there as I watered or leave and return to turn it off.
Compared to a watering can, the drip-irrigation bucket can have an advantage too. Take this pumpkin, for example, which is planted on a slope.
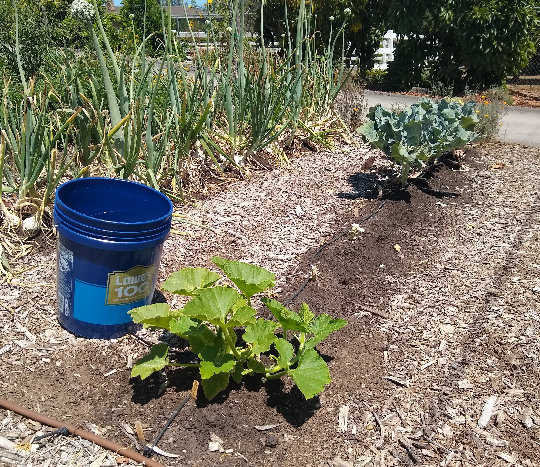
It would take a long time to water with a can slowly enough that the water didn’t run off down the hill. With the bucket I can adjust the dripper such that all the water slowly percolates into the soil next to the plant.
(You may notice that there’s a dripline under the pumpkin. Why am I not using that? If I did, then I’d be wasting water in that gap between the pumpkin and the broccoli.)
When not to water with the drip-irrigation bucket?
A watering can or hose is a better option for some plants though. For example, I use a watering can for very small vegetable plants that I recently put in. And I use a spot sprinkler or dripline connected to a hose to water large trees.
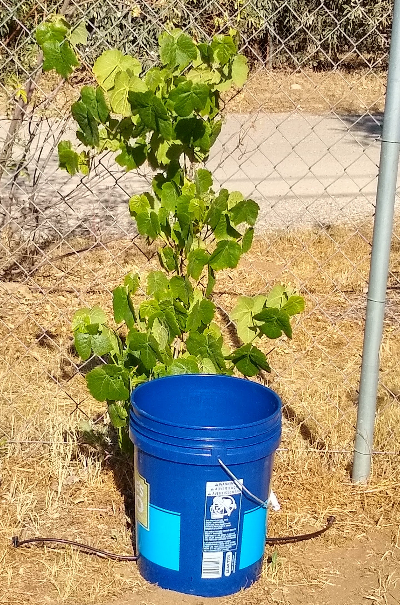
In general, the drip-irrigation bucket is my choice for medium size plants that don’t have access to my automatic irrigation system (yet).
How to make a drip-irrigation bucket
How I make a drip-irrigation bucket, in four steps, using these materials:
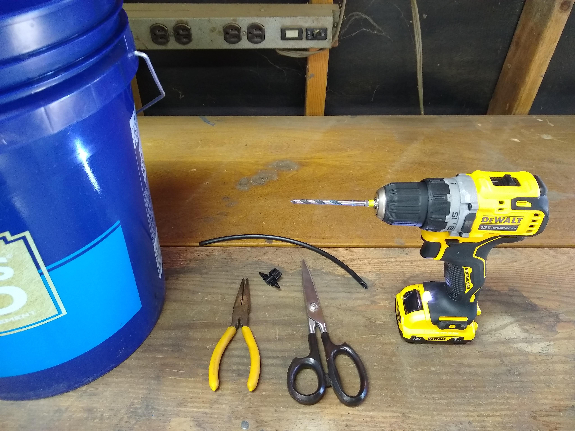
1. Drill a hole about an inch up from the bottom of the bucket with a 3/16-inch bit.
Locate the hole under where the bucket’s handle falls down, which makes it easier to carry. (Otherwise, the tube rubs your leg as you walk.)
2. Cut a piece of 1/4-inch polyethylene tubing to about a foot in length. Then cut an angle on one end.
3. With needle-nose pliers, pull the tube through the hole into the bucket. If necessary, drill the hole a little bigger to fit the tube in. But be careful not to drill too big or else the hole will leak.
4. Insert a shut-off valve into the end of the tube outside the bucket. This is your adjustable drip emitter.
Now in motion:
Here’s a bonus step that you might want to add. Put in an additional hole and tube on the opposite side of the bucket. This way you can apply water simultaneously in two spots on either side of a plant. This is especially useful for bigger plants.
You can, for example, apply four gallons in total to a plant by putting two gallons out of each of the tubes. This gives the larger plant a broader zone of wet soil to drink from.
I’m sure that every plant in your yard is watered by a dedicated emitter or sprinkler that is connected to an automatic system, but if you know anyone as unruly a gardener as me, then let them know about the help that can be found in this mobile drip-irrigation bucket.
All of my Yard Posts are listed HERE
Got no ads clogging up The Yard Posts because cool people like you send support. Thanks!


Novel idea. I like it. Simple and effective.
Wow. It’s a great idea. Do we need a lid to keep the water from being evaporated?
Hi Le,
No need for a lid. Even at a drip rate, the water drains out within a few hours and there’s not enough time for a lot of evaporation.
always put a lid on them, little animals get trapped in them and die.
Good reminder, Connie. Thank you. One time I didn’t retrieve my bucket for a few days and found a lizard inside — still alive, but incapable of getting back out on its own.
Hi Greg, I love that you are using a bucket for watering. I actually use this method for watering my avocado tree. It allows me to be more accurate with the amount of water I’m giving it. I’ve been using your watering schedule for years now and have the most beautiful 12 year old tree. I have a small vegetable/flower garden in my backyard that I water by hand, do on tree watering days I fill up the bucket and let it drain out as I am watering my plants. It works very well. I saw the respone from Connie one of your readers, and because I’ve had lizards get caught in the buckets, we put a tree branch in any buckets we use, so they can climb out. Thank you for all the tips, I’ve learned a lot from your blog.
Smart! Thanks, Diana. I love the tree branch idea.
Add miracle grow to the water and you can fertilize while you are watering your plants
The bucket trick is something I can use immediately. Thanks, Greg!
Can you please explain what you mean by a ‘spot sprinkler’ and how you connect a dripline to a hose? Love the bucket idea!
Hi Barbara,
I’m thinking of the fixture that you screw onto your hose that sends up a rain of water in a spot, or circle. Like this: https://www.lowes.com/pd/Yardsmith-900-sq-ft-Spray-Sled-Lawn-Sprinkler/50328315
And you can connect a dripline to a hose by attaching a hose-thread adapter to it. Here is one of those: https://www.homedepot.com/p/DIG-3-4-in-Female-Hose-Thread-x-1-2-in-0-700-O-D-Compression-Swivel-Adapter-C34/100141505
Thanks for the quick reply. Very helpful.
I love this idea! It will actually be perfect for watering my white sage too…
This is a great idea. I can see using this in my squash plants and other climbing vegetables plants I have. I find dragging the hose so I just water the base sometimes will get tangled with the low vines. With this method I can just set the buckets there and fill them as needed. Too expensive to run a full drip system for me. So this will help.
So simple, yet so genius!
This is great! I tried a more basic version of the bucket irrigation method where I just drilled a few small holes in the bottom of the bucket. I wanted a way to use rain barrel water on plants that weren’t in the barrel’s drip line zone without flooding them. The wholes in the bottom were problematic because I needed a second bucket to carry the water and in my hillside yard I had a hard time finding a flat spot for the bucket to rest that was also where I wanted the water. This give me so many more options! Very excited to try the upgraded version.
Hi Janelle,
That’s exactly what I used to use, and I encountered the same difficulties.
Hi Greg
I’m in the process of planting new avocado trees (GEM, Lamb and Reed) to join my existing and producing avocado tree that grew from seed.
One planting site is where I had a large Queen palm and a large spreading Agave removed. The palm stump remains and there are a lot of dried roots in the soil and a thick layer of the dried palm berries on and in the soil.
Does this make for a poor planting site? Should I amend the soil with decomposed granite to counter the excess plant material?
Any ideas would be greatly appreciated. Thanks.
Hi Bruce,
I would just remove most of the old palm roots from a planting hole that is about a foot wider than the container of the new avocado trees. That should give the new avocados enough soil to root into over the next few months without encountering the decomposing palm roots. By the time the young avocados root out farther, the old palm roots should be highly decomposed and not cause any problems. That’s my best guess. That’s what I would do.
Hi Greg, Thank you for your helpful blog. I planted my first 15 gal Hass in April, before I found you on the internet. It’s on a small mound on the side of my backyard hill. A resource that I used at the time recommended using a drain-pipe to be placed on the inside of the mound to insure that water would reach the root ball. I’ve adopted your recommendation of several inches of mulch beneath the tree and micro sprinklers, as well as water amount based on canopy width. I’ve split watering 60/40, sprinkler/drain-pipe. It’s breaking out with new growth and seems happy. What’s your thoughts on the drain-pipe?
Hi Terry,
I would personally never use a watering pipe for an avocado tree, especially a newly planted one.
The avocado trees that I’ve seen being watered with these pipes have never been performing well. That doesn’t mean it’s because of the pipes, however. It could be that the trees are not being watered properly in other ways (volume, frequency, etc.).
But considering where a newly planted avocado tree’s roots are, and where avocado trees generally like to root out as they age (in the upper handful of inches of soil), it seems more suitable to apply water at the surface. I certainly know that applying water in this way works very well, as this is how every farmer in the world does it and it’s how almost everyone I know does it.
If you simply apply the water of the micro-sprinkler directly to the top of the rootball, which is right by the trunk on a newly planted tree like yours, then as long as enough water is given it will percolate down as deep as the tree’s deepest roots — and of course, it will also wet the upper soil and roots on its way down.
Smart idea! Someone could also put a little glue on the drip tube inside the bucket and then pull it out a little to seal it to the bucket. Could also use a 1/2 GPH dripper – assuming a steady 30psi (the bucket will be less) your 5 gallon bucket would water for at least 10 hours.
Hi Rick,
Thanks for the ideas. I’ve yet to find a glue that doesn’t eventually lose its seal when the tube gets moved around, but maybe there’s one out there that I just haven’t tried. I like to be able to move the tube around to get the dripper right where I want it. (The tube is always slightly curved.)
I have used 1/2 GPH drippers and others that are not pressure compensating, so they work on very low pressure. It’s a viable option. The reason I now go with the adjustable valve is that if I’m on flat ground I can raise the output to 2 or more gallons per hour without getting runoff, and therefore I can get the watering done faster.
Also, what happens is that the output needs to be low at first while the soil in the spot is getting moistened, but then you can raise it significantly after 15 minutes or so. Sometimes I do that just to save time if I’m around.
Of course, if you didn’t still have a shut-off valve behind the emitter the thing would be dripping the whole time you’re hauling the bucket to the spot.
Hi Greg,
Give a sharp wood drill a try when drilling the hole in the bucket. It gives a cleaner and smoother edges which helps sealing.
For better sealing use a 6mm top hat rubber grommet like this one:
https://www.ebay.co.uk/itm/254515406378?mkevt=1&mkcid=1&mkrid=710-53481-19255-0&campid=5338722076&toolid=10001
Thanks, Vasco. Believe it or not, I don’t get any leaking as long as I don’t drill the hole too big although it takes some time and effort to pull the tube through the small hole. But I’m going to try the top hat grommet you suggested anyway. The extra expense might be worth going through less effort pulling the tube through.
Excellent idea! Thanks for passing it along! Watering a single plant by garden hose is such a drag;) Really gaining a lot from your yard posts, you’re making me a better gardener and helping me adapt to Southern California growing conditions.
Excellent idea. NOW – I want to do rows of trees / tree seedlings. Any thoughts on filling the rows of buckets with water? Perhaps a 1/2″ drip line with a “T” going into a hole in the lid?
This is epic! Thanks for sharing! Can you attach drip tape or something similar? Would love to use for my strawbale
Hi Lee,
Yes, I have attached quarter-inch dripline with emitters spaced every foot or so.
I wish there was a demonstration of watering with this system. Is there any leakage where the tube connects to the bucket? I’ve seen other systems with couplers and o-rings, but this would be much simpler, as long as it doesn’t leak.
Hi Peter,
There is no leakage as long as the hole is slightly smaller than the tube. The tube must be squeezed through the hole and it then prevents leakage. I’ll shoot a video using one of my buckets if I get time.
This is such a an amazing way to provide plants with rain water. IMO city/tap water is packed full of… Well everything! All the added conditioners, treatments, toxic junk you don’t want to give your plants or yourself. A great spin on the bucket drip system is in a greenhouse or small garden you can use hospital IV bags and the tubes with flow valves and set to d r i p or flow
this is a great idea! I made 3 for my tomato plants and they are doing so much better this year! THANKS! What emitter did you use on the end I keep having to re-adjust them. They just slowly stop dripping. I think I have the wrong ones. which did you use?
Hi Larry,
Thank you. I use shut-off valves for 1/4-inch poly tubing, such as seen here from Drip Depot: https://www.dripdepot.com/replacement-quarter-inch-tubing-valve-for-ez-flo
Cool! I’ve done a similar thing for trees with 55 gallon rain barrels that aren’t in use during the summer, tubing with inline emitters and a battery operated Toro timer. You can put them in the parkway with a sticker that says, “Leave me be, I’m watering a Tree!”
This was so helpful. Just made my own. Do you ever have any issues with it not dripping out of the bucket? I tried mine on flat(ish) ground and no water flow until I raised bucket 12 inches off ground.