
More than any other vegetable, growing corn makes me feel like I’m farming — not gardening, but farming.
It’s partly because corn is a big plant. It’s one of the few vegetables that stands taller than you. And corn is usually grown in some arrangement of multiple rows so it also takes up a lot of space.
Planting arrangement and pollination
This is one of the main challenges to growing corn at home. The typical planting advice is that you make a minimum of four rows. In other words, make a patch, a block of corn plants. But that amount of space might be hard to come by.
No matter, this is good advice, and the reason for it is related to how corn is pollinated, that is, how the kernels of corn on a cob are able to grow. Corn kernels are seeds, and these seeds cannot grow unless there has been pollination. Here’s how that happens, or can happen.
Life of a corn plant
The stages of life that a corn plant goes through, from seed sowing to seed production, illuminates the why and how of getting good corn to eat from our gardens. First, the seed or seedling goes into the soil and we have a little grass plant.
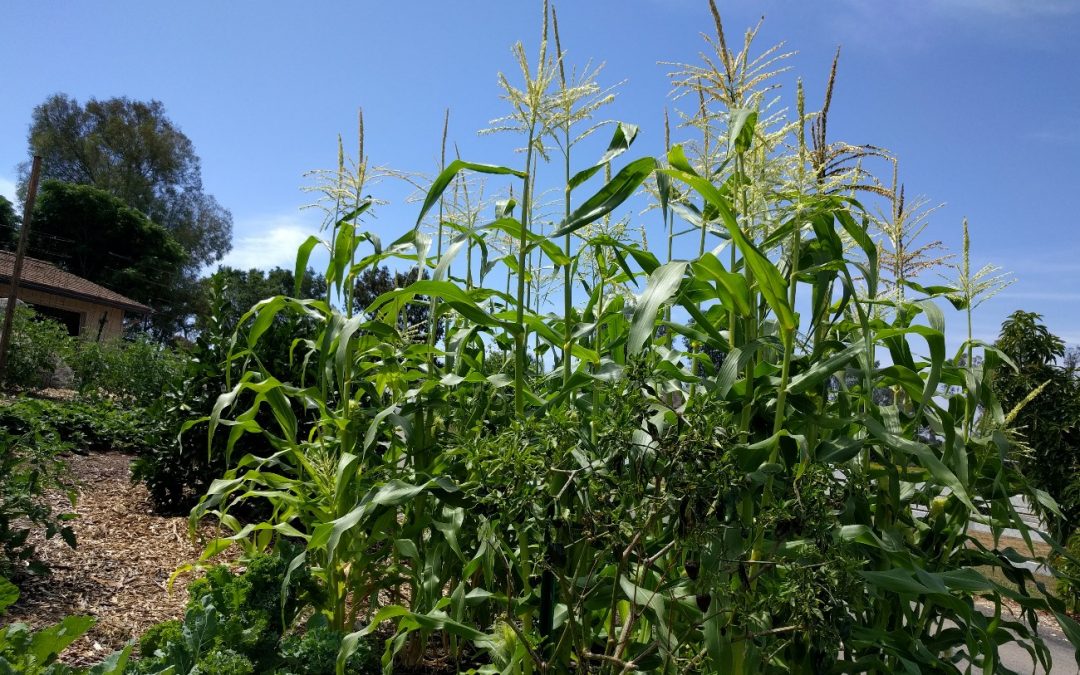
The corn plant gets thicker and taller until forming a tassle on top, the tassle being considered a male flower because it produces pollen. When a corn plant is tassling and a breeze comes through, you notice orange dust falling, the orange dust being the pollen. You also notice bees on the tassle collecting the pollen.

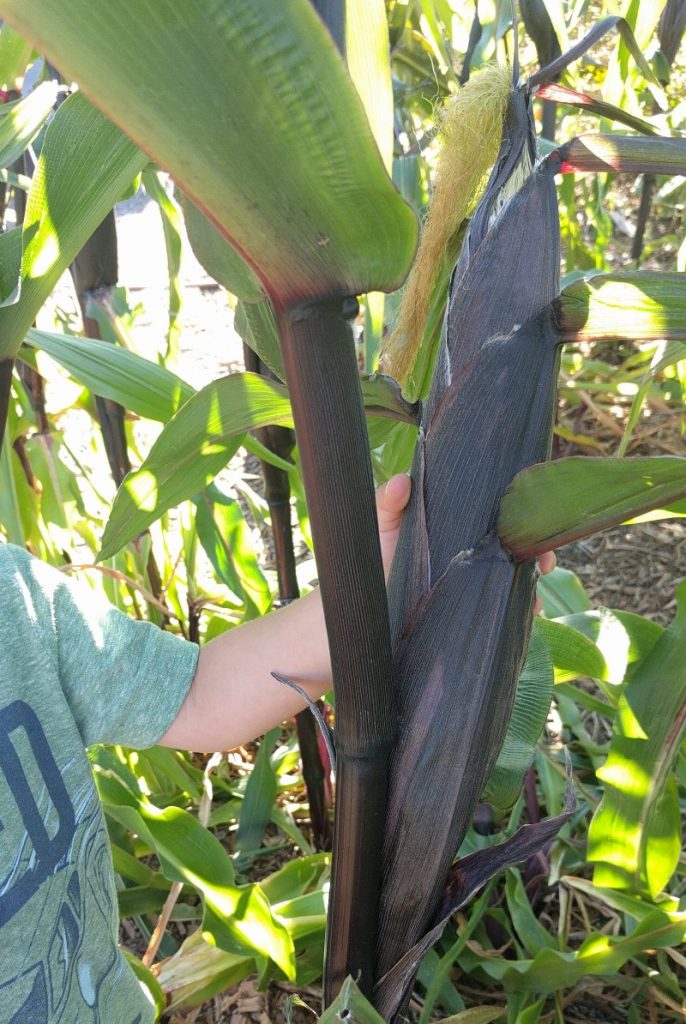
A corn plant makes a tassle on top at the same time that it makes incipient ears along its stalk; you notice stubby branches coming out of the sides of the corn plant and at the tips of them emerge silks, creamy white hairs.
A corn plant is built such that its orange dust pollen from the tassle falls down and lands on the silks below. Each of those silks is connected to a tiny cob inside the stubby branch (husk), and if a silk is dusted with the falling pollen then a kernel of corn will grow at the base of that silk.
Every kernel of corn on the ear below formed because its silk was pollinated — touched by some falling pollen.
Planting arrangement and pollination, part two
Now we can envision why it is advised to plant corn in many rows or a block. Imagine the opposite. Imagine growing just a lone corn plant. The breeze would come through and pollen would fall, but the pollen wouldn’t fall straight down onto the silks below; the pollen would be mostly carried away by the breeze, away from the lone corn plant.
A single row of corn plants is not much better arranged for pollination. Unless the breeze is blowing parallel to the row, the pollen will be wafted away from the plants and their silks.
So by planting many rows or a block, you get a bulky area of plants with tassles releasing pollen in the breeze that is able to fall on silks of neighboring plants all around. Then you get ears of corn with good pollination, meaning you get ears of corn that are packed full of kernels.
The challenge is that you might not have 25 square feet or more of garden space to dedicate to a corn patch. The good news, though, is that you can still get decent ears of corn without following that standard advice.
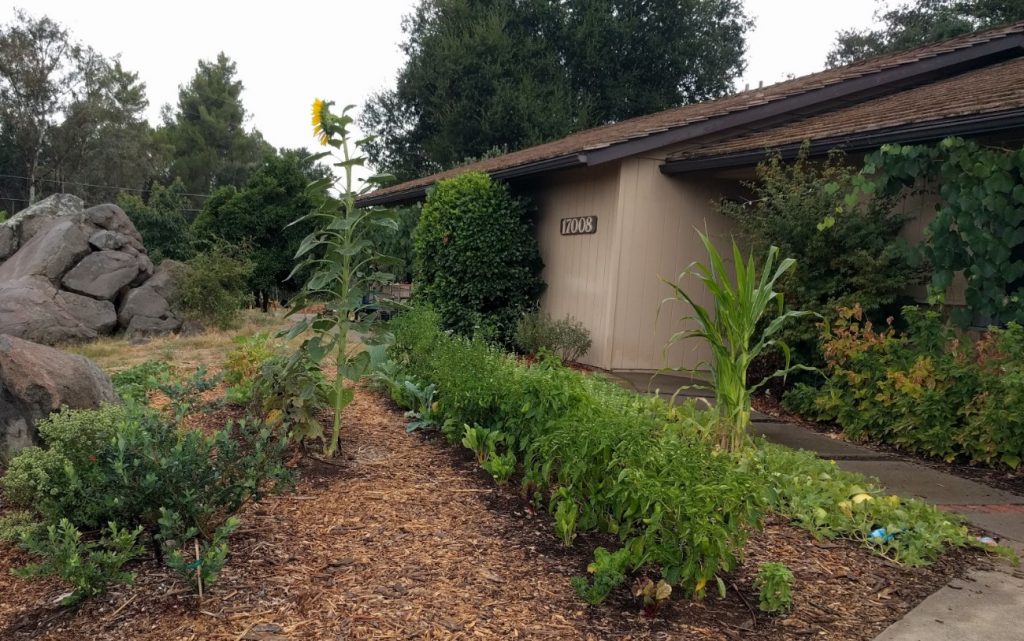
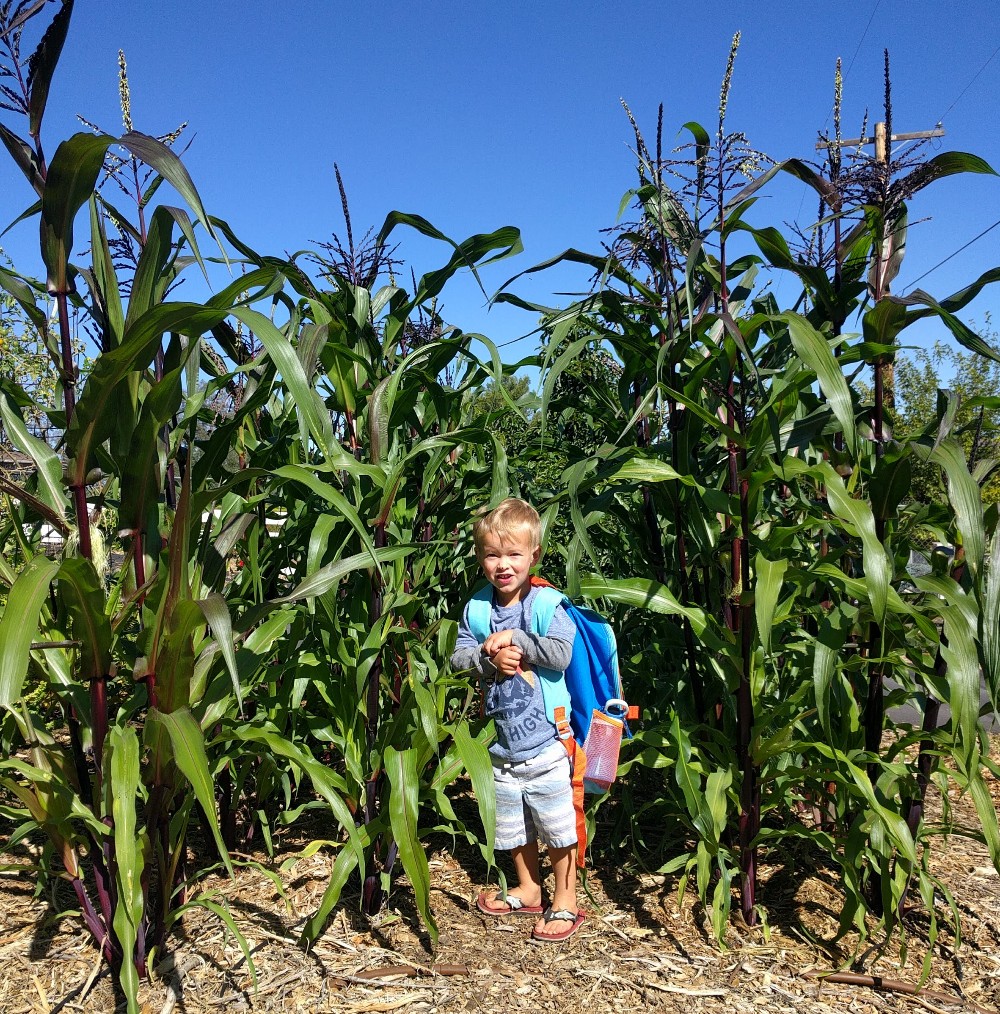
I’ve grown just two rows of corn and gotten decent pollination — the ears were acceptably full. And I once also tried just a single clump of three corn plants. Here it is growing above some honeydew melon vines on the right in the photo below.
For these corn plants, I noted when their tassles started releasing pollen and I gave them a light shake a couple times a day when no breeze was around to take it away. The orange dust fell down onto the silks. The ears of corn turned out with decent kernel fill.
So now I’m wondering how far one can go with this. Can you grow a lone corn plant? Just pollinate by hand, and get a couple of good ears? I don’t see why not. I’m going to try it sometime this summer. Maybe you’ve tried it already? If so, tell me how it went.
Varieties
Because corn is wind pollinated, and because we eat the seeds (kernels) of corn, you can’t plant different kinds of corn near each other without affecting their taste (assuming they tassle at the same time). You must stagger your plantings of different kinds of corn.
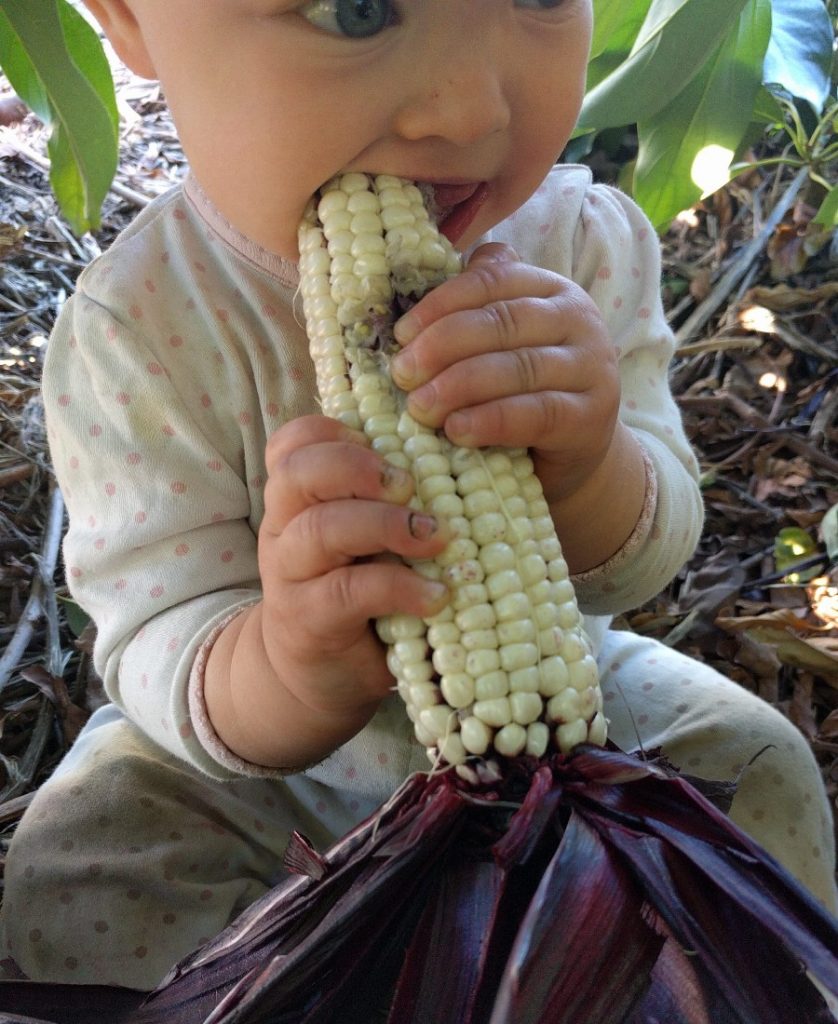
And there are so many different kinds of corn. I’m unaware of a kind that doesn’t grow well here in Southern California. For fresh eating, follow your taste buds. If you like it extremely sweet, then grow varieties that fill their kernels with extra sugar, called supersweet or sh2 or synergistic.
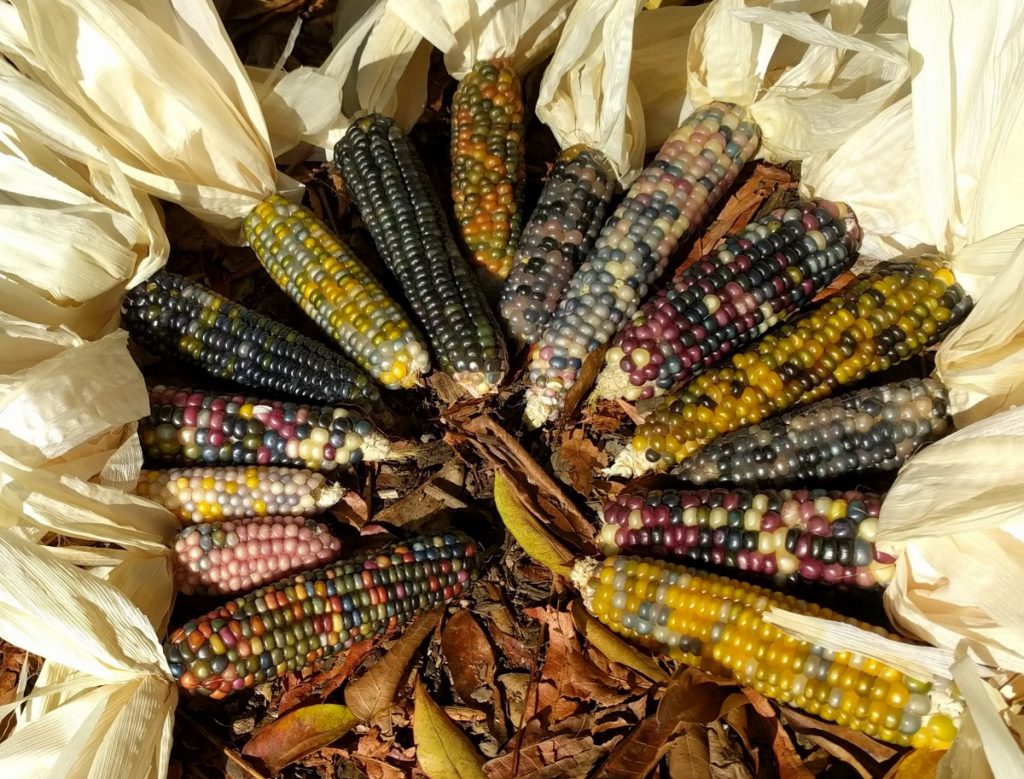
Those types are too sweet for me, however, so I mostly grow traditional varieties like ‘Golden Bantam’ or slightly sweeter types called “sugar enhanced.” The ‘Delectable’ variety shown above is a sugar enhanced type.
(More on this complex typology for corn here at Johnny’s Seeds or here at Territorial Seed Company.)
Then there are other types of corn bred for uses other than fresh eating. I grew a nice crop of Dakota Black popcorn one year. And recently I’ve been growing some Glass Gem ornamental corn each summer to be used for fall decoration. I save a cob or two and sow those seeds again the following summer. (Our chickens eat the rest.)
Sowing dates
Last summer, I tried pushing my sowing date for corn later than ever before, and I sowed Martian Jewels on August 23. The crop still matured well, and we ate those ears fresh off the stalk starting in mid-November.
Usually, I sow corn as early as late February, but March is always a safe starting time.
So what I do is plant small corn patches multiple times from about March until August. I sow every month or two and end up growing three or four little corn crops per year. This way my family can eat the whole harvest fresh and there’s no processing work to freeze a big harvest. We don’t live in Idaho; we don’t have a short growing season such that we have to grow all of our corn at once.
Spacing
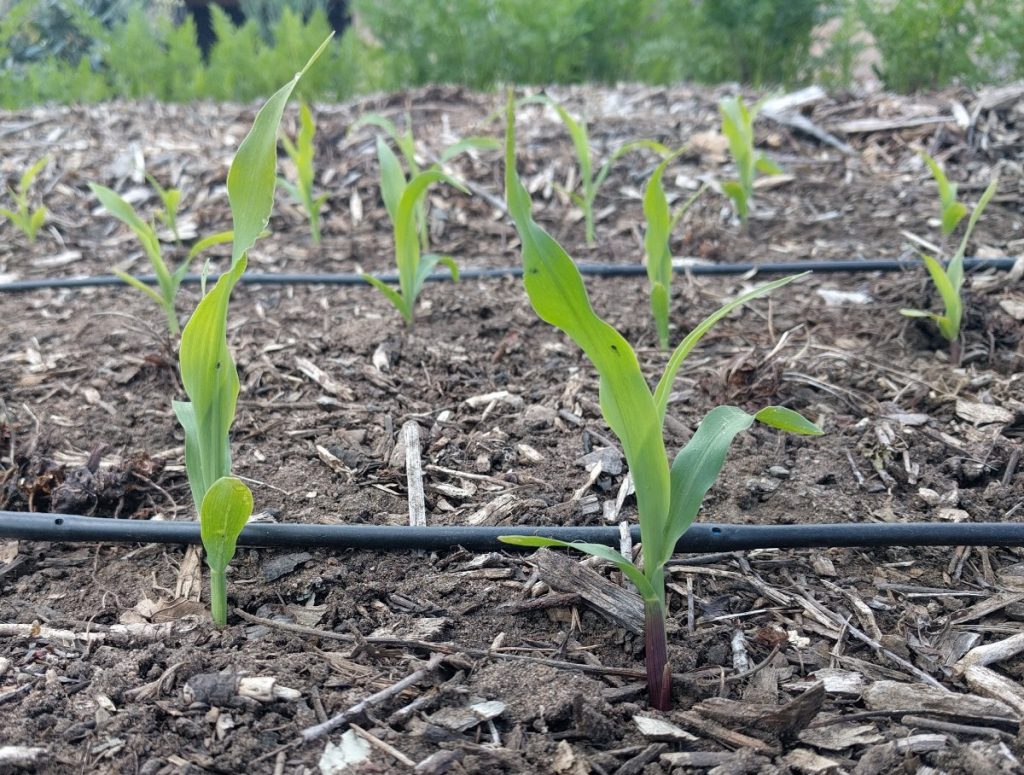
Corn is easy to grow from seed. Like peas or beans, you just put the seed a knuckle deep in the dirt and — as long as the dirt is thoroughly moist beforehand — you don’t need to even think about the seeds let alone water them until they’re up and growing.
I space my seeds about six inches (a little wider than my hand), with an eye toward thinning about every other one in order for the mature plants to be spaced approximately one foot apart. There are always a few seeds that don’t germinate or are weaklings so I try to remove those ones and keep the big and strong ones. Alternatively, you could sow two seeds every foot and then remove the weaker of those two.
Here is the small patch I sowed six inches apart on March 22 (so three weeks from sowing):
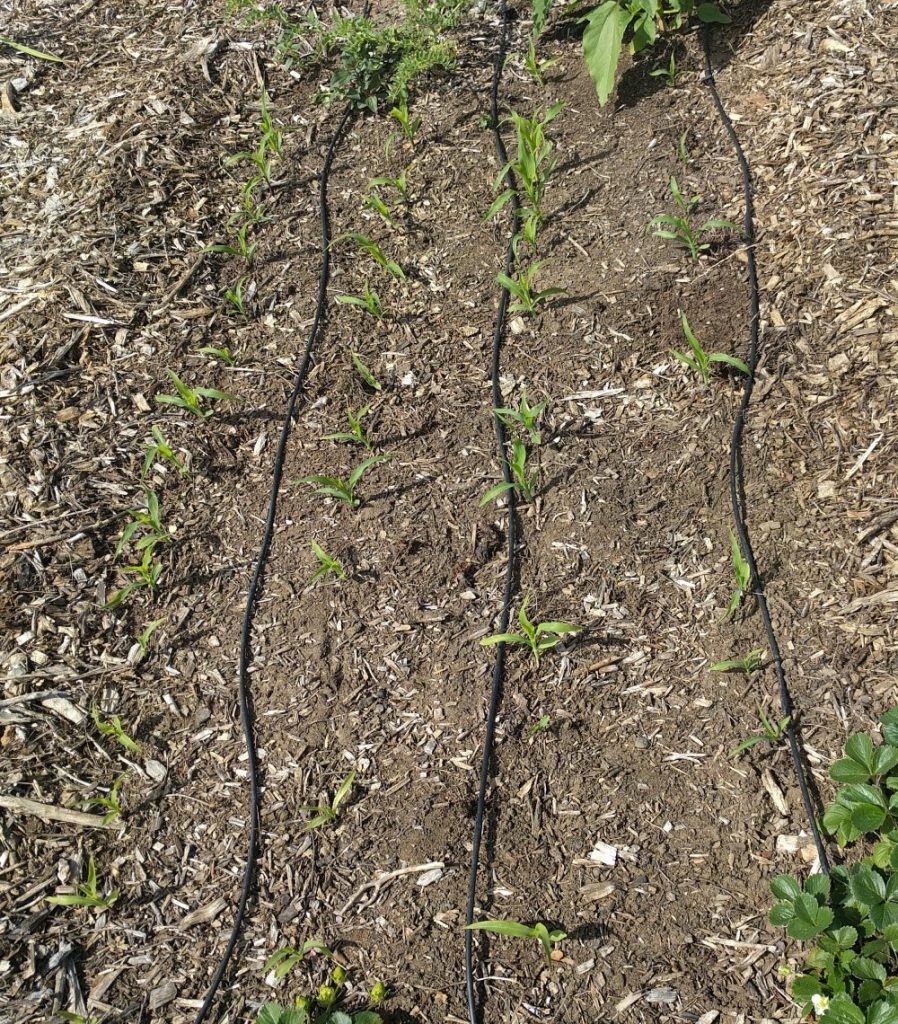
No need to yank plants out of the ground. Just cut them off at the base with scissors or shears. Now the plants are about one foot apart. (The rows are also spaced one foot apart.)
While I didn’t do it with this sowing, sometimes I intentionally leave a path a couple feet wide between the middle rows so my kids can play in the “corn tunnel.”
Fertilizing
Everywhere you read that corn is a “heavy feeder” and that you should “side dress with a high-nitrogen fertilizer after four weeks of growth,” but I’ve never seen a reason to follow such instructions. I treat corn just like any other vegetable. I put an inch or two of compost on the surface of the soil of all of my vegetable beds once or twice per year, and my corn has always grown and produced just fine with that.
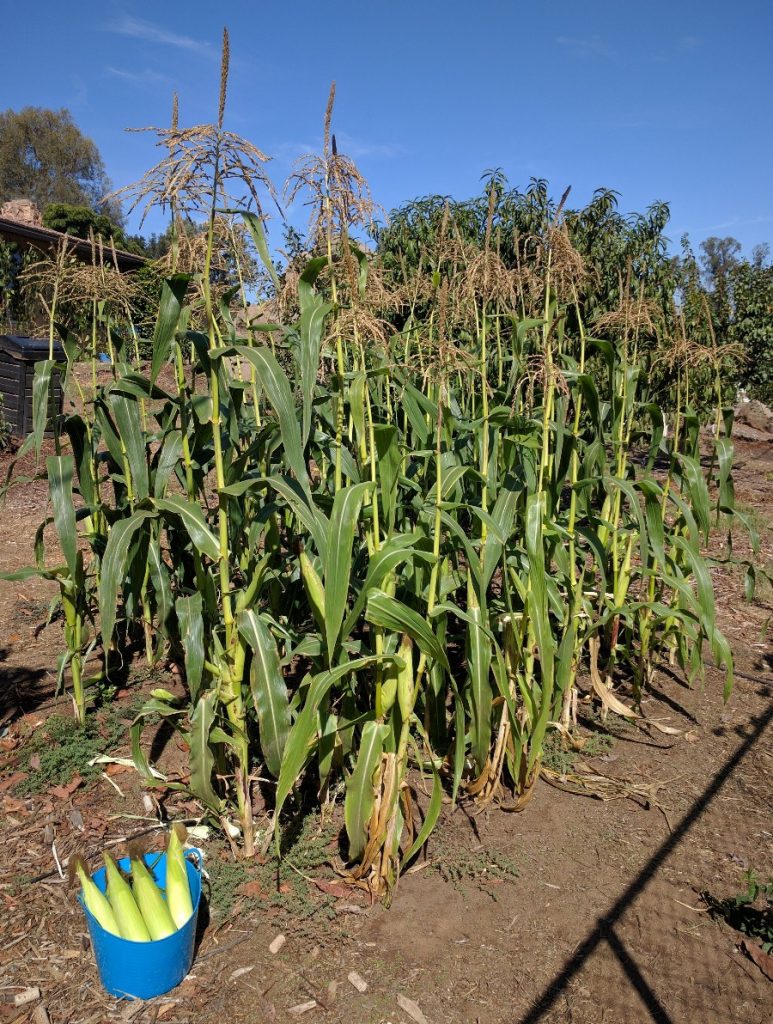
In fact, one summer I grew a corn patch in an unused area of the yard where only weeds had ever grown. All I did was clear the weeds and sow the corn seeds. I did zero other soil preparation or even compost. The plants looked good and the yield was very satisfactory. Here is that patch at harvest time.
What I’m saying is not that corn doesn’t need fertile soil, but that it doesn’t need any extra fertilizing compared to other vegetables, as far as I’ve observed.
Watering and mulching
I do usually mulch under my corn though. After the plants get at least a foot tall, I spread compost or wood chips under them. This is not for soil fertility directly, but more for water retention and infiltration.
Corn grows on the same watering volume and frequency as other vegetables until it gets to silk-and-tassle size. At that point, it asks for extra. The leaves will curl in the heat, and the plants won’t produce as well if I don’t add more than previous.
Since I grow my corn on the same drip lines as my other vegetables, I just hand water the corn extra at this stage of their development, and the mulch helps to retain the water and prevent runoff (so I can add water fast).
Pests and diseases
I’ve never experienced a disease on my corn plants, but there are a couple pests that arrive. Aphids sometimes inhabit the husk leaves, and then ants show up to tend the aphids. That’s annoying, but it has never affected the quality of the corn ears so I do nothing about it.
Corn earworms are worse. They do actually get into the corn ear and damage it. I do nothing about corn earworms either, however, because the damage is always only at the tip, and at the tip of only a few ears in a crop. I just snap the tip off of those damaged ears.
If for some reason corn earworms are more damaging in your garden, I’ve read at the University of California Integrated Pest Management website that Bacillus thuringiensis and Spinosad products are effective.
Harvesting
The second main challenge to growing corn (the first was that it’s big and wants a lot of space) is that they’re like watermelons: they’re tricky to harvest at the right time. After you’ve grown corn many times, you can just feel an ear and tell if it’s ready (it feels full, plump and yet the husk leaves are still soft and green — or purple in some varieties). But until then, there are some clues to observe and help with a timely harvest.
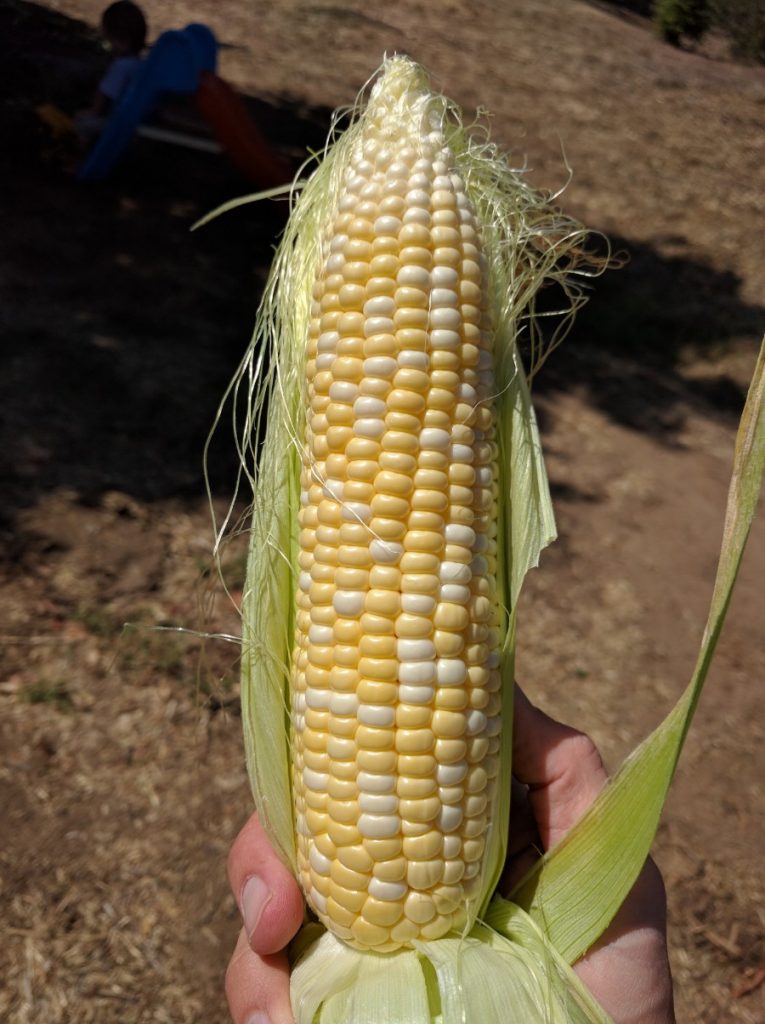
The silks that are showing outside the husk should be brown and dry, especially toward the tips. Once that’s the case, then feel the ear. It should feel filled out. There’s no give because the kernels inside are fattened.
Now peel open the tip of the husk. The silks will still be white in there. Peel open just enough to reach the kernels at the tip and puncture one with a fingernail. If clear juice comes out, you’re too early. Eat that ear and it will taste bland. On the other hand, if it oozes pasty, very sticky juice, you’re too late. But if the punctured kernel puts out what looks like milk, then you’re right on time.
Break that sucker off with a twist downward at its base, and take it over to the shade of the nearest avocado tree.
You might also like to read my posts:


Thank you Greg! Corn is a gift from our ancestors and you remind us not to make it complicated. I’m going to try two rows in my tiny space this year. I had luck with two plants in my greens bed last year and we had about four ears– we called that success!
Thank you, Amy. Great to hear you had success with just two plants. I love the potential of planting just a couple of corn plants multiple times throughout the warm seasons.
This information really helped! This year I’m trying to grow two lone corn in my tiny backyard. I planted the seeds around Easter, so I hope I can successfully harvest something!
Greg, your articles are outstanding. You have created a fantastic website that is easy to understand with accurate information written so everyone can understand it all. I really appreciate it!
So kind of you to take the time to write that, Richard. Thank you very much.
Great post! Glad to know it’s okay corn hasn’t germinated after 1 and 1/2 weeks, and that I don’t have to worry about watering. Question: you said corn should be planted in soil that’s already wet. So what should happen for soil that is wet, but gets muddy and dries quickly? The moisture sinks, and it’s mulched, but should I worry about the corn drying out? Thanks, can’t wait for next post!
Hi Shalom,
I think that for your situation right now you should do some excavation. Dig up one of your corn seeds. Find out for sure what the soil moisture around it is like and see if it has started germinating.
Sometimes this kind of exercise gives surprising results. For example, you thought you’d sown in moist soil, but it was only moist two inches down. Or, the corn is germinating and about to pop above the soil line and all is well.
It is absolutely key to sow into soil that is moist at least a foot deep or to water immediately after sowing in order to wet the soil to at least a foot deep. I prefer the former since you won’t have to worry about seeds floating to the surface while you’re watering and you can dig to check the depth of moisture without disrupting your sowing.
Great Post! Question: If corn was planted in a soil that gets “muddy,” and dries out relatively quickly, should it be watered? The soil was mulched, and the water sank. Do you know what kind of soil this might be? Thanks, can’t wait for next post!
After attempting sweet corn for my 3rd or 4th season, I finally got some good consistent results this year – this was an early shot – https://www.instagram.com/p/Byy6-XPgQAC/
I need to plant deeper next year – too many tipped over after they got taller, but still got a decent harvest.
I’m looking for something to plant in that same space now until next Spring. If it produces food, too, great. But I’m mostly just looking for something to plant that will help with the nitrogen fixing and keep the weeds away so prep for the corn next year is a bit easier.
Any suggestions on what to plant there for the next 6 months?
Still haven’t gotten a good/edible avocado off my tree, most seem to burn and drop. But I may get a few this year it’s looking like. Each year seems to get a little better, though. I think the tree just isn’t big enough to cover the fruit enough to keep it from burning. The ones with good leaf coverage are still looking good. SoCal summer heat can be harsh on them probably if it hits them direct i think.
Corn looked good in that photo. Here’s what I would do: Add compost of three or four inches over the surface of the area. Then, leave it be until you plant corn in the spring. The compost will have broken down more to make for a fertile place for your corn; I think you’ll get more out of compost compared to a nitrogen-fixing cover crop. The compost will also prevent weed seeds from germinating.
You could also add the compost and then plant something else in the area to eat through winter, which will get more use out of the space. For ideas as to what to plant there, see my post on which vegetables to plant in October: https://gregalder.com/yardposts/southern-california-garden-october/
Inland Southern California sun does burn exposed avocados rapidly, and I find that it happens a lot more on certain varieties. Hass might be the worst. It hangs so much fruit out beyond leaf coverage. At least, as the tree gets bigger it carries more avocados inside if it’s healthy.
HI, the silks already emerged but I can not see any ears coming. The plants looks very healthy and tall.
Hi Rose,
The ears stay hidden within the husks. You only see the silks hanging out of the end of the husks (the green leaves that wrap around the ear of corn). You’ll notice that husk getting fatter as the days go by, and the silks will also start to dry. You won’t hurt the ear of corn if you gently peel the husk back a little to see the end of the ear near where the silks stick out.
Does corn variety seem to matter for nematode resistance? (Asking just for any casual observations—I don’t think any labeled nematode resistant ones exist). After rereading your nematode post, I decided to make my whole tomato bed corn (and French marigolds) this year to try to reduce the load a bit.
Hi Jessica,
I’ve always thought that all corn does not host root knot nematodes. And I’ve never seen the galls on corn roots (of any variety) in my garden.
They’re also listed as non-hosts on this page, but they are apparently hosts of “root lesion” nematodes: https://ipm.ucanr.edu/home-and-landscape/nematodes/#gsc.tab=0
Awesome, thank you!
Thank you Greg for this article. I enjoy the simplicity and growing experiment with fewer corn. I’ve read quite a bit that complicates growing. My parents and ancestors grew of the desert in Mexico off cactus, corn, beans, squash, tomatoes, chilies and a variety of plants native to the area and using the three sisters methods, without any complicated measures and hand watering from the river. I found your article to be what I was looking for and a great read. I have some varieties at 3 ft now, I plan to cross pollinate, up the sides are 1500 Year old Cave beans winding up the stalk. Definitely feelin’ like a farmer.
Here’s a picture of how my family had the set up in Mexico. If you look on the ground you might see the bean vines and Squash. No additives, just the nitrogen the beans gave off to the corn. I’m in the agricultural valley, they do things differently here. That’s my brother.
http://imgur.com/a/O3w80AF
That is so cool. What an awesome photo. Thanks for sharing, Elizabeth.
I hope your corn and beans continue to grow well this summer. I’ve got some about the same height as yours right now, and this is the size when they start making me feel like a farmer. This is when I remember why it’s so fun to grow corn.
Incidentally, this year I sowed the corn in my strawberry patch. So instead of beans winding up the stalks, I’ve got strawberries sprawling below. It’s a strange combination, but they seem to be getting along well.
Just hoeing a 5×5 corn patch today. For 25 plants (and given that I will probably forget to hand pollinate), I should sow all at once rather than staggering, right?
Hi Jessica,
Yes, sow all at once so they tassle at the same time and provide pollen for one another.
Hi Greg,
Having some success growing corn in Los Angeles, planted in late August. Everything is a little sparse but I think it needed a bit more feeding. The issue I’m having is I think pest related. I appears the silks on my fairly well developed but not ready cobs are being eaten, as well as possibly the husks. It looks almost as though the corn was growing out of the stalks, but I’m fairly positive I may have some pests roaming about. Have you ever experienced this? I know we have raccoons, possum and rats in the area. I’m assuming it’s the rats due to the location on my property.
Very much a bummer.
Two varieties of sweet corn, by the way.
Hi Henry,
I wouldn’t put it past rats to eat anything. I’ve never had possums or raccoons bother my own corn. Earworms certainly get into the end of the cobs where the silks come out. You can peel back the husk a little to find their frass inside.
Where in S California are you located? I am near Ensenada, 70 miles S of San Diego. I see you encourage planting in February, any special variety, an early or mid season corn is OK?
Hi Calvin,
I’m in Ramona, which is inland San Diego County. I’ve never noticed the need to be selective about variety for early corn sowings, but for you in Ensenada you might consider how cool the spring usually is in your location. I’m thinking this might depend on how close you are to the ocean or if you’re up in the hills. If you often have fog in spring, I’d wait a bit longer to sow corn so you’re more likely to have the ears mature in higher temperatures and taste sweeter. My place heats up early in the spring so I don’t worry about this, but we sometimes cool down fast in fall so I need to be careful about planting slower varieties late in summer and not getting very sweet corn as it matures in the fall.
Informative and interesting post on corn growing! Thank you! I am wondering about two things: growing corn close to the ocean where we get a cooling breeze all summer and spacing. Do you know (from your experience or from other reports) if we’d get appreciable benefits from planting corn in black plastic mulch (in cool coastal areas)? And, when spacing corn fairly close, do you know whether it makes a stronger stand when planted in trenches, then hilled up as it grows taller?
Hi Gene,
Thanks! I don’t know if black plastic mulch would provide any benefit to corn. The closest to the ocean that I’ve personally grown corn was two miles, and my results were fine without any such measures. I’ve seen corn growing well nearly spitting distance from the water, but I haven’t tasted the results so can’t say anything more there. Is it the flavor development that you’re concerned about?
I would guess that hilling up around the stalks as you described would strengthen their stand, but I’ve never bothered doing so, and so I can’t say from experience. Is it the wind you’re worried about?
thank you for responding:–) So, it’s just cold in our yard, microclimate shaped by towering pines and facing toward the cool ocean breezes. In the full sun area (8-9 hours of sun), our plan is to use black plastic to keep the soil from cooling during the “June Gloom” and to plant in slight trenches so we can hill up around the roots. Last year corn failed for multiple reasons; we are hoping for better outcomes this year!
Perhaps others have corn growing experience that might help?
I appreciate your answer and love the blog!
Greg…thank you so much for your wonderful advise! I am a kid from the Midwest, having grown up on Indiana sweet corn and I am planting corn in my San Fernando Valley back yard for the first time. Any particular suggestions about caring for corn during our hot (and growing hotter!) summers??
Many thanks!
Hi Susie,
My main thought would be to not skimp on irrigation. Corn loves the valley heat as long as it’s not thirsty.
Hi Greg, I took a shot at growing corn, I definitely planted it later in the season, July 3. The seeds I planted are called Double Standard, from SD Seed Co. I’m in Santa Barbara. Based on the seed packet, I thought it would be getting good about now. It says 75+ days, and its been 91 days.
What I’ve seen is that most of the ears are all yellowish (not green), and the corn is not very sweet and just sort of rubbery. I pulled up 4 of the 20 plants, but figured it would be worth asking before I pull the rest out.
All of the silks are brown, all the way up to the ears. Even the one ear that still has green husks. Perhaps I underwatered? Of the four I pulled out already, the soil is perhaps on the dry side, but certainly dark in color. I watered every other or every third day until a couple weeks ago, when I was gone for a week +. But the plants have not really changed much in the past week or two, they already had brown husks. I had tried on before I left two weeks ago and it also was rubbery and not sweet.
Thanks, Matt
Hi Matt,
I’ve never grown Double Standard, but based on your description of things as well as what Johnny’s Seeds says about the variety it sounds like you might have waited too long for harvest.
For fresh eating, you harvest when the husk is still mostly green (although the silks have turned mostly brown). I don’t pay much attention to the husk color though. Rather, I pay most attention to the feel of the whole ear. I just frequently grab an ear and sense how fat it feels. When it’s ready it will feel tight and plump; the husk will not feel so baggy around the kernels.
Also, to check before harvesting, you can open up the end of an ear and pierce a kernel with your fingernail to observe the juice inside. If it’s not ready, the juice will look almost transparent like water. If it’s ready, the juice will look more like milk. If it’s too late, the juice will be very white but sticky like glue — I think this was the rubbery texture you mentioned.
But you can just look at the kernels too. If they’re fat, then it’s time to harvest. If there is still some space between kernels, then they need more time. Don’t just judge the kernels at the very tip though. You must peel back a little to see the kernels down lower.
One more thing: this Double Standard variety is described as “(su)” meaning sugary, or normal sugary. This can be misleading because what it actually means is that this corn variety is not capable of becoming very sweet. If you want corn that tastes sweeter, try a variety that is labeled (se) meaning sugary enhanced, or one of the other types that is bred for extra sweet flavor. Here’s more on this corn typology from Johnny’s.
Thanks for the response Greg. The packaging description starts with “This super sweet open pollinated corn”.
Guess I should have been checking in earlier September, live and learn for sure.
thanks, Matt
I noticed that description, Matt. Shame that it led you astray.
I’m not a farmer; I’m a home gardener like you. However, whenever possible, I buy my seeds and plants and other gardening products from where farmers buy them. Their livelihood is on the line. They know where the highest quality stuff comes from.
As for vegetable seeds, the farmers in Southern California who I know primarily buy from Johnny’s and Territorial. I’ve followed their lead and I haven’t been led astray by descriptions or had bad germination (that wasn’t my fault!) since.
good job
We have become fans of blue jade sweet corn, which is a dwarf variety that tillers quite readily. If you’re still growing glass gem, we discovered last year that it is a pretty good popping corn (with some colored pops in the mix for fun).
Dear Greg, I live in the hills near Ensenada. What is a good variety of corn to plant in July. I see you planted Martian Jewels in a\August last year. Our main corn is Bodacious now for years, but it doesn’t do well for later planting. Thanks for your informative site.
Hi Greg, thanks for all the great info you provide on your site. This is an older post but I am just now reading it in full because I am doing some troubleshooting with growing an heirloom flour corn. Your firsthand experience (and that of the commenters too) is really helpful. I find more and more that the ‘conventional’ advice that you find over and over again can’t be taken as the word of god, so to speak- you have to do your own experiments some times!
Hi Greg
I’m giving corn a try in Del Mar a block from the lagoon by Roberto’s. The stalks are hip high. Any advice re: watering? My cukes wilt every day so I water them daily. Should I be doing the same for the corn?
Thank you,
Dan
Hi Dan,
You shouldn’t need to water corn daily, but it’s okay if you do. Once or twice per week could be often enough if sufficient quantity is given and the dirt they’re in is suitable (depth, quality).
Corn really needs to have ample water in its early life so it grows tall and uninterrupted before tassling. If the plants are hip high now, keep watering liberally. They’ll need more and more as they grow bigger, and the ears will be bigger if the plants develop well before they start to make the tassles and ears.
On another topic
My nectaplum crop is fewer and smaller this year. Should I do a more severe pruning this winter?Thank you
Dan
Hi Dan,
It might be that your nectaplum is suffering from the same fate as many other stone fruit trees I’ve seen this year. Very few throughout Southern California have good crops this year. It seems like it’s mostly due to the one-two punch of a warm winter and a hot March (during flowering).
As for pruning, just keep in mind that most of the fruit on a nectaplum next year will be made on branches that grow this summer. So when it comes time to prune, don’t cut off all of those small-diameter (“new”) branches or else you will have cut off almost all of the flowering/fruiting wood.