
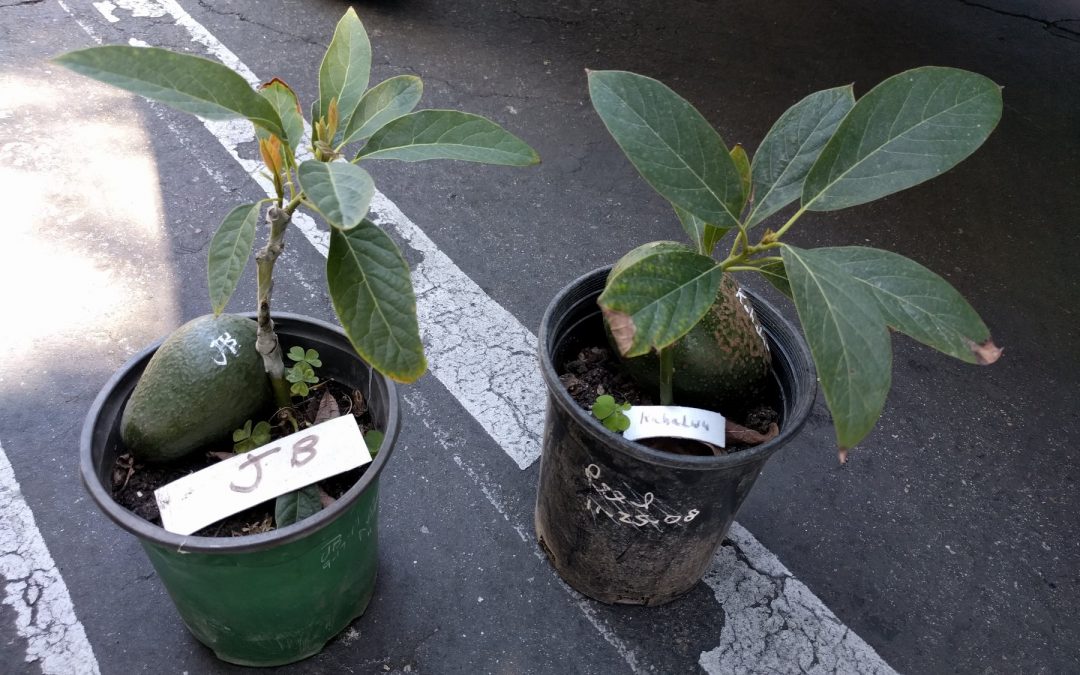
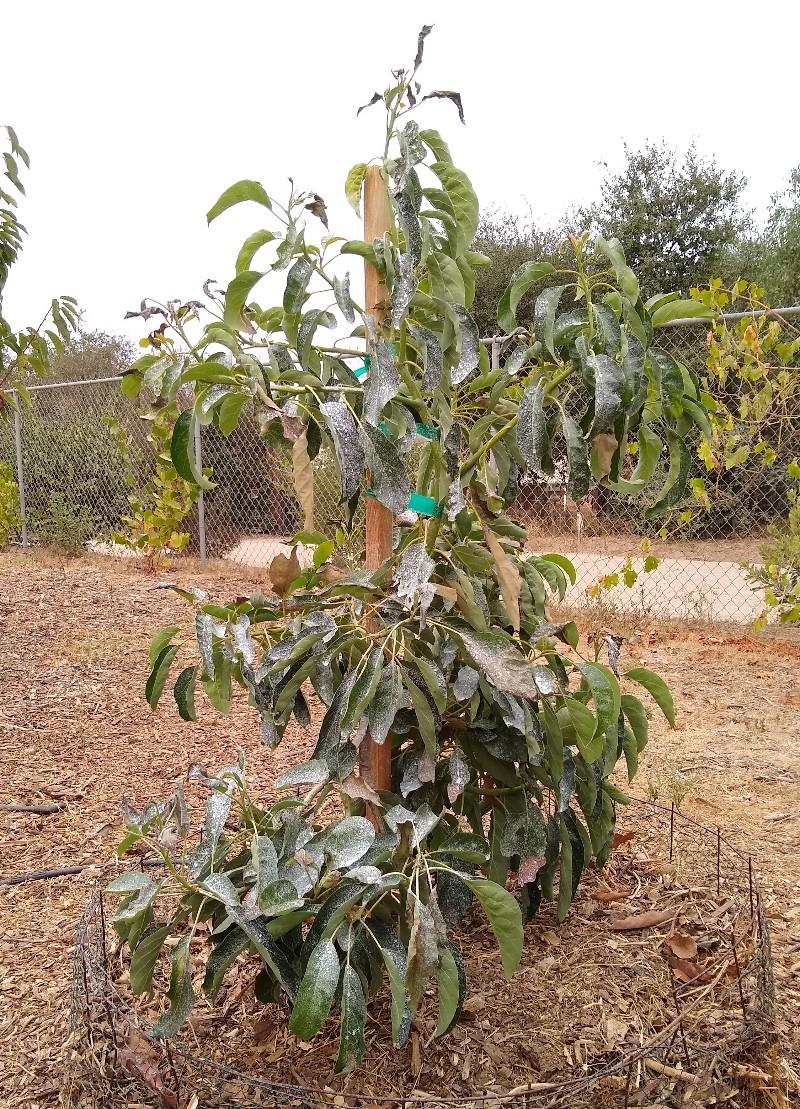
Even though I’ve planted many avocado trees, I was nervous putting in this little Jan Boyce, or JB for short (pictured on left). It is a particularly fine-tasting variety that I’d been trying to get my hands on for years.
But I needn’t be too nervous. I’ve already made most every mistake there is when planting an avocado tree; I know what not to do anymore. So here I write about how to plant an avocado tree with an eye toward avoiding common errors.
Testing soil drainage
How fast water drains through the soil in your yard is a vital piece of information to know because avocado trees are unlike any other in that they have a very low tolerance for their roots remaining soggy.
So what you should do before planting in a spot is test the drainage. You simply dig a hole about a foot deep and a foot wide, fill it with water and wait for it to disappear. Then fill it again and see how long it takes for the water to disappear this second time.
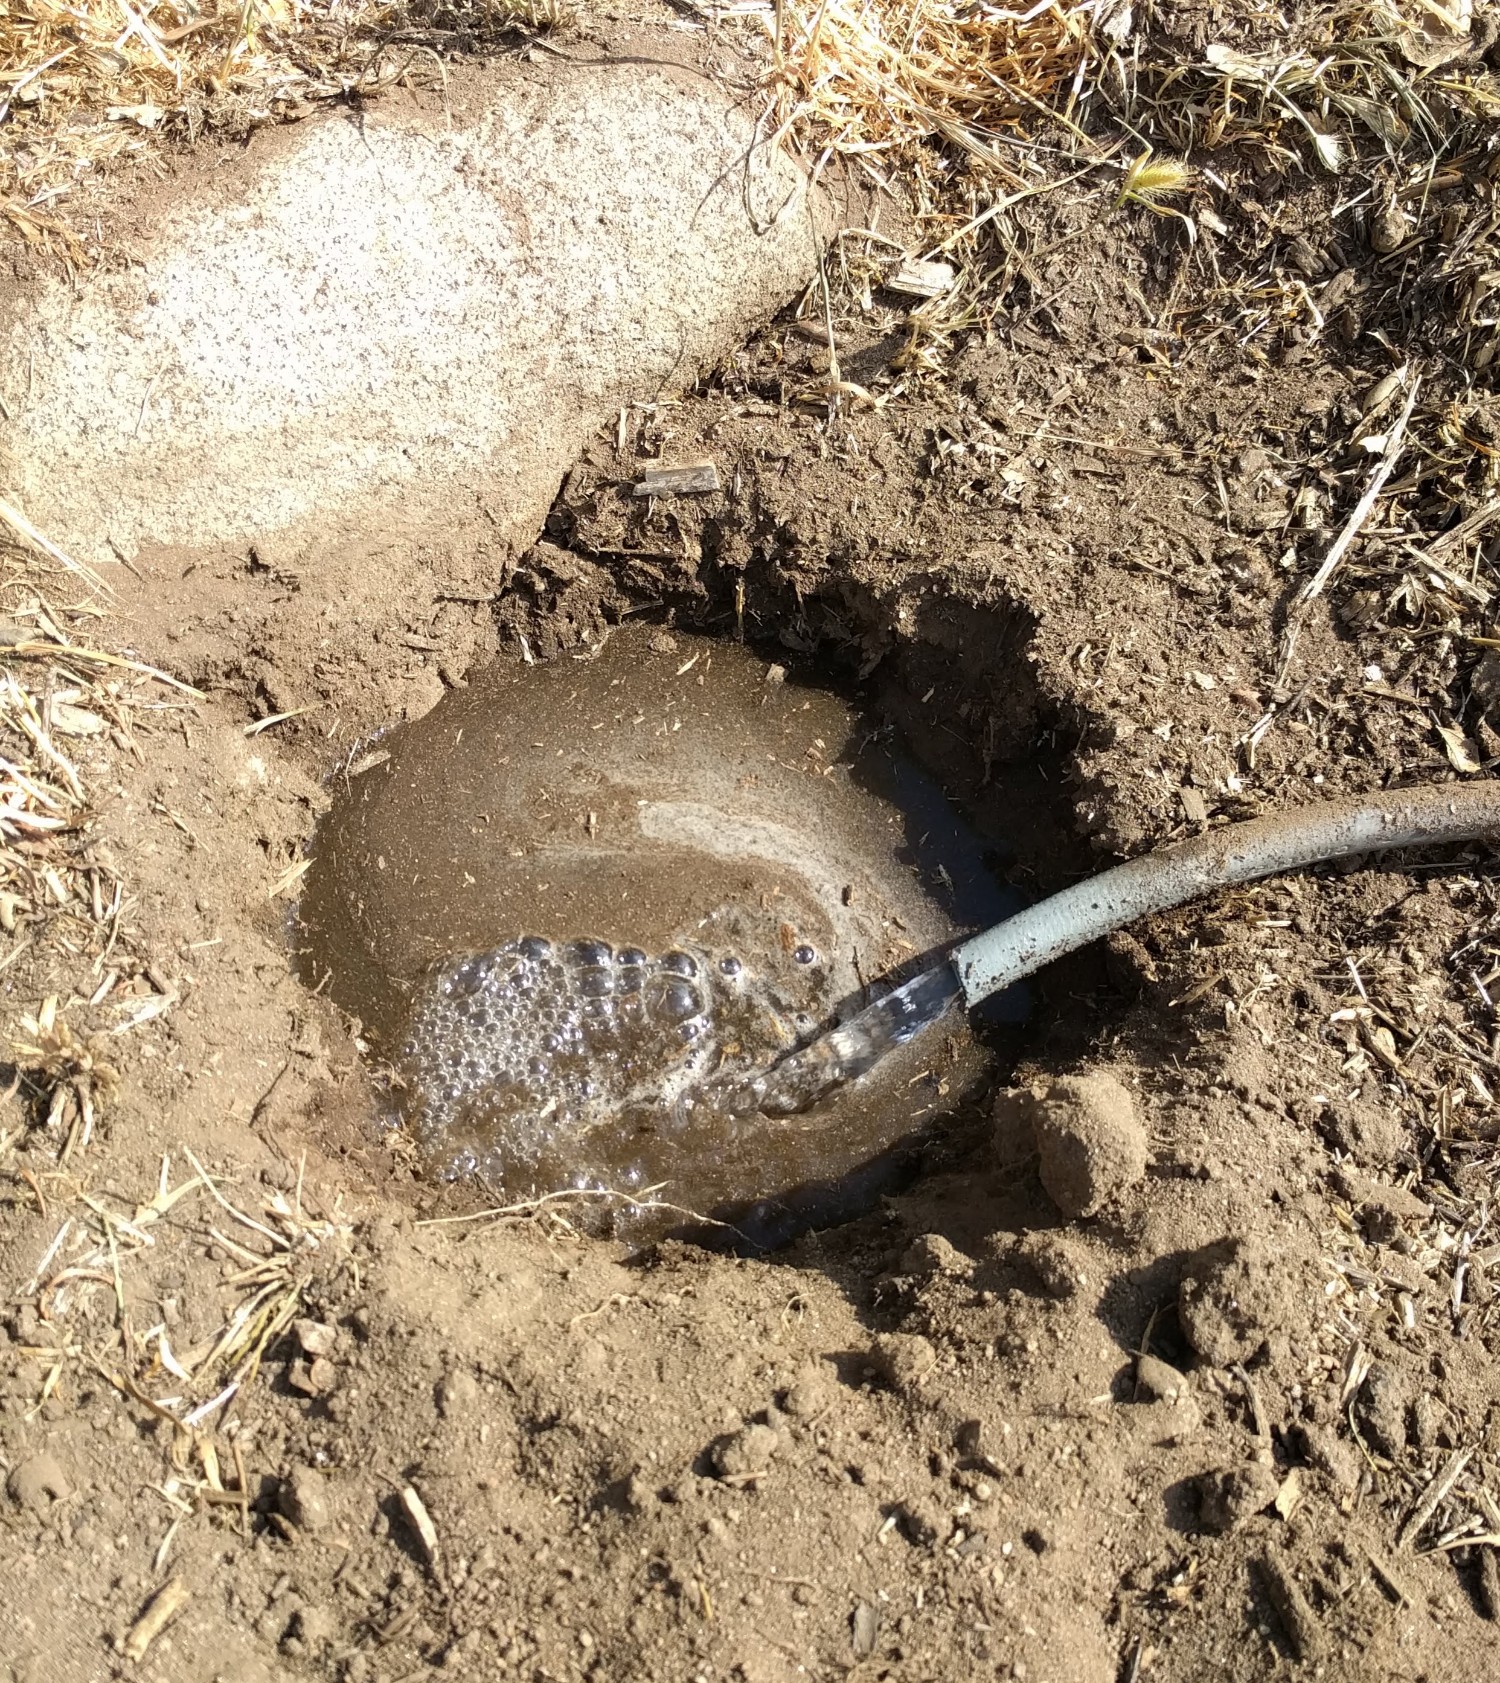
A rule of thumb that many avocado experts have used over the years is that it must disappear in less than a day, 24 hours. But really, if it takes more than about eight hours I think you’re in the danger zone and you’re going to have to be careful not to water too much too often. You’ll also need to make sure that winter rainfall doesn’t puddle around the tree. Otherwise, your tree’s roots will rot, its leaves will turn yellow and droopy, and you’ll have wasted your time. It probably won’t be apparent right away. It might not reveal itself until the end of summer or until the tree’s first winter.
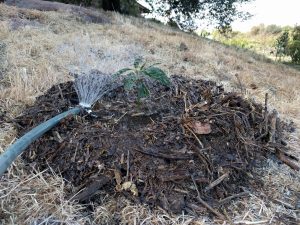
Mounds can help. If your spot’s drainage is on the slow side, then build a mound of soil from 1-3 feet high and 4-7 feet wide (depending on how big the tree is) and plant the tree in the top of it. You’ve essentially created an area of soil with better drainage for your tree.
An avocado farmer in Ventura County has clay loam soil that doesn’t drain very fast, so when he planted some new trees he put them on mounds:

(See more on this topic in my post, “Planting avocados in poor soil.”)
On the other hand, if you have fast-draining soil like me, where water drains out of the hole in less than an hour, then don’t bother planting on a high mound. If you did, you’d make it necessary to water even more frequently. In our case, plant level or only raised a few inches — unless your soil is shallow. If you hit rock or gritty subsoil only a foot down, do plant on a slight mound just to give the tree more good soil to root into.
Digging the planting hole
Dig a hole that is a few inches wider than the container. Do this so you can get your hands in the hole as you lower the tree and settle it in. There’s no need and no benefit of making the hole much wider. (One exception might be if you find many roots from other plants in the hole you dig, for example if there’s a mature tree nearby. In that case, you might dig wider in order to give the young avocado some space to itself before those plants begin re-rooting where you’ve planted the avocado.)
Also, dig the hole only as deep as the soil is in the container, no deeper — or even shallower if you’re planting on a slight mound. If you dig deeper, you’re likely wasting energy at best. You’re going to have put some dirt back into the hole, and later that dirt will compact and sink the tree somewhat.
Experiments have been done planting avocados in small versus large holes. No advantage has come from digging large planting holes. See “Avocado Planting Systems” by Ben Faber and G.T.A. Barnett.
Removing the avocado tree from the container
To get the tree out of the container there are different techniques according to the size and type of container. A little one-gallon like my Jan Boyce is easy. You just squeeze or slap the sides to separate the plastic from the roots, then tip the container and slide the rootball out.

Do this right next to the planting hole so you don’t have to carry it. Usually, the container mix is a loose mix and the avocado roots don’t hold it together well. The rootball tends to fall apart in your hands. So be prepared to embrace it and lower it into the hole immediately.
Avocado roots are brittle. They’re unlike other fruit tree roots. If you grab any while lowering the tree into the hole, they’re likely to snap off.
The most common size of avocado tree that we home gardeners buy in nurseries is sold in what’s called a five-gallon container. The process of removing the tree from a five-gallon container is the same as for my little Jan Boyce in the one-gallon container, but everything is heavier and more awkward. It can help to have a partner when sliding the container off the tree’s rootball.
The largest size that most nurseries sell is in a 15-gallon container. These trees are so big and heavy that they require a different procedure unless you’re The Hulk. What I do with a 15-gallon is cut the container off the tree’s rootball rather than slide it off. I lay the tree on its side next to the planting hole and, with a utility knife, slice down one side of the container and across the bottom. Then I roll the tree and slice up the other side. You can then pull the container off and slide the rootball into the hole. (It’s crucial to have made the hole the proper depth before sliding the tree in.)
Finally, there are also avocado trees sold in plastic sleeves. These are the easiest trees to remove from their containers because you can just use scissors to cut the sleeve, and the small rootball is easy to handle.
(You might like to read my post, “Should you buy a big or small avocado tree?”)
Filling the hole and watering in
At this point, put some of the dirt from the hole back in around the sides of the tree’s rootball, but only about half way. Then fill the moat with water. After it drains, tamp it down with your fingers to get air pockets out and settle the soil around the roots. Then fill the hole with dirt up to the level of the tree’s container mix, but don’t cover the container mix with dirt. If you do, it will be hard to get water through the dirt and into the container mix where the tree’s roots are.
Note that you’re only using your native soil to fill the hole. There’s never been any benefit shown in adding compost or fertilizer to an avocado tree’s planting hole. (This was studied and reported on in the same paper mentioned above, “Avocado Planting Systems.”)
That being said, I have seen avocado trees that have been planted in large holes and with compost added to the planting holes that have grown very well in their first couple years. It’s not that large planting holes and adding amendments are bad. It’s just that they haven’t been shown to give a tree any benefit when compared to avocado trees planted without those extras.
I like to build up a berm a few inches high around the new tree now. I make it a foot or two wider than the container was, and I add mulch. The berm isn’t necessary, but it makes it really easy to water in the tree right here after planting, which is necessary.
You want to water a lot on planting day. Along with testing the drainage, watering lavishly on planting day is the second very important thing you can do for your new avocado tree.
Not only do you want to water the tree’s rootball, which has been shocked by having its home removed and being placed in new surroundings, but you also must thoroughly soak the surrounding native soil because otherwise it will literally suck the moisture out of the container mix. Real dirt is able to grab and hold onto water better than any container mix. This is also the reason that you don’t want dirt covering the top of the container mix. (See photos of water’s movement, or non-movement, between native soil and container mix in this excellent article by Dani Lightle of the University of California’s Cooperative Extension.)
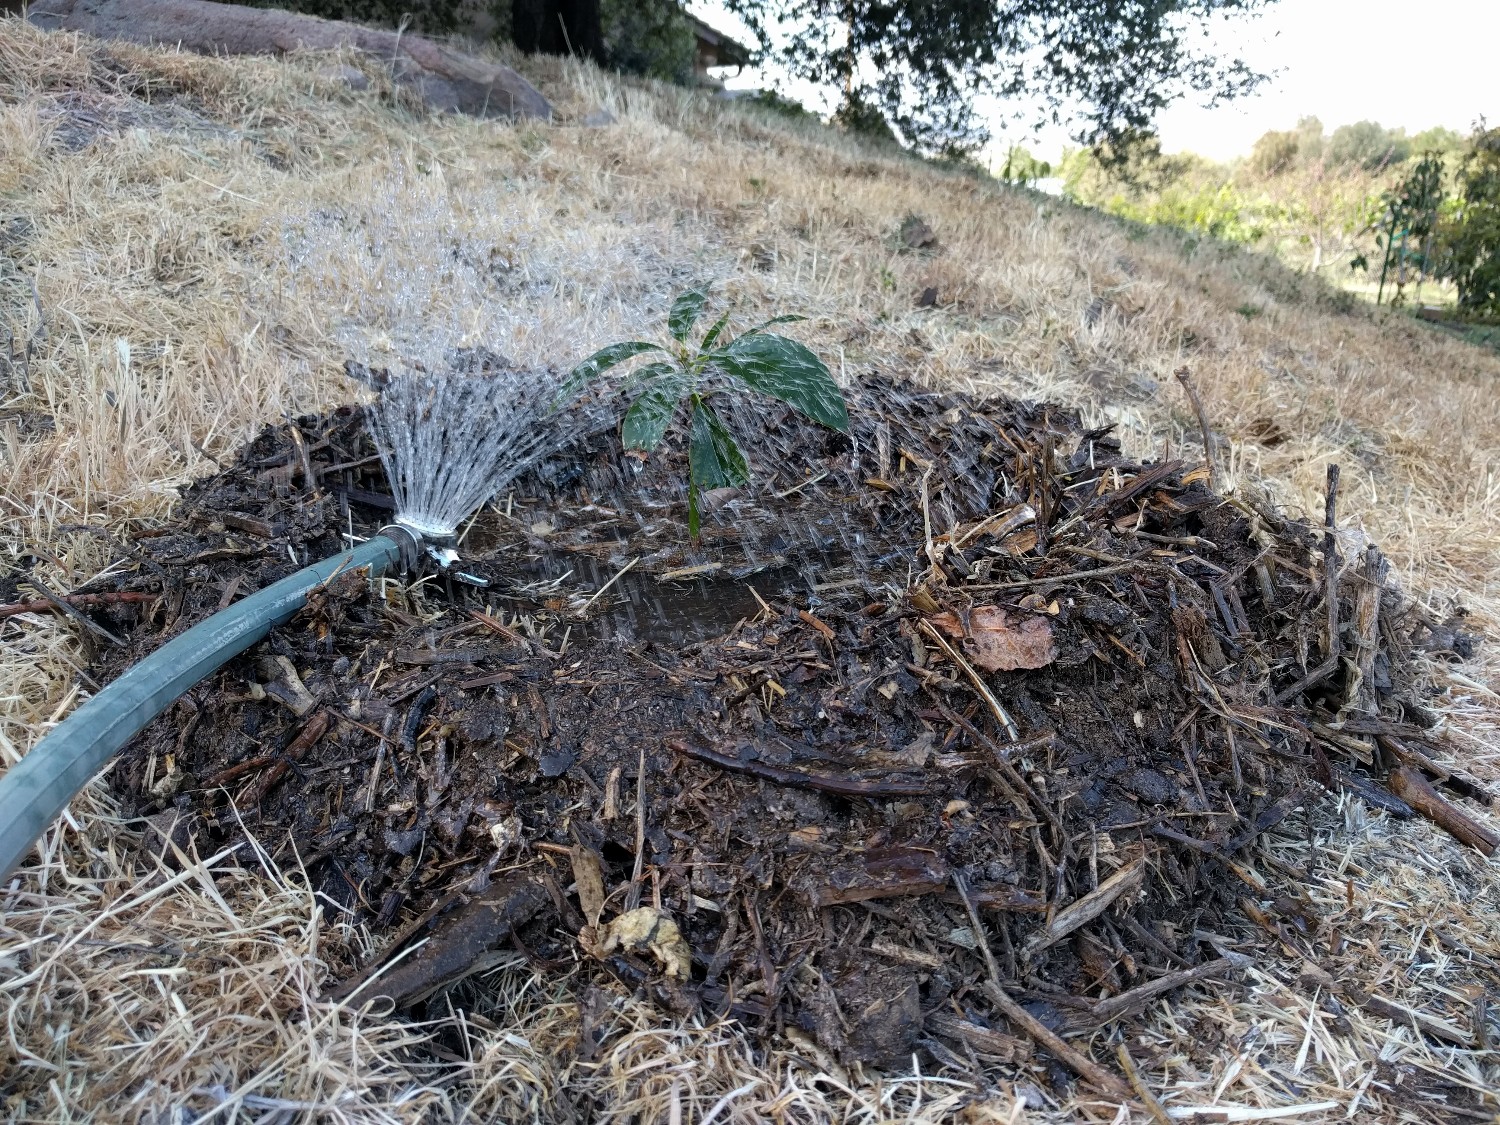
I fill up the basin, let it drain, and fill it up another couple times in order to soak and settle the planting area. You could also accomplish this watering with a sprinkler.
(Here is a video where I plant an avocado tree.)
Here is a video where Sam Garibay and Consuelo Fernandez of Brokaw Nursery plant an avocado tree:
Staking the avocado tree
My little Jan Boyce didn’t come with a stake and it doesn’t need a stake. But if you bought a five- or 15-gallon tree, there will be a stake tied to it.
You cannot remove this stake and expect your tree to stand up on its own, nor can you leave the stake as is and expect the tree to grow a strong and healthy trunk. I’ll call this the third key to getting an avocado tree off to the best possible start to life in your yard.
Some years back, I broke my ankle. I was in a cast for some months, and then I visited my doctor and he took it off and told me to stand up. I was afraid. But he explained, “As soon as possible, you need to start using these muscles again so they will strengthen.”
The stake that is tied to your new avocado tree is a cast. It is tightly tied to the tree’s trunk, and it supports the trunk, but it also prevents the trunk from strengthening. The trunk can only strengthen if it is able to flex.
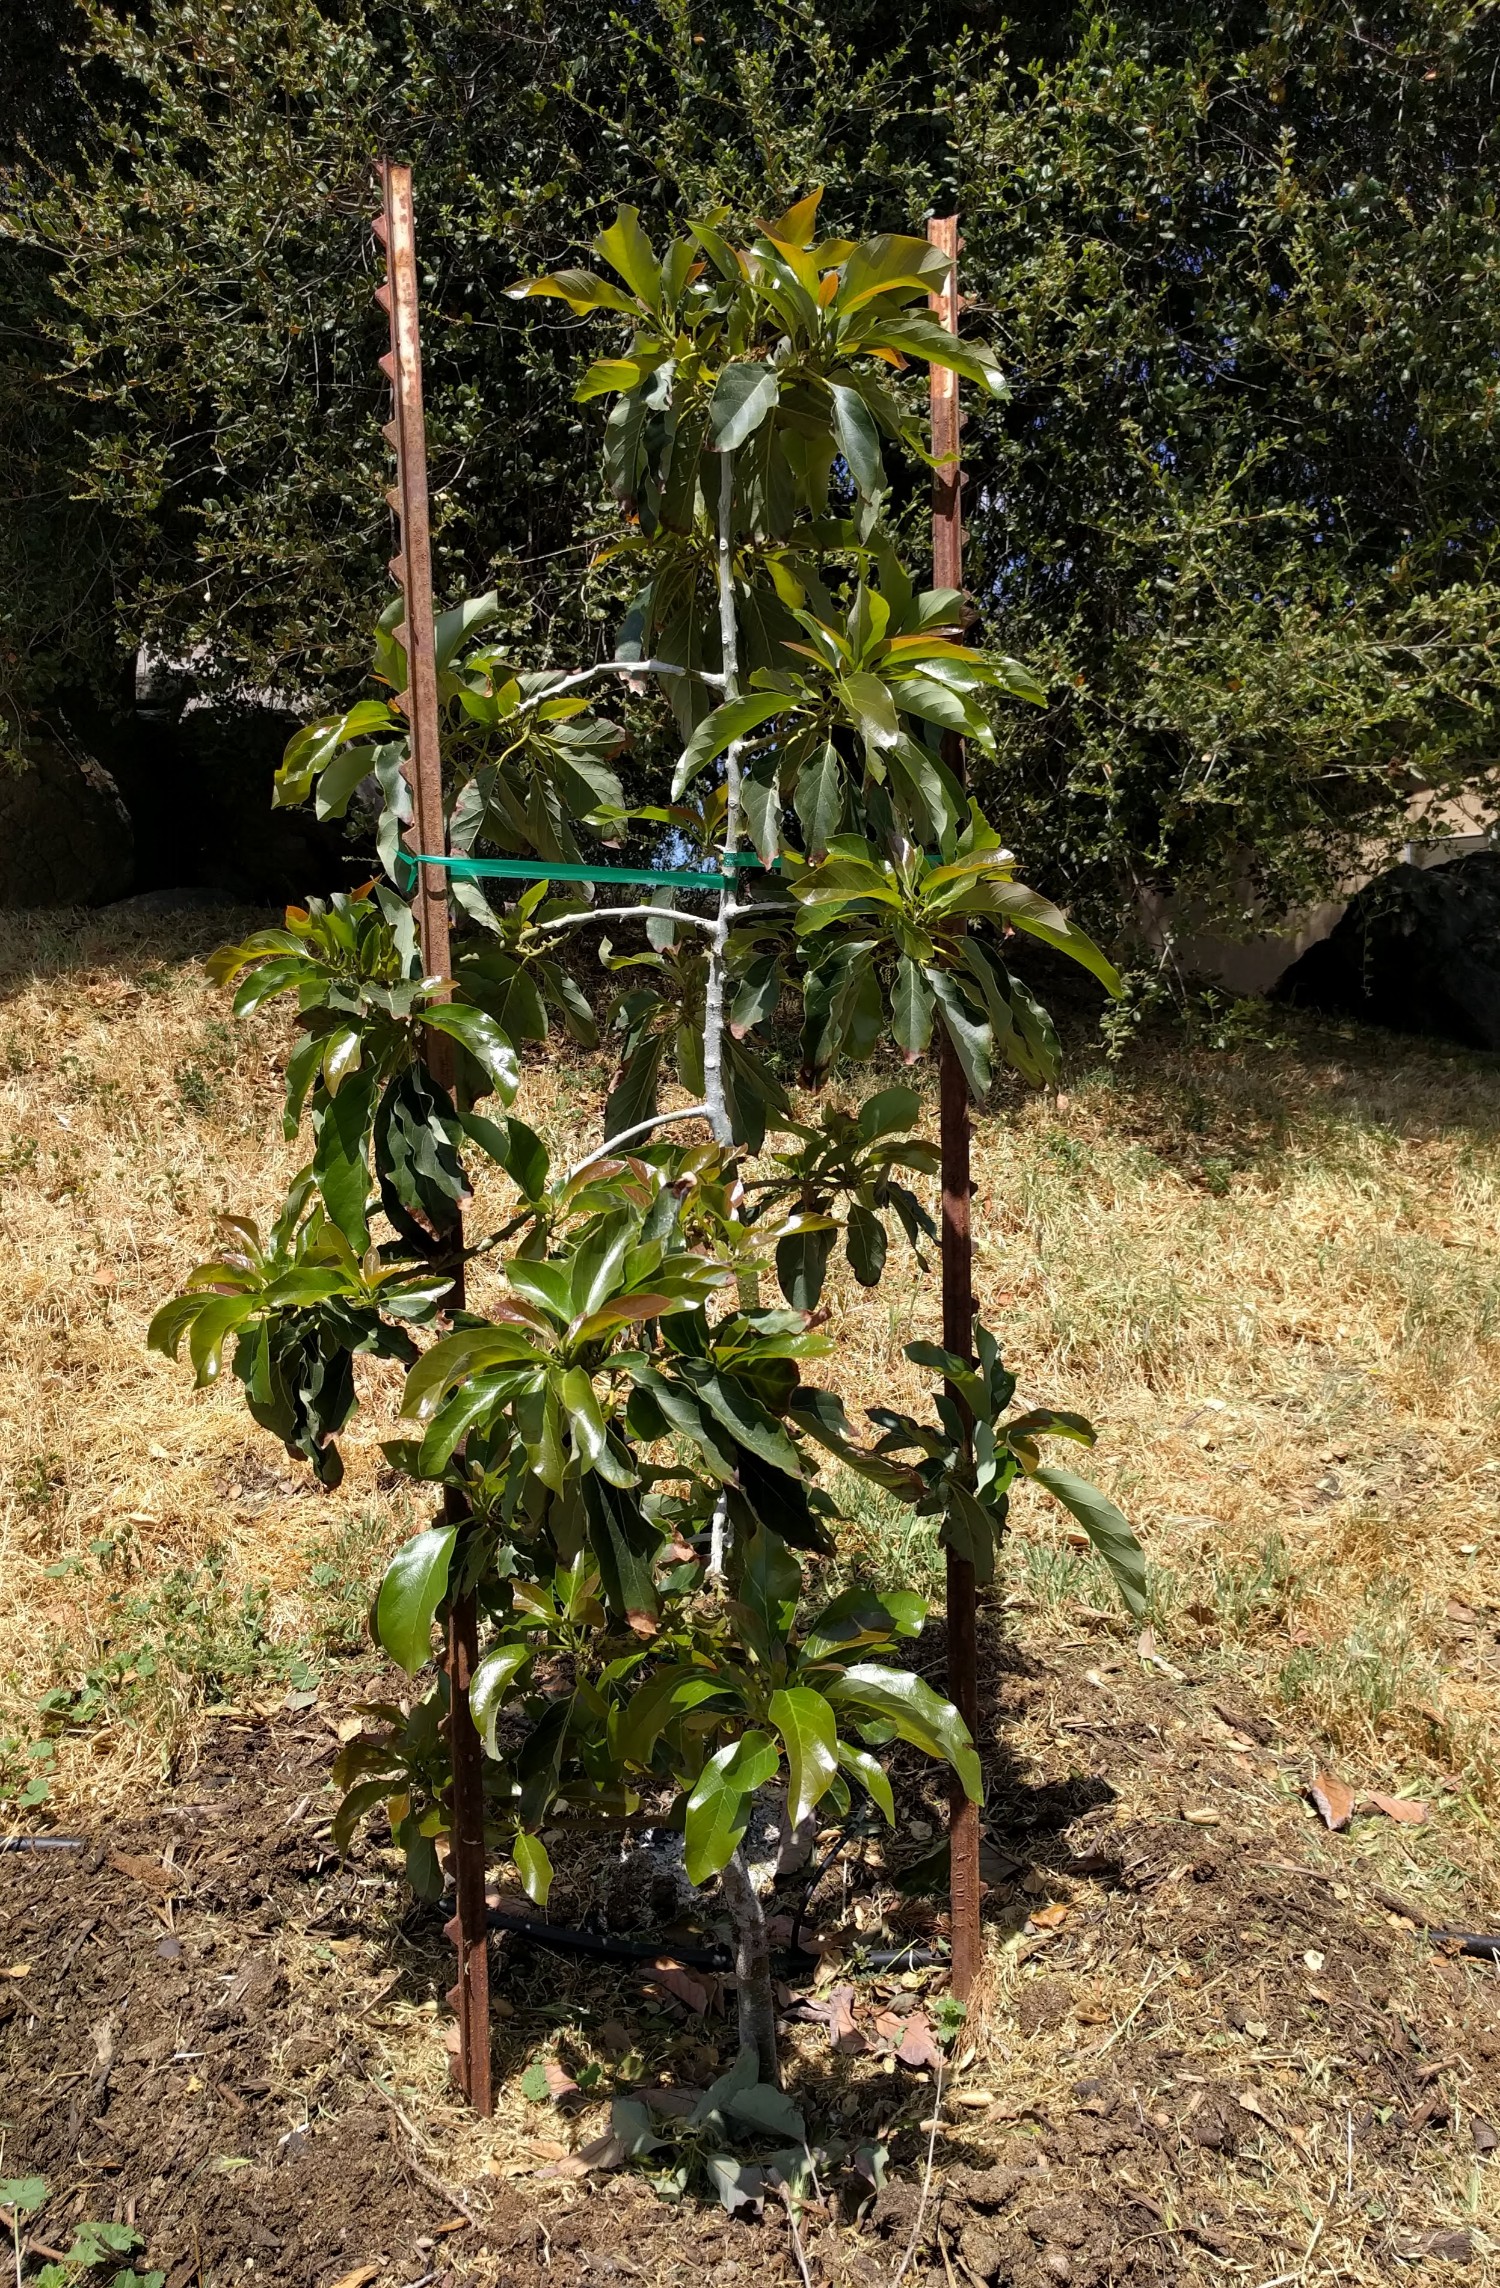
There are a couple of effective ways to restake your newly planted avocado tree. Most avocado farmers replace the nursery stake with a thicker, taller single stake (2″ x 2″ wood or 1/2″ metal pole), and the tree is tied to that — not more tightly than is necessary. I stake some of my trees like that.
Or sometimes I replace the nursery stake with two stakes inserted just outside the rootball on either side of the trunk. The stakes can be made of bamboo, 1″ x 1″ wood, metal, it doesn’t matter. Using one-inch nursery tape or something similar in size, I tie the trunk to each stake. (The tape can’t be too narrow or inflexible or else it will cut into the trunk as the trunk grows and moves in the wind.)
You want to tie the trunk to the stakes as low as you can without the trunk flopping over. If the trunk is already fairly strong, you’ll be able to tie relatively low. But if the trunk is weak, you’ll have to tie higher or even possibly tie at two levels.
With either staking method, you should frequently check up on the stake ties to see that they’re still holding the tree up correctly. Often they need adjusting.
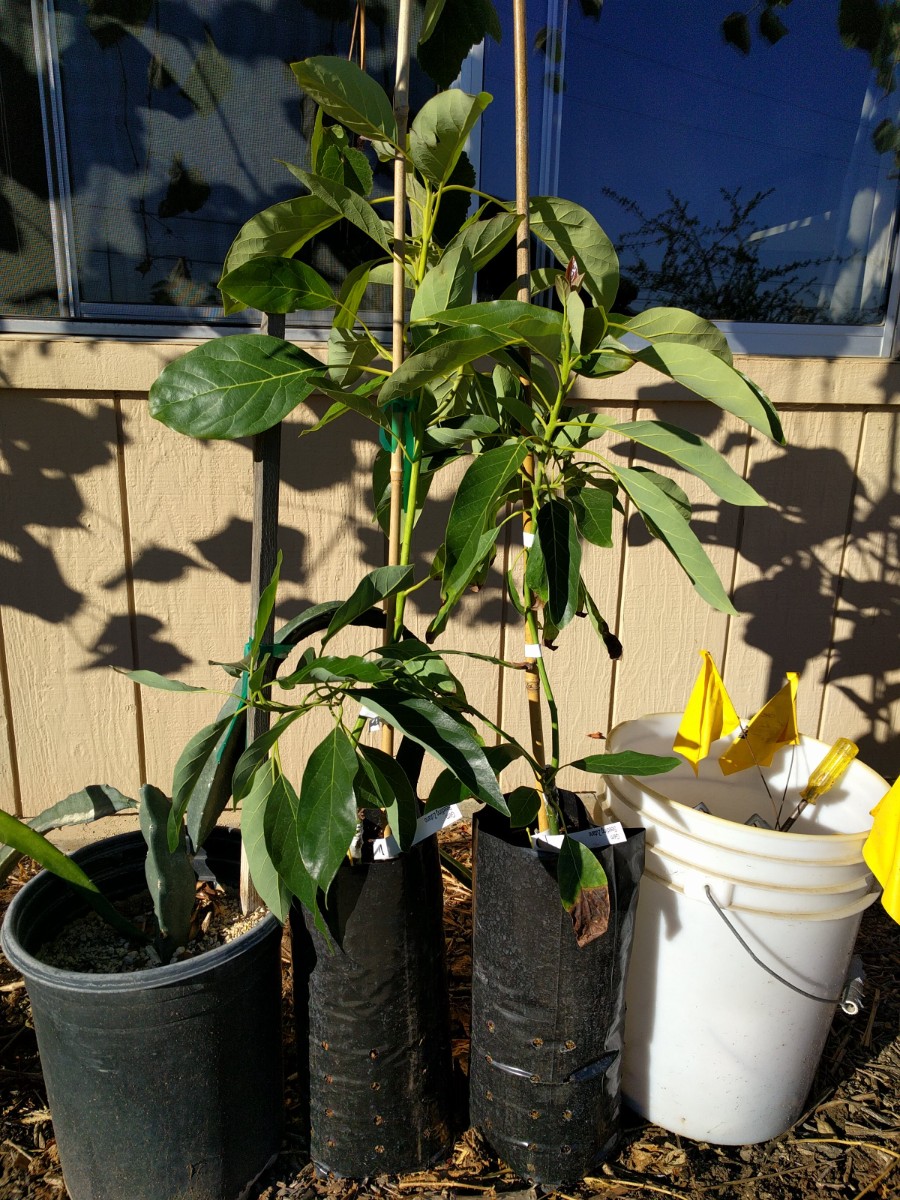
In addition to staking, you may need to do a little training and pruning over the first year or two in order to balance the tree’s growth and help it stand alone and hold its first crop. A poorly staked and trained young avocado tree could end up leaning like my Lamb:
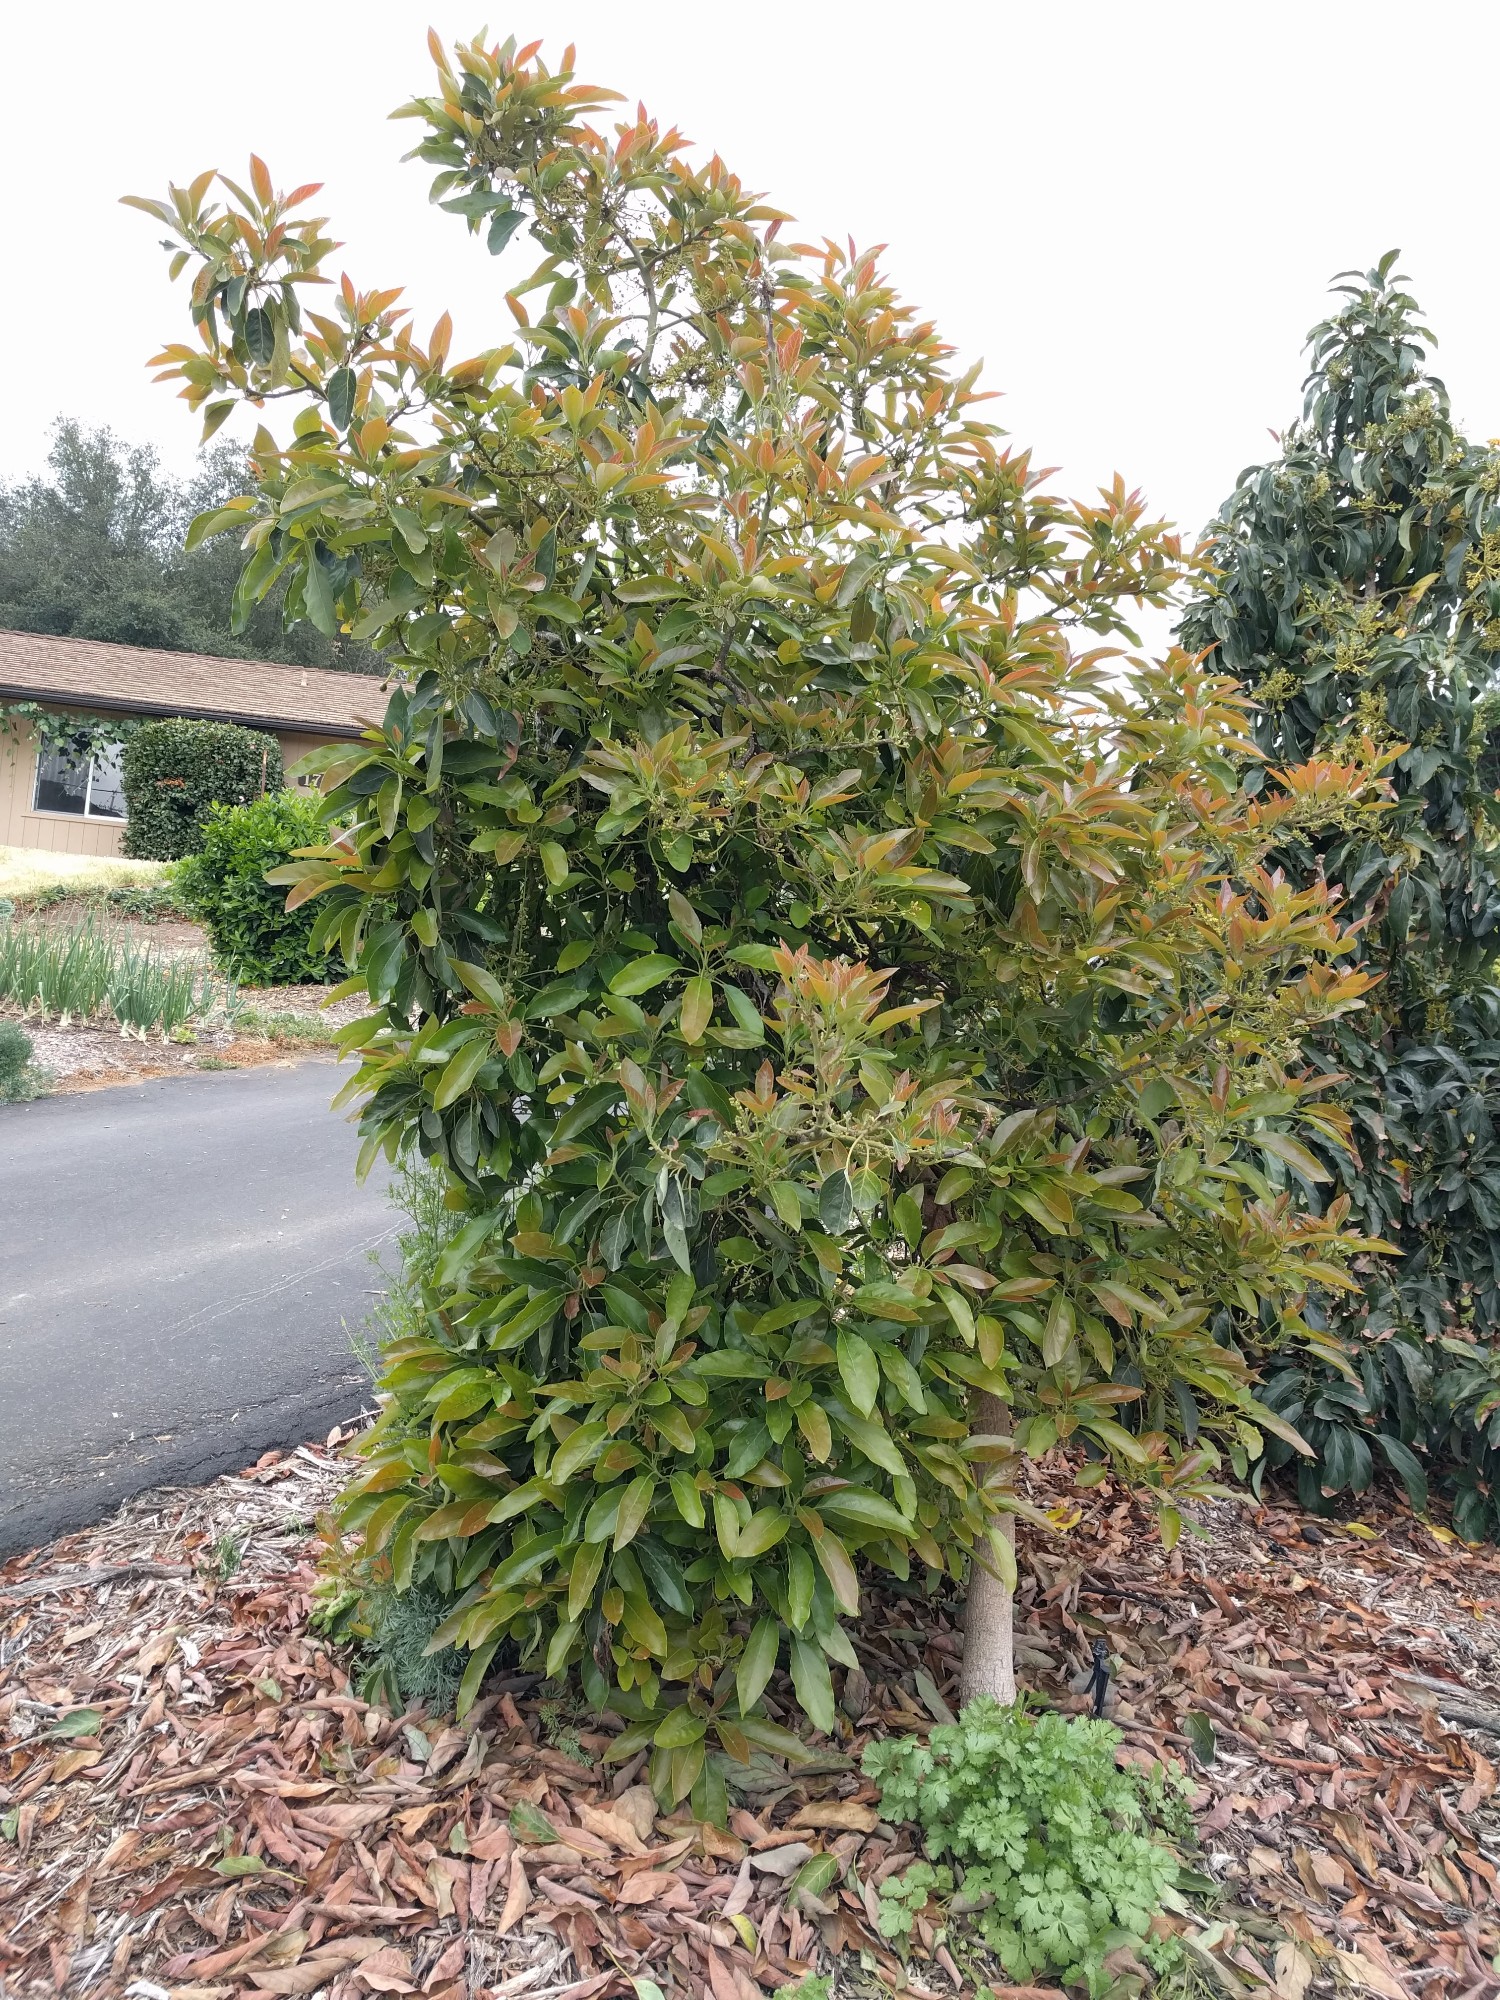
To avoid this, please see the suggestions and examples in my post, “Training young avocado trees.”
(Here is a video I made about staking avocado trees.)
(Here is a video of mistakes related to staking avocados.)
Looking forward
After being watered in and staked, your baby avocado tree is ready to run. Just be aware going forward of a couple of important issues. One is sunburn. Exposed branches on avocado trees, including the trunk, are more sensitive to sunburn than any tree I know. Please read my post, “Avocado trees get sunburned — what to do?”
Also, if you’re planting in the summer, consider shading the new tree on hot afternoons for the first few weeks. By hot afternoons, I mean over 90 degrees. The reason this might be helpful is that often at nurseries trees are bunched together and shading one another, but you might buy and plant yours alone in full sun. This can add to the shock of transplanting. I’ve found that giving such a tree relief on a hot afternoon while it’s acclimating can avoid sunburned leaves during those first weeks. (See photos of shade structures in the above linked sunburn post.)
Secondly, even as watering avocados appropriately is important generally, watering avocado trees during their first one to two months requires extra attention. Once you get through this initial phase, your tree is resilient because it will have grown roots into the surrounding native soil. In the meantime, don’t slack. And for details, please read my post, “How to water a newly planted avocado tree.”
Finally, if your yard ever gets frost, be prepared to protect your young tree from any particularly strong cold spells in its first winter or two. This can be as simple as posting a beach umbrella over it for the night. For more on that see my post, “Protecting avocado trees from cold.”
Thanks for your support of my Yard Posts. It allows me to keep them coming and keep them ad-free.
All of my Yard Posts are listed HERE

It makes me want to plant an avocado tree!!! Thanks.
Hi Grey,
Where did you get your one gallon Jan Boyce ? Thanks!
Hi Dan,
At “Green Scene” at the Fullerton Arboretum in Orange County. Julie Frink and other members of the California Rare Fruit Growers sell such uncommon fruit trees there. It’s a gardening event that happens once a year in the spring.
If you’re interested in getting an uncommon avocado variety like Jan Boyce now, you might look at Atkins Nursery or Subtropica Nursery or Paragon Tropicals. (Contact information in my post “Where to buy an avocado tree,” linked above).
I highly recommend Epicenter Nursery up near Santa Cruz as well. They also sell JB’s and are wonderful people.
+1 on Epicenter Nursery. They’re in La Selva, just South of Santa Cruz. Owners Ellen and Freddy are the most knowledgeable, helpful, friendly people you’ll ever meet. They have avocados that do especially well on the coast/in Northern California: Santa Clara Gold, Palo d’Oro, Bird Avenue, Reed, and D’Arturo, to name a few
Hi! Im about to plant a lb avocado tree from a 15 gallon container. How do I choose the right spot in my yard? Does it prefer full sun or partial? Morning or afternoon sun preferable?
Hi IM,
“Micro-climates with these characteristics are ideal: wind-sheltered, as sunny as possible, warm in winter.” That’s from this post: https://gregalder.com/yardposts/growing-avocados-in-southern-california/
Welcome to our contry Tanzania in Njombe region to help us how to deal with these crops
Hi Greg,
I am looking to plant two trees on a slope, but the slope is decently steep. I know I shouldn’t create a ledge or anything that would allow the water to pool. What is the best method for planting two trees so that the roots have room to grow, and water will absorb effectively but not pool?
Thanks in advance for all the great information!
Hi William,
My entire yard is sloped to varying degrees, and so was my previous yard. I’ve made all the mistakes you can when planting avocados on a slope, I think.
Assuming your drainage is good (see the test above), then you probably do want to make a sort of mini-ledge initially. This will keep the water from running off down the hill as you water by hand on planting day and through the first couple weeks. I just build a half-moon shaped lip to act as a berm in this way on a slope.
Alternatively, you can water with a dripper or micro-sprayer from the get-go and never need to build that ledge. But you’ll have to be careful not to have run-off, as well as water long enough to wet the soil completely to a depth of at least two feet deep, as well as a couple feet wider than the tree’s rootball.
But before the ledge-or-not-ledge step, you’ll want to be sure to set the tree into the slope at grade. That is, don’t plant high. It’s very hard to keep a new tree watered if it’s planted high plus on a steep slope. You can do it, but it’s tricky. If your drainage is good, there’s no need to plant high on a slope.
When winter rolls around, and the rains arrive, you’ll want to break the lip of that ledge down (if you’ve built one). That is the time you’ll need to be aware of water pooling because you won’t be in control of how much you water — as you are during the dry months. Just knock the lip of the ledge down and then be sure to mulch on top, and you shouldn’t have any problem with run-off or erosion while also not having pooling.
Thanks Greg!
I just purchased a reed and a Hass. I am planning on planting on a slope as mentioned above. I was wondering what your thoughts are on using deep watering stakes. My plan is to use your recommended micro sprayer for the bulk of the watering, but I thought that it may be smart to have a few deep watering stakes near the tree for deeper watering every now and then.
Thanks again for the great information!
Your intuition is good, but I think your trees will do better if you occasionally water them deeply with the micro-sprinklers rather than stakes. You can accomplish this by simply running the sprinklers for extra time.
Just yesterday I saw a Fuerte tree that has been watered with three of those stakes for the past couple years and it’s doing poorly compared to a Hass right by it that is watered with sprinklers. Avocados just don’t seem to like that style of watering very much over the long term.
As always thank you for the insight! My only concern is that it gets difficult to deeply water on the steep slope, but I think I can work on the micro sprinkler settings to get it right!
I think you can too, especially if there’s a thick layer of coarse mulch under the tree.
Hi Greg,
Just discovered your website, and like many others, have made many mistakes and killed multiple avocado trees by overwatering, combined with clay soil and a moat/well to pool water leading to root rot. Thank you for your detailed explanations and “how to” guides on so many home garden subjects that we are attempting. Thanks to your guidance, success is in our future!! Quick question. We live in Palos Verdes, south of LAX, and wondered if you know of a good nursery closer than San Diego area, that carries the Reed and Fuerte varieties of avocado? Thanks again for all your sharing and info! Tim V.
Hi Tim,
Thank you very much for the feedback. It’s encouraging to hear that my efforts here are valuable to you.
Reed and Fuerte avocado trees should not be difficult for you to find near Palos Verdes. I don’t know the retail nurseries near you, but I do know that there’s an Armstrong in Long Beach, as well as one in Torrance. They can get both of these trees for you if they don’t already have them in stock. You can also ask at any other nursery near you that carries avocado trees to order a Reed and Fuerte. The large wholesale growers which supply them (such as La Verne) grow these varieties so this should be possible.
Let me know if you run into any further problems getting these trees.
Hi Greg, I have an 6 year old Fuerte, only about 4′ tall, because it suffered a traumatic break when a limb from another large tree fell on top of it. It had flowers and even a couple of fruits on it when I bought it, but since the accident, it hasn’t flowered. I’ve nursed it back to health, and it’s looking very healthy with all the rain we’ve had in the LA area. But it still hasn’t flowered. I have a 5-gallon Reed, and was considering one of two options:
-Plant the 5-gallon Reed a foot away from the Fuerte so it can be watered on the same sprayer. Will digging a hole for the Reed so close to the Fuerte’s roots harm the Fuerte?
-Dig up the Fuerte and give it to a friend. I hate to give up on the tree because after 6 years, I’ve invested so much time and energy in it. But I’ll do it if I have to.
FYI: have a14 ft high Sir Prize near the Fuerte, and it’s doing very well.
hi Greg, many thanks for your info. I have a 3 feet high avocado Haas on a pot inside an apartment, Im starting to doubt if I can keep it cause its getting big. About a month ago it started to get brown tips on a few leaves, seems maybe ive been underwatering it? have not been giving it too much water as I am afraid of root rot. Any tips?
Hi Enrique,
If your pot has plenty of holes on the bottom and you’re using a fast-draining mix inside the pot, then it’s highly unlikely you can induce any root rot infection in your tree. Don’t be afraid to water it often, especially if it’s in a sunny window and the humidity in your apartment is low because you’re using a heater, for example.
If the tree is getting too big, you won’t hurt it by cutting it back. You can even just pinch off the terminal buds and it will grow bushier rather than taller.
I just finished transplanting a 15g Hass and it came tied to a wooden pole. After cutting the ties I was shocked just how weak and floppy the tree was. Going to stake it properly but I had to tie it back to the pole quickly for fear it would literally flop a u-turn and break in half. Tree is about 5′ tall.
Hi Zen,
That’s a good point. The process I follow is cutting off the ties to the original stake in order to see how the tree flops, but being prepared to handle it so it doesn’t snap in half. But I don’t remove the original stake yet.
I tie it back to that original stake while I tie it to the new stake(s) in the proper place. Once the tree is supported by the new stake(s), then I remove the tie to the original stake and I remove the original stake.
I had the same issue, planted my fuerte last summer, about the same size as mentioned above and tied off to a wooden pole. I left the stake while it reacclimated since it was floppy and didn’t not want to further stress it, but am thinking I probably need to remove it before it gets any bigger with spring /summer growth coming. Is there a time of year that is best or should be avoided so as to not stress or damage the roots, or best to just remove it asap? I am in San Diego.
Hi Russ,
You can stake and restake any time of year. Before totally removing a stake, I usually just loosen or remove the ties for a few days to see how the tree stands. Sometimes it starts to flop too much after a little wind and you realize that it needs support for a little longer.
Hi Greg, I have a question about staking a container pomelo tree. I bought it from the nursery and it came in a 11″ pot. The stake is in the middle and I’m wondering if I need to restake it? I’ll put the tree outside when the weather gets warmer. I live in Toronto. Thank you for your help in advance!
Hi Kim,
I love that you’re growing a pomelo in Toronto!
It so happens that five months ago I planted a small mandarin that was tied to a single stake in the middle like your pomelo. I untied it to see how well it could stand up, decided that it did still need a little support, and so retied it in one spot to the same stake. No restaking.
I just walked out to check the tree. I untied it and it’s already strong enough to not need the stake anymore. Citrus are much stronger than avocados in this way.
Most likely, you can do as I did with this mandarin and will not need to do any restaking.
Good luck this spring and summer!
Hi Greg- So much awesome info here. I’m hoping you can help me with my avocado tree (unknown variety) that I’ve had for about 6-7 years now and it hasn’t fruited. It now has 2 mature trunks coming out of the ground and I’m not sure if that’s the cause. I don’t know which one to cut down. I was hoping to post a picture here for some help but don’t see an upload photo. Would it be ok to email you the pics for help? Thank you!
Hi Amara,
Did you buy this tree at a nursery or did you grow it from seed?
Hello Greg,
Thanks for the great info. I read your reply to William who is planting his avocado on a slope. I too am planting my avocado on a slope but with very poor drainage due to poor soil. The top foot and a half is sandy loam. After that it’s compacted clay followed by compacted sandstone.
I dug out a section of the slope 4’x4’x3’ to accommodate a planter box the same size. As well as dug a hole in the center another 2’ deep that I plan to fill with clean gravel to help with drainage. I even went one step further and dug a 3 to 4” hole coming in from the lower section of the slope sideways into the 2’ hole and will be inserting a 3” pvc pipe to allow the runoff to drain.
Did I go overboard? …. lol.
What do you recommend for the filling of the planter box?
As you can see, I am worried about root rot.
By the way, I will be planting a Kona Sharwil and was also thinking of planting a Gem in the same manner. What are your thoughts about planting 2 trees in same planter say 1’ apart? It would save me from the back breaking work.
Hi Gabe,
Good to see that you’ve taken the drainage issue so seriously with your new avocados. It’s important.
Maybe you went overboard, maybe not. When I’ve planted avocados in clayey soil or poorly draining soil or shallow soil (compacted layer only inches underneath), I’ve gone up rather than excavated; I’ve built a mound. I’ve done that on both flat land and hillsides.
I can’t say whether it’s better to excavate as you have or mound like I have since I haven’t tried excavating. But I can say that mounding works. I’ve seen it work every time I’ve done it right. As an aside, this is the method that avocado farmers use around the world, too.
Use your native sandy loam soil for planting the avocados in, if you can. Sandy loam is an excellent type of soil for avocados. My soil happens to be sandy loam.
You can certainly plant two avocado trees one foot apart. In the backyard of my childhood home, I’ve grown a double-trunked avocado tree like that for my mom. (Once the trees get big, they look like a single tree that has two trunks.) The only task is making sure that one of the trees doesn’t grow much taller and shade and crowd out the other. It’s just a matter of pruning as necessary.
How do you water a mound on a steepish hillside and prevent erosion? If you go drip it won’t wet the entire mound.
Hi Matt,
Good question. Some of my avocados are on fairly steep slopes, as well as up on mounds, and I’ve found two keys to watering them and not getting runoff (without using drip).
One is using a micro-sprinkler because, like drip, it puts on the water at a low volume. And two, having a coarse wood-chip mulch under and around the tree. With both of these in place, I can wet the entire mound and not get any runoff. I hope that can work for you, too.
Okay thanks I’ll give it a try. As for mulch is there any you don’t recommend? I don’t want to acidify the soil or have the mulch leach anything harmful out.
You should find good answers to those questions in my post about mulch under fruit trees here: https://gregalder.com/yardposts/using-wood-chips-as-mulch-for-fruit-trees/
Thank you very much for the advice. I really appreciate it.
Specially for the good news on planting 2 avocados together near each other.
That’s going to save my back.
I was at Home Depot the other day and couldn’t resist buying a nice Pinkerton grown by Durling (it probably should have been in a 24 inch box and not a 15 gallon). The question I have is the spot I want to plant it in had a very large tree I removed a few years ago. I ground the stump of that tree down. Anticipating planting a new tree in that location I tried my best to remove as much of the ground up stump as I could but when I dug the hole yesterday to plant the tree I could see some of the ground up root mixed into the soil. Is this an issue? Should I plant the tree somewhere else in my yard? I understand that avocado roots are sensitive and I imagine the decomposition of the wood remaining in the soil will generate heat so this is what I am worried about. It’s not that much ground up wood and my instinct is to go ahead and plant but I thought I’d ask your option prior to doing so… Thanks in advance
Hi Eric,
I’ve impulsively bought trees like that before too!
I doubt there will be a heat issue with that ground stump since it was a couple years ago. The main concern I’ve heard about is that the microorganisms that decompose such wood grindings use nitrogen to do their work and thereby keep it away from the new tree’s roots, so to speak, until they’re done. Nitrogen “tie up,” they call it.
However, my experience is that the worry is overstated. I once planted a citrus tree where a plum tree had been cut down and ground only months before. I expected to see poor growth or yellow foliage. I saw no such symptoms.
It sounds like in your situation I’d go ahead and plant in that spot but possibly plant a little high, figuring that further decomposition is going to sink the tree a bit over time.
Hi, I just had a question about testing soil drainage…When you say that the water should disappear within 8 hours after filling the hole the second time, could you be a bit more specific?
If there is no standing water, is that okay, even if the soil, at the bottom of the hole, looks darker than the surrounding soil? Are you saying that it should be completely dry and show no signs of water or just that there shouldn’t be any standing water in the hole?
Thanks so much!
Hi Greg-
Thanks so much for all of the great info on the site. I’ve been growing a Reed that I got from a 5 gallon container (now in a 20 gallon grow bag) for the past 6 months and I can’t get the tree to stop flopping over. It seems like the only thing I can do is to stake it like the nursery did. I tried staking it like you showed in your post but the flop is getting worse as more leaves grow on top. Any advice on how to deal with this tree? I’d be more than happy to post a picture of the tree if that’s possible.
Hi Chris,
Thanks. I empathize. I’ve dealt with some avocado trees that insist on flopping like yours; it’s so annoying.
You have a few options: One, cut off some of the top. This will give the weak trunk less weight to hold up now, and by the time the top grows back it might be strong enough to no longer need staking. Two, put in a thick 2-inch by 2-inch stake and tie the tree to it. Plan to just leave the stake there for years. Many commercial avocado farmers do exactly this. You can also use two stakes and tie the tree in multiple places and plan to leave the tree tied (with adjustments as necessary) for a year or more.
Either way, it sometimes takes a year or more to get the tree to stand on its own. Also, I’ve found that some trees that were grown for too long tied to the nursery stake never properly strengthen and need to be pruned to get them to stand on their own.
I’m hoping to soon do a new, fuller post, possibly with some video, about staking avocados. I’d also like to do one on pruning and training the newly planted trees because these topics all go together toward making a tree stand strong in the shape you want in the long run.
hi!
I grew an avocado from seed and currently have it in a relatively small pot (i would guess a bit less than a gallon). It’s about 1.5 feet tall now but the ‘trunk’ isn’t very sturdy. I don’t have a yard and a Master Gardener had recommended that i move it into 5 gallon pot for the next year or so before I eventually move it into the ground. Would you recommend staking it? (frankly, i’m a little concerned about moving it at all given how delicate the roots are.)
If it’s useful, I’ve nipped the buds twice already so the leaves are quite large, but none of the side shoots really grew to any meaningful size.
Hi Lili,
Seedling avocado trees are usually pretty tough and you don’t need to worry about damaging them when transplanting. Go for it. You might want to put it into a pot that is only approximately three gallons in volume next because jumping from less than one up to five means you’re going to have a lot of potting mix without roots at first and this can make watering properly difficult.
I’ve never seen the need to stake a seedling as they are always sturdy, but maybe yours wasn’t outdoors in the wind enough to become sturdy. Sure, stake it if it is flopping over.
Some nurseries grow their avocado trees in wood chips and bark and I heard this planting mix will decompose overtime, making the tree less healthy in the long run than growing in planting mix composed of rock and sand. This sounds logical but would the surrounding native soil eventually fill out the space left by the degraded medium? I’m ready to plant my avocado tree outside but not sure if it is worthwhile to rinse out the old planting mix and replace with a high quality soil before planting. Thanks.
Hi Loan,
I wouldn’t bother doing any such rinsing. I’ve planted avocado trees from every major wholesale grower in Southern California and some have grown better than others, but I’ve seen no correlation between how well they grow and the mix that was in the container.
You’re right to step back and think about how the tree will grow for a second. That little tree is going to have roots out into the native soil within a month from planting in the spring. Very quickly, the tree no longer cares about that planting mix if it was planted right and is watered right.
I’ve screwed up with a lot of new avocado trees over the years, but I can’t blame any of that on the mix that was in the container. I highly doubt anyone else can either.
Hi Greg, a couple weeks ago I planted a 5 gallon Fuerte tree. Its staked and doing fine. My yard has gophers, so I installed a cage around the roots using 1/2″ galvanized steel mesh. What I am wondering is, is the cage is too small in size for the roots to grow year over year? I was looking as some mature trees today and realized the trunk of them is likely the size of the cage itself. The dimensions of the hole I lined with the steel mesh are roughly 16″ diameter and maybe 6″ deeper then the soil from the transplant.
Hi Matt,
Good timing on this one. I was at a friend’s house just the other day and he said he had planted some of his avocados in gopher baskets and they were growing more slowly than the others. We wondered if there was a connection. Maybe, maybe not.
The idea with these wire cages is that they’ll break down after a few years and won’t girdle the roots. I can’t say whether this actually happens though. It might depend on the type of tree and the type of soil.
I have never used the cages because the previous owners of my house did and I dislike running into the wire mesh in the soil here and there when I dig or plant. It has certainly not degraded in my yard very much. So I have just committed to becoming a vigilant gopher hunter. I have lost a few trees to gophers over the years, but I haven’t lost one since 2018, as I recall.
I wish I had a clearer answer for you, but I only have these observations. I’d bet that other people have different experiences.
Thanks for the feedback Greg. It sounds like you don’t have direct experience with this issue. I don’t think I would be as concerned if I had used a gopher basket purchased from a nursery. Those have holes roughly 1.5″ or so. They are also fairly thin, so I think they would break down over time. The material I used is only 0.5″ holes, and I uncovered some of that galvanized mesh I had put around a drain line (that a gopher had chewed through and ruined) and it was very much in tact several years later. I’ll likely go in there and remove some, if not all, the material around the sides to allow the roots to propagate though the soil. I’ll likely have to live with the piece of material underneath, but I suspect that since an avocado tree doesn’t put down a tap root (I think) I’ll likely be ok.
Hi Greg, and thank you for all your very informative articles.
About 5% of my one year old trees are in poor condition with few or no leaves (April 2020).
Can I help them in any way, or are they nohopers I should remove?
All trees get the same treatment and have the same soil, but some got a fair amount of wind during the winter.
All trees got some (30g N) fertilizer a month ago and there is no lack of rain.
Thanks / Erik
Hi Erik,
Not sure, but you might want to give them a little more time. Are the branches still green or are they getting sunburned? If no sunburn, then I’d give them time. If they’re getting burned, then you might just replace.
Hi Greg.
No, there is hardly any sunburn. Just the odd spot and twig. All the week plant’s branches are yellowish green. Most branches have buds / shoots at the tips and further down, but no development. Dead parts are trimmed off.
Thanks / Erik
Hi Erik,
I’d give them just a little more time to show some action and then replace. A replant rate of five percent is not bad at all.
Thanks for the feedback Greg. You were right about waiting for signs of life.
By now, (mid June) all but 3 of the weak plants have recovered and sprung to life. They are sprouting with buds and fresh leaves.
Thanks / Erik
Great to hear, Erik. Hope the positive trajectory continues.
Hi Greg- I planted two avocado trees in March, a Lamb Hass and a Wurtz bc we have a moderately sized suburban yard. Both seem happy – following your watering schedule and lots of leaf growth. I followed your advice with the double staking method so they could sway with the wind, but the top of the Wurtz is super floppy. It would be about 5 feet tall, but the last foot is horizontal growth. Not sure if I goofed by not adjusting the tape supports (but it seemed counter intuitive to move them higher with age?), or if this is normal? The Lamb Hass is sturdy and upright and I have adjusted the tapes lower as it gains strength. All of the Wurtz branches are more flexible and hanging, so not sure if it is related to the type. The trunk is probably 1inch in diameter at the bottom, and 1 cm at the tip. Would you recommend I prune off the top foot? Or attempt to force it upright by moving the tape? Or leave it be? Super invested in keeping these guys happy! Thanks so much for sharing all of your knowledge.
Hi Cat,
It so happens that I was out staking my Holiday avocado tree yesterday, which is another floppy variety similar to Wurtz. These varieties tend to need staking for many years if you want them to grow up rather than weep and sprawl. My Holiday was planted in 2016.
Rather than two stakes, I used one tall stake. It’s a thick metal stake that’s seven feet tall, so there’s about six feet above ground. And I tied the Holiday all the way to the top.
You’ll likely want to also do something similar with your Wurtz. And plan to just leave the tree tied to a stake for longer than your Lamb. I used to get so irritated with these floppy varieties that need support for so many years, but I’ve seen that if you do provide them with that support and don’t try to get them to stand erect on their own as early as other varieties, then they can hold fruit and will eventually gain trunk strength.
Uh, oh…I guess I better tie my droopy branches back to the stakes! I heard contradictory advice that a staked branch won’t gain its own strength and will have a chance of breaking if I remove the ties to the stake. Help! Which is right?
I have a Lamb Hass and a Fuerte (approaching 10 years old) – both have more horizontal growth and have yet to reach 6′ in height. I have half a dozen stakes I was using to keep the horizontal and weepy branches up off the ground. Eventually, I’d like to prune the bottom 3 feet to keep animals (ground squirrels, rabbits, gophers, dogs) away…but I don’t want to do that until the tree has more height and strength. As soon as there are avocados on it, the current branches touch the ground. I’ve learned from the extreme heat in 2018, so this year I have good shade for them. I also added a soaker hose in a 6′ diameter ring around the trees, in addition to the single dripper I had between them.
I also have a 2′ diameter ring of retaining wall blocks…and am concerned that they’re half submerged in the dirt (to prevent digging rodents) and that might be restricting some of the roots. There’s also a 2′ ring of 2′ high rabbit fence to limit access to the trunks. I think I may have gone overboard with protecting it, but our third try seems to be doing well. I even used a rototiller to break up the clay and mix in soil amendments in a 2 foot deep and 6′ wide circle when we planted them. So far, so good. What do we need to adapt for the future?
Hi David,
In staking, you need to balance between keeping the tree/trunk upright but allowing it to sway a bit in the wind. Even then, sometimes trees refuse to grow up and stand on their own. At that point, you must prune in order to achieve that end.
I’d guess the retaining wall blocks are restricting the trees’ roots. Avocado roots will grow right at the surface if there’s any mulch.
I’d also guess that the fence is no longer necessary. In my experience, rabbits don’t chew on avocado trunks after the first couple years.
Hi Greg,
I’m up here in Nor Cal. I purchased a Fuerte and a Holiday Dwarf tree from our local Sloat’s. I’m on a property that has Apple, Plum, Asian Pears, Bartlett Pears, Pomegranates, Orange, Lemon and a few peach and cherry trees (these last 2 aren’t doing well). Anyway, My question is should I plant the 2 avocado trees together – as in sharing the same planting space – or should I keep them separated. They are still in their original 4 gallon cans and have been since I bought them in March. I love avocados and I really don’t want to screw this up. The reason why I haven’t planted them yet – first because I’m too chicken, second I want to learn what keeps them thriving and what doesn’t. I’m planning on planting soon.
Hi Bob,
I bet your patience with planting those avocados will pay off. The pair of Fuerte and Holiday will be hard to manage if they are planted too close together because the Fuerte will grow so much faster and bigger. I’d make sure that the Holiday is planted either south of the Fuerte or at least 10 feet from the Fuerte. Otherwise, you’ll end up having to constantly prune the Fuerte back so it doesn’t overwhelm the Holiday.
Once you plant, be sure to water amply and often. This time of year, the days are long and can be hot, and the soil is often totally dried up from the winter and spring’s rains. The main mistake made with newly planted avocado trees this time of year is underwatering. See this post: https://gregalder.com/yardposts/how-to-water-a-newly-planted-avocado-tree/
My Fuerte tree is 2 months old, and is growing like crazy. It started from a 5 gallon pot, and has grown roughly 6″ in two months. The first month was almost nothing, just me watching and waiting for those buds to open up. And have they opened.
With spring winds the tree seems a bit top heavy now. It’s staked somewhat loosely, and it bends a decent amount in the winds. Even in a small breeze, the top moves around a fair amount, I’m imagining due to the abundant growth on top.
I’m considering pinching off the top to stop it for a bit and hope it will put more energy into the trunk. The other side of my brain says the tree will grow fine without me adjusting it. I’m guessing it could be similar to your Pinkerton you mention in the post.
This is a dilemma, Matt. I’ve gone back and forth over the years, but at the moment I lean more toward using tall stakes and continuing to let the top grow while tying it up. Someday soon, I need to write a post on training and shaping young avocado trees because I can show the effects of different methods and prunings with the photos I’ve taken over the years.
The trade offs for your tree are likely: Pinch off the top and slow its growth and probably get the tree to stand on its own a little earlier. Or just keep tying the top up to stakes and probably end up with a larger tree with a few more fruit earlier.
Yes, please to the training and shaping guide! I’m ready to start shaping…or at least ready to be prepared when my trees are big enough!
Thanks for the response Greg. I’ll think I will let it grow and support it as necessary.
And thanks for all the great advice on your blog. After covering trees (and lots of area in between) with mulch recently I’m off to buy tomatoes, cantaloupe and maybe another summer edible to take advantage of my weed reduced gardening area.
Hi Greg! Thanks for all the information you have given me so far. I spur-of-the moment NEEDED a fuerte avocado tree in my life… so I purchased it and planted it in a pot with about 15 inch diameter. It is growing well, (about 4ft tall)! I would like to plant it in the ground but I am very concerned with the invasive roots. How close can I plant it to a driveway/block wall/foundation? If I prune it back as it grows, will the roots be less invasive? Can it produce fruit in a pot? My yard spacing is less than I thought. Thanks!
Hi Jenn,
I’ve never noticed avocado roots doing damage to driveways or walls or foundations. Avocado roots are relatively wimpy. I wouldn’t worry about that factor.
Technically, avocado trees can produce fruit in a pot, but it’s a difficult long-term strategy to try to grow an avocado tree in a pot compared to growing it in the ground.
Greg –
I just discovered your site. Excellent information! Super thankful! Quick question. When should an avocado stake be removed? I have a 4 year old Hass avocado tree that’s getting big. The base of the trunk is probably 6 inches or so. I’ve haven’t removed the wooden stake (probably 4 feet tall / 1-2 inches thick).
Hi Elisha,
Thanks! You can remove the stake once the tree no longer needs its support. But I’ve seen trees in commercial orchards that still have their stakes even though the trees are 20 years old; the farmers just never got around to removing them. This isn’t usually a problem unless the ties to the stake remain wrapped around the tree and can girdle the trunk or a branch.
Hi Greg,
I have planted about 400 carmen hass tree and need to buy 2 stakes for each so a total of 800 stakes. Do you know how tall the stakes should be? How long before the young avocados can support their own weight?
Also where is a good place to buy the stakes?
Excellent site and great information btw.
Cheers
Hi Eman,
Thank you. Usually people use stakes from 6-10 feet long so the stakes can stick out of the ground 4-8 feet. It’s better to go longer than shorter, I find, because it’s a hassle when a tree still needs some support up at five feet but your stake is only four.
Stakes are usually needed for one to two years after planting. Much depends on how well a tree is trained during those first couple years though. If the training has been poor, then the tree might need support for longer.
Here’s a post about training, in case you haven’t seen it: https://gregalder.com/yardposts/training-young-avocado-trees/
I’ll be posting a video or two about staking in the next week or so.
Hi Greg – Thank you SO much for your articles, you are a life saver. I am currently running a drainage test as you recommend. However, I believe my soil is clay. I don’t have high hopes that it will drain appropriately. To clarify your mound instructions, I understand I need to do the following: 1) Use the native soil to build a mound 3 feet high and 6 feet in diameter (my rule of thumb based on your suggestion) 2) slightly compact this mound with a very gentle slope towards the top 3) drop the new (15G Hass) tree into a hole right in the middle of the mound (I’m thinking it looks like gently sloped volcano, pre-planting of the tree 4) the bottom / roots of the root ball will be slightly above ground level 5) leave the top of the root ball / top soil of container uncovered from dirt or mulch 6) place mulch around the tree / mound but not on top of the container mix (I understand nothing should go on top of the container mix 7) what exactly is a berm? I don’t know if you need a berm if you plant the tree on a mound? Or is the berm the mulch around the tree? Thank you so much for your response, I am planting this weekend (Del Mar).
Hi Greg – I dug three different holes in my front yard. All of them are relatively close to each other (two are 6 feet apart and the third is 30 feet from those). Is it possible that the drainage would be different in each location? Two of the locations drained within 8 hours on the second go. The third, however, (6 feet from one of the holes) is taking quite awhile. This could also be because I dug this particular hole rather deep (18 inches?). Maybe that is affecting it. I don’t want to risk it and find it somewhat strange that 6 feet apart and 30 feet apart seem to drain fine when this other hole does not. Any response is appreciated, I’d also more than welcome a chance to talk to you on the phone! Thank you!!!
Hi Cameron,
I really do wish I could just transport to your yard for ten minutes and plant with you. I love planting avocado trees. But we’ll do our best here in the comments section.
Yes, it’s very possible to have different drainage times in holes around your yard. This happens in my yard. It happens in almost every yard and for many reasons. For one, the dirt was graded and played with when your house was built, and outside dirt may have been brought in also. So there is never just one soil (in type and depth profile) in a yard except for the tiniest of yards. There is almost always some variation.
A berm is a long mound. The word is used in two ways in the post.
I use berm to refer to a lip or rim around a newly planted avocado tree (on a mound or not) that can function as a basin to keep water from running off and away from the tree.
Secondly, berm is used to refer to long mounds created for more than one tree to be planted into. In an avocado grove, farmers often use bulldozers to create long berms instead of individual mounds (volcanoes) for individual trees. I’ll try to add some more photos of mounds and berms to the post above.
Thank you Greg! After reviewing the drainage, I am probably in the “danger zone” in the best location for sun and space. I will build the mound for this 15G Hass tree. The spot that is 6 feet away is also on a very very gentle slope which may further help the drainage. I plan to plant the other (5G Hass) tree in the ground at that location. There is a very mature orange tree 6 feet from where the avocado trees will go. I’ve been reading about watering and how this may affect the water for the young avocado. However, I hope the mound will really help the 15G tree and furthermore I will need to closely monitor the watering. Thankfully none of the trees will be shaded from the sun as they are all south facing, with the sun moving east to west over the southern horizon. Trying not to stress too hard, just going to try my best and see what happens. Appreciate your help.
Sounds like you’re doing everything right, Cameron. It’s also good that you’re planting this time of year. Being in Del Mar, you have no threat from cold through the winter. And here in fall, the weather is mild so there is more margin for error in terms of watering too little (which is the most common cause of problems with newly planted avocado trees in spring and summer). Just be sure to apply the irrigation water right next to the trunk from now until about April 2021.
If you haven’t already seen it, check my post on watering newly planted avocado trees (and be sure to add a little more water for the 15-gallon compared to the 5-gallon): https://gregalder.com/yardposts/how-to-water-a-newly-planted-avocado-tree/
Hi Greg, my Fuerte which I planted from a 5 gallon pot is over 5′ tall now. Its is growing just fine, no concerns. But I do have a curiosity. I was digging around the tree today, down below the 4″ or more of wood chips around it, down into the dirt, rather near the trunk. I was surprised to see, or more accurately not see, roots. I know my 12′ tall Hass is going to have different characteristics than my 5′ tall, maybe 3′ across Fuerte. I expected to see the Fuerte’s roots poking up just below the wood chips like they do on my Hass. I struggled to find any roots, could only find dark vanilla colored ones diving deeper into the soil very near the trunk, none of the very light colored ones just below the surface.
I’m imagining this is not unusual for a young tree, what I was wondering is at what point does the tree start spreading roots out more near the ground, versus just going down deep.
Hi Matt,
You’re spot on with your observations. Much depends on the soil conditions and irrigation practices, but young avocado trees do generally grow roots down rather than out just as you noticed with your Fuerte. This is one reason that drip irrigation works so well on young avocado trees. Drip irrigation wets the soil more vertically than horizontally in the sandy and loamy soils that avocados are usually grown in.
I’ve seen young avocados begin to grow roots near the surface as soon as a few months after planting, but usually this doesn’t happen much until a couple years after planting. When I’ve seen it happen early, the trees were planted on a slight mound in sandy loam soil and covered with a layer of compost and then a deep mulch of mostly oak leaves. The trees were irrigated with a sprinkler covering the entire mound. In other words, the area where the soil met the compost and mulch was hospitable for avocado roots since it was both consistently moist, full of nutrients and microbial life, and airy. That’s almost everything an avocado root wants in life.
But as I said, that is not the norm for my trees or others that I know. Normally the trees wait a couple years until there’s canopy coverage and leaf litter to create such a hospitable environment for growing many roots up near or into the mulch.
I planted my third avocado today, a Reed. It’s a rather small one that came in a 5 gallon container. When I planted my Fuerte I cut the sides of the container. Wish I had done that with this one. When the potting soil finally let go of the pot it just slumped out, potting soil everywhere. I’m guessing the tree will be fine, but I’ll never try that again.
Part of the result is I did put my yard soil (along with some worm compost and aged manure) over the potting soil to cover the trunk which was exposed. After looking at the article linked above, at least I have gravity working for me. And I did fill the hole twice, and soak the dirt that was part way filling the hole a few times as well. And then soaked everything afterwards, with wood chips over it all.
Hi Matt,
I hate when that happens. I’ve done that before. Seems to happen when a tree’s roots haven’t filled the potting mix enough to hold the mix together.
Hopefully, the roots are healthy despite being few, and the tree will be fine.
Thanks for the response Greg. 4 days after planting the tree seems fine still, so I’m guessing it will be fine. Made for some nervous nellie moments though. I sort of wonder even if I had cut the sides off if I could have had the same problem, as like you mentioned its a fairly small tree, so not tons of roots. It’s only 18″ from ground to the top of the trunk, plus a few inches of leaves on top.
Maybe the lesson here is if purchasing a tree this small to let it grow in the pot for some time to grab onto the soil better for transplanting? I just figured a plant is always better off in the ground than in a container.
Hi Matt,
With small trees like that, I guess you’ve got two good options. One, let it grow in the pot for a bit longer. Or two, cut the container off rather than pull it off. It’s tricky, but I have successfully cut down the sides of the container and across the bottom, kept the container around the root ball, lowered it into the planting hole, and then slid the container halves away and out. You have to dig the hole wider when doing this though so you can get your hands in there and work it.
I feel the same about getting avocado trees into the ground as soon as possible if the weather is amenable. I have a hard time caring for plants in pots because you can miss a single day of watering and kill them.
Hi Greg
I have a 15 gallon hass to plant. I live in Ventura where the soil is mostly clay. I have tried avocado trees in my yard with no success. The nursery advised me to use 50% native soil and 50 % amendment. Do you recommend this or would I be better off mounding my tree? If mounding what mixture would be best for the mound and how high should I build the mound. Tree is about 4 feet tall. Also if you have covered where in the yard is best to plant taking in full sun or west, north facing etc. I have the room to plant another avocado with the hass, what would you suggest?
Thanks
Jay
Actually my bad, I just tested the drainage, and since this tree will be planted on a 3 foot raised area, with a retaining wall, the drainage is fast. So my new question is the tree will have about 2 feet on 2 sides of it before running into a wall and the other 2 sides can run freely. Is this an issue? Also regarding a second tree, any suggestions ( type b, or a specific variety that compliments the hass and does well in the Ventura area?
Thanks
Jay
Hi Greg
I’m actually going to go back to my original plan and plant at ground level. Please see my first question. Also, the hass is starting to flower, is it recommended to pinch off the flowers this first bloom?
Thanks
Hi Jay,
Have you done a drainage test? How long did it take to drain in that spot?
No need to pinch off the flowers, but you can if you want. Just don’t let the tree set and hold
more than a couple avocados this year.
For varieties to complement Hass, check out these posts:
https://gregalder.com/yardposts/whats-the-best-kind-of-avocado-to-grow/
https://gregalder.com/yardposts/avocado-varieties-for-year-round-harvest/
Hi Greg
Thanks fir the response. The drainage test with filling the hole a second time took about 2.5 hours to drain. I decided to mound the hass with 50% native and 50% Kellogs amendment, then mulch with straw and wood fir chips. We shall see. Hoping the tree doesn’t get to much water due to the storms over the next few days. Any suggestions?
I am going to mound the fruit (pluot) and kishu madarin trees as well due to the poor drainage. if I buy a 4 in 1 pluot tree, does that satisfy the need for another pollinator plum tree or do i need 2 physical pluot/plum trees?
Thanks, have learned a ton with your yard post articles.
Hi Jay,
Your drainage is not super fast, but it’s not bad. You shouldn’t have problems related to drainage. Nevertheless, a little mounding can’t hurt.
Usually, the varieties used for 4-in-1 pluot trees provide for pollination needs so you shouldn’t need an additional tree. If you want to tell me the varieties, I can confirm that for you.
You’re very welcome!
Hi Greg,
I have a young sapling that I grew from seed, and by the end of this week it would be 3 months planted in the ground. When I planted it, I put in a 1″x1″ central stake.
Theres advice that after a short time, maybe 2 months the central stake should be replaced with 2 side stakes. I had planned on doing this today. However, my area is experiencing strong winds. NOA predicted gusts and winds up to 36mph.
It’s a good thing that I watched your video on staking. There are several grown avocado trees with central stakes. So I’m thinking maybe I need not replace the central stake on my plant. What do you think?
And by staking it, did I weaken the trunk?
My Hass avocado is 3 years old, 30″ in height with 30″ span. Its trunk is 3/4″ diameter.
Now I’m also going to check out your page about freezing temps. Tonight it’s supposed to go down to 37F. I hope my plant will survive all this!
Thank you for this website. Really appreciate all you do!
Best regards,
-Elaine J.
Hi Elaine,
Thank you. There’s no perfect, single way to stake avocado trees — as I show in my video and as you can see by the fact that various people get good results using different methods. The principles are just that you want to prevent the tree from toppling, and you want it to be able to strengthen. These can be achieved in a variety of ways. I even use a variety of ways to achieve it in my own yard.
You ought to replace the central stake on your young tree if the tree is growing taller than the stake and yet still can’t stand on its own. You have to test this by cutting the ties and seeing how it flops.
In a sense, all staking weakens the trunk of a tree. However, staking can be necessary in order to get a tree to grow vertically rather than horizontally. In that way, it’s a necessary evil.
Hi Greg,
I recently was given a beautiful Haas in a 5 gallon sleeve from Maddock Nursery. Problem is that I have nowhere to plant it in an all-concrete yard and I won’t be moving for another 6 months.
How long can it stay in the sleeve? Could it be temporarily transferred to something larger and then planted after 6 months or is 2 transfers harmful?
Thank you so much,
Dominic
Hi Dominic,
You could probably keep that tree happy in its sleeve for another few months, but if you can see that the roots have completely filled the sleeve it would be better if you put it into a larger container, on the order of 10-15 gallons. The tree would not be harmed by getting transferred up to a larger container and then eventually transplanted into the ground, as long as you do it carefully and don’t damage too many roots. This is exactly what all nurseries do in order to sell 15-gallon trees.
Hi Greg,
Thank you so much for the info you’ve posted here on your site. It’s been a big help in picking out my avocado trees. I have clay soil and where they will be planted has bad drainage so I’ve built a 4x4x2 raised bed for all of them. Do you have any suggestions as to what type of soil to fill in around them, on top of the existing soil? Thank you again for everything.
Hi Greg,
First of all, thank you for this site! A wealth of knowledge.. I have learned so much.
I just purchased my first tree. I am a little nervous to plant my hass. There are so many factors to consider.
We have poor draining clay soil in our la costa backyard. Failed drainage test miserably when we dug a few feet down! We have a raised planter bed on top of the clay though(only 1 ft in height with good soil) so we will have a 3 foot mound on top of that. So that should give us a total of 4 feet of decent soil.
For the mound, we do not have any extra native soil, so is adding a non native soil mound ok? We were thinking about purchasing some high quality soil in bulk
Appreciate any info! Thank you!!
Hi Greg. Just discovered your site. I live in Diamond Bar, CA and have had a hard time establishing my Wurtz Avocado. It is 5 yrs old and planted on a 30 degree slope. The soil is semi clay and I almost killed it watering once a month. Over the last 3 years it seems to like water once every 2 months through out the year, unless it rains. In 2019, 10 avocados set and I set up a nylon shade cloth roof to protect it from the 100 -120 summer heat. That summer it was 120 and all the fruit dropped. 2020 I had about 20 set and it was 110, again they all dropped. What can I do?? Also, the tree is about 8 ft high with very few branches. Those it does have do not branch out but hang down along the trunk with about 12″ of flare.
Hi Randy,
Sorry to hear about the Wurtz’s woes. I would guess that your tree would benefit from more frequent watering in the summer, especially during heat waves. Even if your soil has some clay, your steep slope should provide decent drainage such that you don’t have to worry too much about holding back on the water so much for fear of root rot.
Check out my post on watering: https://gregalder.com/yardposts/how-much-and-how-often-to-water-avocado-trees-in-california/
Hey Greg,
Love your blog, and I go back and reread articles all the time.
I think I made a mistake when I did this water test. I did it in July when I was digging some roots out of an area I was getting ready for my avocados. I have hard clay soil, and I needed to soak the ground a bit to help dig, and the water always dissipated within hours each time I filled up the hole. I assumed this was multiple good tests, that I had good drainage in spite of the clay, and I went ahead and had a gardener plant two avocados directly in the ground this January. In February, when I was digging a hole myself for a citrus tree, the ground was COMPLETLY DIFFERENT than it had been in July. Softer, wetter, and honestly it looked a lot healthier even though it is still clay. I did the test again as a matter of curiosity, and the water from the second fill up did not dissipate for two whole days. At the time I wrote it off because of the recent rain storms and plunked my Meyer Lemon into the ground, but now I’m not so sure…. my trees are all on a shared drip – becasue that was the only way I could do it. I didn’t have enough pipe in the ground to zone them as you suggested, and I figured I would just do minimal watering on the line and supplement with the hose as necessary.
Is there a right time of year to do this test? I’m in zone 10B and we don’t get much rain, but there is regular water here now becasue of the drip that wasn’t there when I did the test, AND I’ve been working a lot to improve the soil. I’m afraid I should have just built the mounds because I know I have clay soil and that my beloved trees will die because I didn’t. Is mostly dry most of the year enough to prevent root rot? Any thoughts?
You’re awesome. Thank you for your posts,
Casey
Hi Casey,
Since you filled the hole multiple times back in July, I think you probably got an accurate reading on the drainage in that spot. It might be that where you planted the Meyer lemon just has different drainage. Soil can vary quite a bit even within one yard.
Don’t let your avocados dry out too much or have to survive on too little water due to fear of root rot. They still need the same amount of water to live, regardless of whether the soil drains fast or slow. Just make sure you’re not watering wet soil. Wet soil would be soil that when you grab a handful and squeeze it leaves moisture in your palm, stains your hand, and doesn’t crack when you bounce it.
You are amazing!! Thank you!!!
Hey Greg how I’ve been watching your videos on avocados and I recently got a Gwen tree. In my front yard my soil after the first 3 inches is clay, with horrible drainage.I live around downtown Culver City and was thinking of making a raised bed 4×4 12inch or 24inch high and planting the tree in that. Is that okay would you recommend anything better?
Also should I fill the raised bed with the native clay soil and amend it with good products. I was told it should be at least 50/50 or the native soil should be a little more like 60/40. Idk lol
Thanks in advance all your videos and articles have given me hope that I grow an avocado tree after killing my first 2.
Hi Sam,
I know I’ve answered your questions elsewhere, but I’ll note here too for the benefit of others. I’d go at least two feet high rather than just one. Even though most avocado roots are in the top handful of inches, you want to keep the soggy soil of the clay far enough away so that there isn’t constant capillary action bringing that moisture up into the roots in the raised, mixed soil. In commercial operations, they build mounds more like three or four feet high.
Let me share what someone else in a similar situation did. A guy in Redlands whose soil is clayey built a six-foot by six-foot planting hole (he dug down into the clay two feet and built up above grade one foot additionally) for each of his avocado trees. He filled the planters with a mix of sand, topsoil (probably a sandy loam soil), his native clay, worm castings, steer and chicken manure, and compost. He added four inches of wood chips on top. He showed me photos of the process and the trees one year later and they look impeccable, as good as any avocado trees I’ve ever seen.
Hey Greg
I’ve been watching your videos on avocados and I recently decided on getting a Gwen tree. In my front yard my soil after a couple inches is clay with very bad drainage, I was thinking of making a raised bed 4×4 12inch or 24inch high and planting the tree in that. Is that okay would you recommend anything better?
Also I read some of your answers on what to put in the raised bed, however I was wandering if I should mix in the native clay soil with amendments maybe around 50/50. What’s your take on that ?
Thanks in advance I have finally got the courage to plant another tree after a few have died in the past.
Hi, Greg,
I am working on creating a presentation about avocados for the Orange County (CA) Master Gardeners Speakers Bureau. I became a Master Gardener with the class of 2019. I love your photos. May I use one or two (with your The Yard Posts source captions under the photos)? Thanks very much. Adrienne
Thanks for asking, Adrienne. Sure, go ahead, and best wishes on the future presentations.
Hi Greg,
I just bought my first avocado tree and believe that if there’s any chance it survives it will be only because of your fabulous website! It’s a 15 gal Hass. I’m thinking of buying a 15 gal gopher basket to plant it in, but you mentioned that avocado roots are very fragile. Not sure if the basket will do more harm than good. I’d estimate the gopher risk is moderate (at most), not high. Thank you for your tremendous help!
That’s great news, Susan! You’re probably safe without a gopher basket if you think you’d quickly notice if there is new gopher action near the tree (mounds). But if it’s likely to be days before you’d notice a gopher digging near the tree, then you could plant in a gopher basket to be safe. I’ve seen avocado trees that were planted in gopher baskets that were growing very well after a year or more. Fifteen-gallon size trees are generally pretty tough so I think you could plant it without significant root damage, especially since you don’t live in a hot, inland location that stresses avocado trees in summer.
Hi Greg,
I’m all ready to plant my 15 gallon Hass Avocado tree tomorrow. Doing the drainage test, have the mulch and a gopher cage. Just now a friend noticed brown markings on the tree’s trunk. Wondering if these are bad.
What else must I do as I start planting my first avocado tree. I am glad that it has grown from the planter, it is now 24 to 36 inches tall.
Hi David,
After planting and staking or restaking as necessary, the most important task is watering. See: https://gregalder.com/yardposts/how-to-water-a-newly-planted-avocado-tree/
And later, see: https://gregalder.com/yardposts/how-much-and-how-often-to-water-avocado-trees-in-california/
Also, it is highly beneficial to protect the trunk if necessary and to add mulch: https://m.youtube.com/watch?v=R8TqEIyiy6g
You will then want to think about training the tree’s shape:
https://gregalder.com/yardposts/training-young-avocado-trees/
Fertilizing is also something to consider: https://gregalder.com/yardposts/fertilizing-avocado-trees/
hi Greg,
Amazing article and videos. Thank you for all you do, you have been the most thorough on this subject!
Unfortunately, I found this site after I’ve already dug a HUGE hole. I am planning on planting my tree next to an old pine tree that we just cut down and so I dug down and cut some of the large roots away. I now have a nice big hole, but I found out too late about mounding. Question for you, if I just fill the hole with good potting mix should there be any issue? The hole is about 2′ deep and 3-4 feet wide. The tree would be sharing some space with old tree roots and a buried block of concrete. I think the concrete is far enough away, it would be about a foot and a half from the trunk.
Hi Greg,
I will be planting a Carmen and a Reed tree in a corner of the yard where a dead Brazilian pepper tree was just removed and the trunk ground down. I will replace the remaining mound of ground trunk dust/chips with soil from elsewhere in our yard, and the trees will be planted in soil, bit I suspect there remains some remnants of the pepper tree root structure below. Would you suppose those old roots might I interfere with the avocado tree growth?
Further, my instincts tell me to plant the Reed to the west of the Carmen based on my understanding of their growth behaviors. Is that sensible? I plan on planting these no more than 10 feet apart, for context.
Hi Henry,
It sounds like you are going to plant properly considering the circumstances. I don’t think the decomposing pepper tree roots will cause a problem; in similar situations, I have not seen problems with the newly planted trees. The one thing I would add is to plant on a bit of a mound to ensure that the decomposing roots and disturbed soil where the pepper trunk was don’t settle too much over the next year or two. Your new trees could end up below grade.
Your pair could be happy with the Reed or the Carmen to the west. Both are usually medium in vigor. (It depends a bit on rootstock). But I would probably choose Reed to the west too, all other things being equal. The one factor that might influence your arrangement otherwise is that Reed trees grow more vertically whereas Carmen trees spread out sideways more. If there’s a sidewalk or driveway nearby, for example, you might put the Reed closer to that since it won’t encroach as much.
Hello, Greg
I love all of your information you share for us to use!
I have a young hass avocado tree that I planted in late July (15 gallon that I bought here locally in Norwalk Ca). I followed all of your recommendations, did the drainage test it took about 4-5 hrs. I dug a hole twice a deep and wide, I added ammend to the native soil. I used a technique that I saw online where you put a tube (3″ abs in my case) in to the ground to where the roots end to water at the bottom of the root ball and train the roots to go down for water. Instead of watering on top and water not penetrating deep enough. I have fertilized it when I planted and about 6 weeks after with an organic avacado fertilizer. I water it about 1 to 2 times a week in the tube and on the top of a small mound I made and mulched when i planted it. It was doing very good it even had a small avacado when I got it. About 3 week ago it started dropping its leaves and started to get new sprouts looked good, but two weeks ago we had a heat wave in to the low 100° here in LA County. By then it had drooped most of its leaves and just had the bare branches, I watered one extra time that week. A few day later I noticed that the tips of a few of the upper and outter branches had shribled tiny new growth that had dried and few day after that the tips of those branches were brown and dead looks like.
I guess my question is if you think those dead tips are normal heat damage or a sign of disease. I have since covered it with a shade cloth canopy to protect because this week we got some nights in the low 50’s and it is still has bare branches because of the dead new growth. I looks like branches near the trunk area that are bare have signs of tiny buds. I’m worried that the cold will stop this new growth and that will make the tree suffer with extreme weather because of its bare branches. Do you have any advice, it would be appreciated. Once again thank you for all of you excellent information and for taking time to answer our questions. Thank you!
Hi Xavier,
Sorry to hear your tree is struggling. I’m going to bring bad news, but it’s my honest opinion. I would remove the tree and plant a new one and water it in a different way. Growing avocados in Southern California is 90 percent about watering right.
No tubes. Water only from the top. And apply the water right next to the trunk for about the first six months.
In short, the reason the tube watering did not work for your tree (and will not work for any avocado in any yard) is that the native soil holds onto the water and does not share it with the avocado roots that are growing within the potting soil (that was in the container). To avoid this, you must water from the top, directly over the original rootball, so that the water can saturate around the roots in the potting soil as it percolates down.
You’re not alone in sacrificing a tree to this tube watering method. Even my own aunt did this because her gardener told her it was a great method. Tree slowly died.
Such trees don’t die immediately because their bottom roots still get a little water — enough to keep them barely alive. But if the trees are not also watered from the top right next to their trunk they’ll decline, especially when the weather is hot.
See this post for more on watering newly planted avocado trees: https://gregalder.com/yardposts/how-to-water-a-newly-planted-avocado-tree/
I Greg. Thanks for all of the great information. I was recently able to pick up a 5 gal Sharwil that currently stands about 2 ft tall. I was wondering if it would be okay to transplant that into the ground now or if it would be better to up pot it to a 15 gal for a period of time before putting it in the ground. I am just up the 5 freeway from you in Lake Forest. Thanks in advance for the advice.
Hi Scott,
I just drove by Lake Forest on the 5 today, it so happens. Go for it. Put that little Sharwil in the ground now. You’re extremely unlikely to get down to damaging cold temperatures in the next month or so there. In fact, if you do, let me know and I will personally deliver a new Sharwil!
Greg, what timing! I threw it in the ground yesterday! I was waiting to find a sharwil because your profile convinced me that I needed one! I planted it near my holiday tree which has been in the ground for a year and half and is now 6 ft tall and pushing some serious growth and starting to flower. I have seen some stuff online about foliar spraying with fish emulsion, molasses, seaweed and water (1oz of each to a gal of water) any experience with positive results of foliar feeding to jumpstart growth?
Hi Greg,
I have been reading so many of your articles and subscribed to your YouTube channel and have learned so much. I wanted to try growing an avocado tree so I bought a 5 gal SirPrize last May and planted it in a half wine barrel. I used Gary’s Top Pot. It has flourished and grew a whole foot by the end of summer. I live in zone 9b. I think I should have planted it in the ground after all. I tested the soil and the drainage is decent but still want to build a slight mound. I’m not sure how to remove it from the barrel without harming the rootball. When is the best time to transplant it (when there is no chance of frost or wait until early spring)?
Hi Greg, Great information. Thanks.
I’ve taken to planting all my trees and plants in oversized holes–solely for Gophers. So large that I have to hand make my Gopher baskets–30 to 36″ in diameter. When I lived in San Diego, almost every tree I planted was destroyed by gophers until I started using baskets. Now in Santa Cruz, its much worse. So, yeah, big holes and big baskets. I’ve a 3 year old Lamb that is flourishing with lots of fruit–thank you and in the midst of planting another Avocado, which is why I’m re-reading your post.
Do you have any information on Avocados and Gophers? Is it one of the few lucky plants gophers don’t like?
Hi Loren,
I do have a post on trapping gophers: https://gregalder.com/yardposts/the-best-gopher-trap-its-a-cinch/
As for avocados specifically, I just keep on top of the trapping game in my own yard, but I have seen others use baskets with great success. So if you don’t want to trap, plant in a basket.
That was another great post on Gopher trapping. I learned much. I do trap, catching a few gophers each month. Still I find my new trees do better if they are completely safe for the first few years in an over sized basket.
BTW: do you have a rare avocado fund we can donate a little to in thanks for all your great advice?
I’m in Northern Cal (Humboldt County, zone 9b) and recently bought two young trees (a Bacon and a Carmen Haas), both in ~5 gal plastic nursery sleeves (long, narrow root ball, roughly 18″ long, as shown in one of your blog photos). The person I bought them from (a local “expert” on avocado trees) gave me specific instructions on how to plant the trees: in a 2′ x 2′ x 2′ hole backfilled with amended soil and with 6″ of the root ball above grade, then cover the top soil around the root ball with gypsum, fertilizer, and wood chips for mulch, then water every them every day with at least 3 gals of water. He did not tell me to do a drainage test, nor mention any special instructions if one’s substrate soil is clay. I followed his instructions to a ‘T’ and, for the first week or two, both trees looked great, each of them exhibiting a lot of new growth. Now, 3-4 weeks in, both trees have stopped putting out new growth and the Carmen, in particular, is looking sad (leaves curling, drooping, etc.). And although the Carmen has several new buds, none of them are leafing. Through my own research, I found your blog and a couple others that mention how critical it is to perform a drainage test before planting, and how, if your soil is comprised of clay, how important it is to plant the entire root ball (all 18″, not just 6″ of it) above grade in a mound formation, leaving at least 3 ft of good soil beneath so the tap root won’t hit the clay when it grows out. I fear that is what has happened to my two trees — that the clay has trapped too much water around the root ball and possibly the tap root is now rotting from lack of oxygen and too much water, causing the plant to shut down and stop growing. Is it feasible at this stage, after a month in the ground, to dig the trees up and replant them above grade in a mound? Or would doing so cause the roots too much damage and trauma?
Hi Greg,
We’re in Houston and the area we live in have high winds as it’s quite open.
Our Avo tree is about 18 months old and 6ft high, looks healthy.
I want to take the stake out, but afraid the trunk might snap. The relation between tree height and diameter of trunk worries me, it looks almost top heavy.
I know the stake needs to be removed to make the tree stronger, can you advise what’s the best to do? Thx
Hi Gerrit,
Sounds like you should not remove the stake. You don’t need to remove the stake in order to strengthen the tree; you just need to make sure the tree can wiggle a bit while still tied to the stake.
Hi Greg, I’m in Solana Beach 100 yards from the ocean. I planted a 15 gal. Haas a couple years ago and got a great crop last season. For some reason the tree did not flower or set new fruit this past season. It looks healthy, and our soil is sandy and drains well. Should I be concerned?
Hi Scott,
No cause for concern. Hass, just like most avocado varieties, will often take a year off if they’ve made a good amount of fruit the previous year. Provided your tree is healthy, I would expect a good bloom and fruitset this coming spring.
Hi Greg,
After six months, my 5-gallon GEM is doing great in a mound; and I replaced the nursery stake with a taller center stake, near my Sir Prize. My Sir Prize has 4 stakes in each corner of the mound with ties to them. It’s about 7 feet tall now. Is there a point when it will no longer need the stakes or should I leave them in although the tree is taller than the stakes now and is not leaning? Should I replace the center stake around my GEM with four stakes like I did with my Sir Prize? The tallest garden stake I can find is 7 ft. tall. Is this height more ideal because the ones I used for the Sir Prize were shorter?
Hi Greg
I recently purchased a GEM and a Lamb tree. Previously when I planted an avocado tree it did not do well and reading now, I see I should have planted it on a mound as we have slow draining clay soil here. I do have some compost readily available; however am concerned if I add that to the mound (or perhaps below the mound which was also a thought) that it would then drain too quickly. Should I just use the native clay soil only for the mound? I did see that there was no benefit to adding amendments but the gardener in me thinks it’s a good idea 🙂
Hi Cindy,
Mixing some compost with the clay dirt is fine, but keep in mind that the compost will further decompose and shrink your mound. So build higher if mixing in compost.
I live in Imperial County. I’m on my 4th in ground avocado, I seem to be getting better at keeping them alive through our summers. My potted avocado tree is doing phenomenal.
Does anyone recommend training the lead branch downward like another perpendicular branch? After it gets to a desired length top it so that a new leader grows. I think it might help with providing more shade for my roots, trunk and future fruit.
Not sure if I can post youtube video links here so that you can see an example.