
While family was visiting for Christmas I invited my niece to prune a fruit tree with me. Is pruning your fruit trees intimidating? What to cut? Where to cut? (You can’t reverse it after you’ve cut.)
This post is narrowly focused: Let’s only talk about where to make a cut. Not which branches to cut, not how many, just where.
Cutting a branch all the way off
There are two kinds of cuts we can make. Either you cut a branch to shorten it, or you cut it all the way off.
While my niece and I were doing our pruning, discussing cutting a branch all the way off, I hadn’t realized that my brother was filming, but he was, and he captured this:
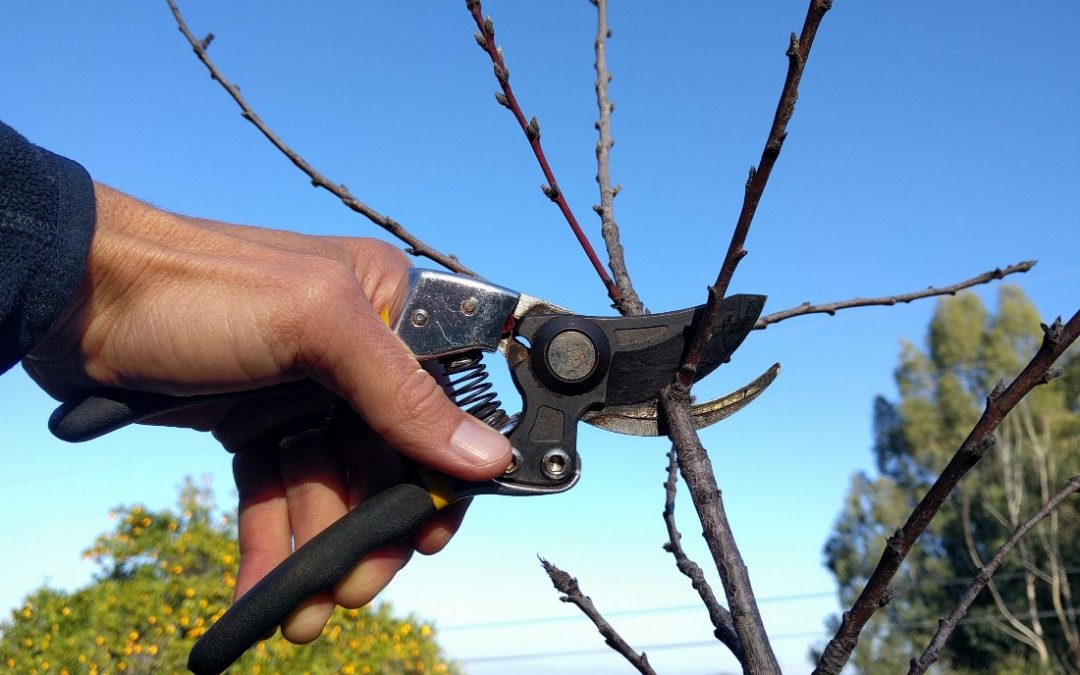
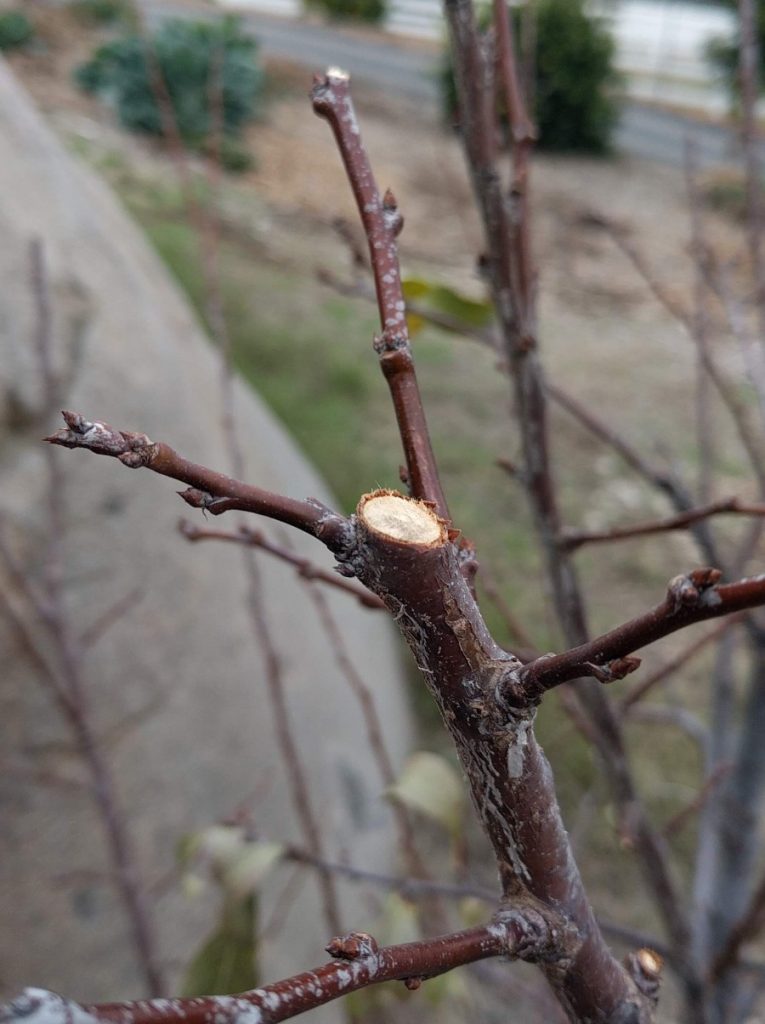
Anyway, I was saying that when you want to cut a branch all the way off the best place to make the cut is just above the collar. The branch collar is the swollen ring at the base of the branch where it connects to another branch.
This collar is capable of healing over your pruning wound. It takes a year or two or more, but if the collar is left intact and heals over the cut then there is no longer an opening in the tree’s bark.
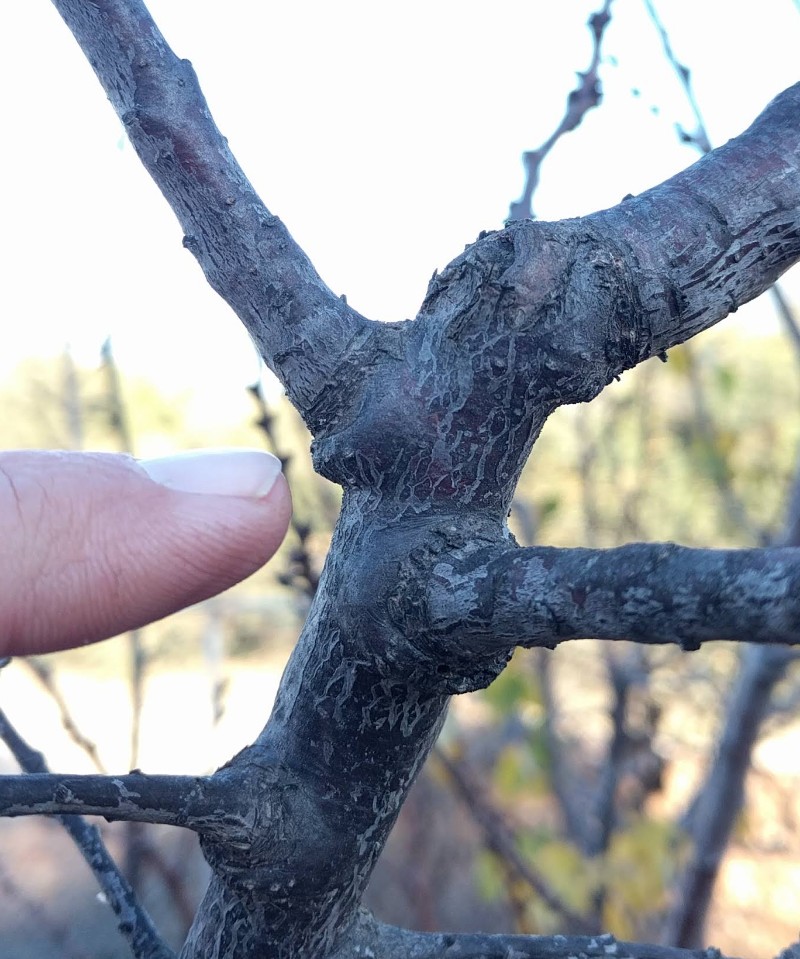
Here is a cut that is in the processs of being healed over:

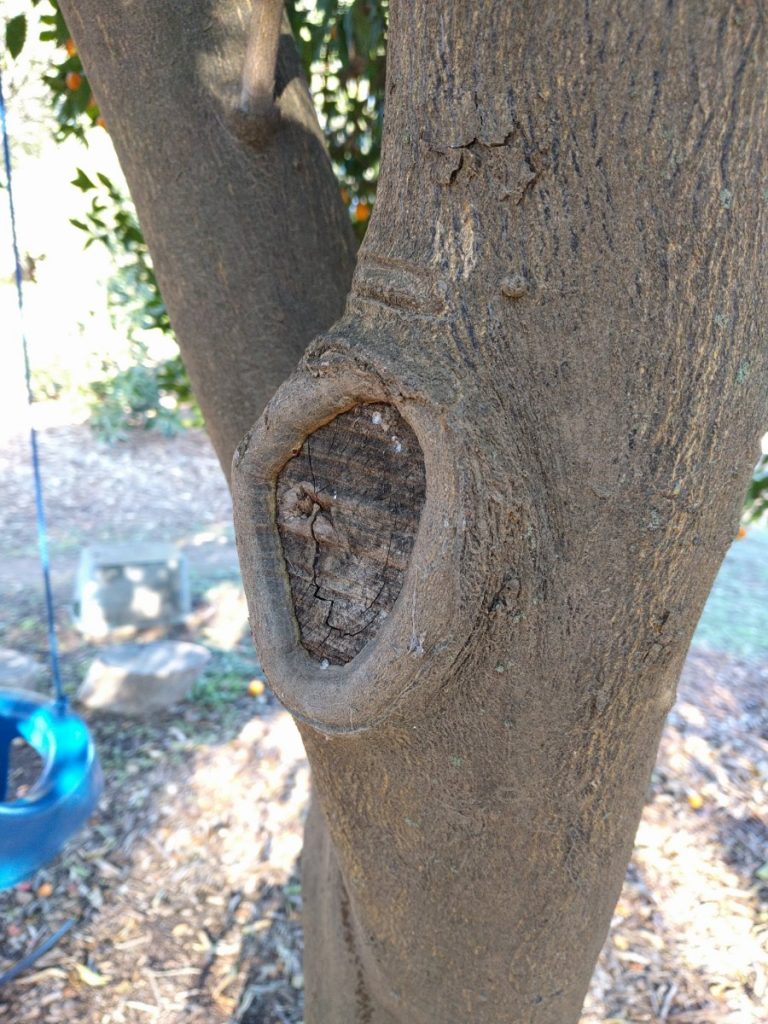
And here is an older cut that has been completely sealed up by the collar:
But what if? I love to play the What if? game. What if you cut far above the collar? In that case, the leftover branch above the collar usually dies back to the collar, leaving a dead stub.
Big problem? No, but it doesn’t look so good and the stub will catch on your shirtsleeve or arm as you harvest fruit or prune again next time. And imagine the compounded annoyance if you leave a lot of these stubs throughout a tree. So there’s no benefit to leaving a stub.
On the other hand, what if you cut low/deep and cut into the collar?
You reduce the collar’s ability to callus and seal up that wound. Big problem? Often not, but it that opening can end up rotting and giving entry to pests or pathogens that reduce the health and strength of that branch.
So if you err, I say, err on the side of cutting too far above the collar rather than cutting into the collar.
Shortening a branch
As for shortening a branch, well, here’s video of me and my niece (and my daughter on my back):
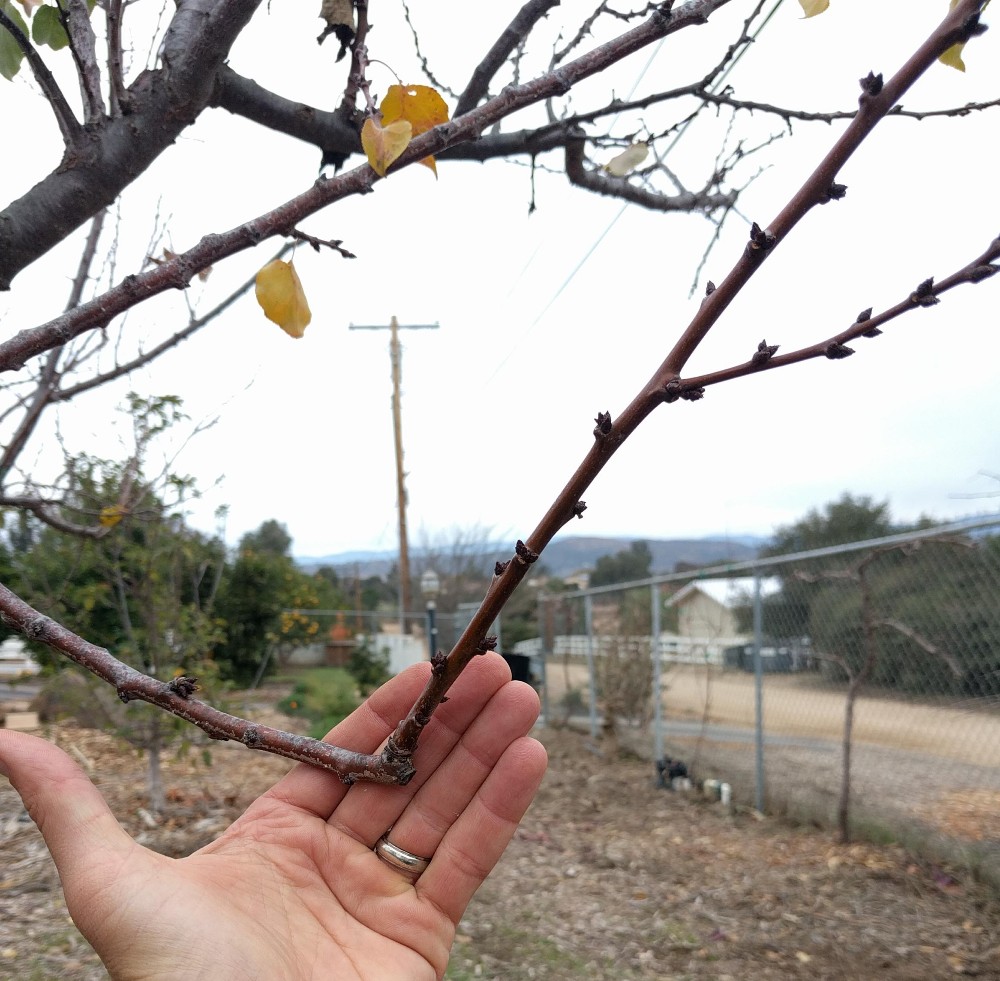
So, to shorten a branch you want to cut just above a bud. The buds along a branch are the points where the branch is capable of growing from. If you cut just above a bud, what usually happens is that (now) highest bud then starts growing.

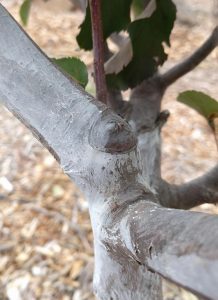
Here is the result of a branch cut back to a bud one year ago, last winter:
(Sometimes a bud or two below that highest bud also start growing.)
The reasons for cutting just above a bud are similar to the reasons for cutting just above a collar. If you cut too far above the bud, the bud will grow but the branch will die back to the bud and leave a dead stub.
In contrast, if you cut too close to the bud and damage it, it won’t grow well or will possibly be killed. So here again, we want to err on the side of cutting too far above rather than too close to the bud.
But what was that talk in the video about “outward-facing” buds? When you choose which bud to cut down to, it’s best to choose a bud that is facing the side of the branch that you want the new growth to aim toward. Usually, you don’t want a branch to grow in toward the center of the tree because it can get too crowded there, so you choose a bud that is facing away from the center of the tree (or another uncrowded direction).
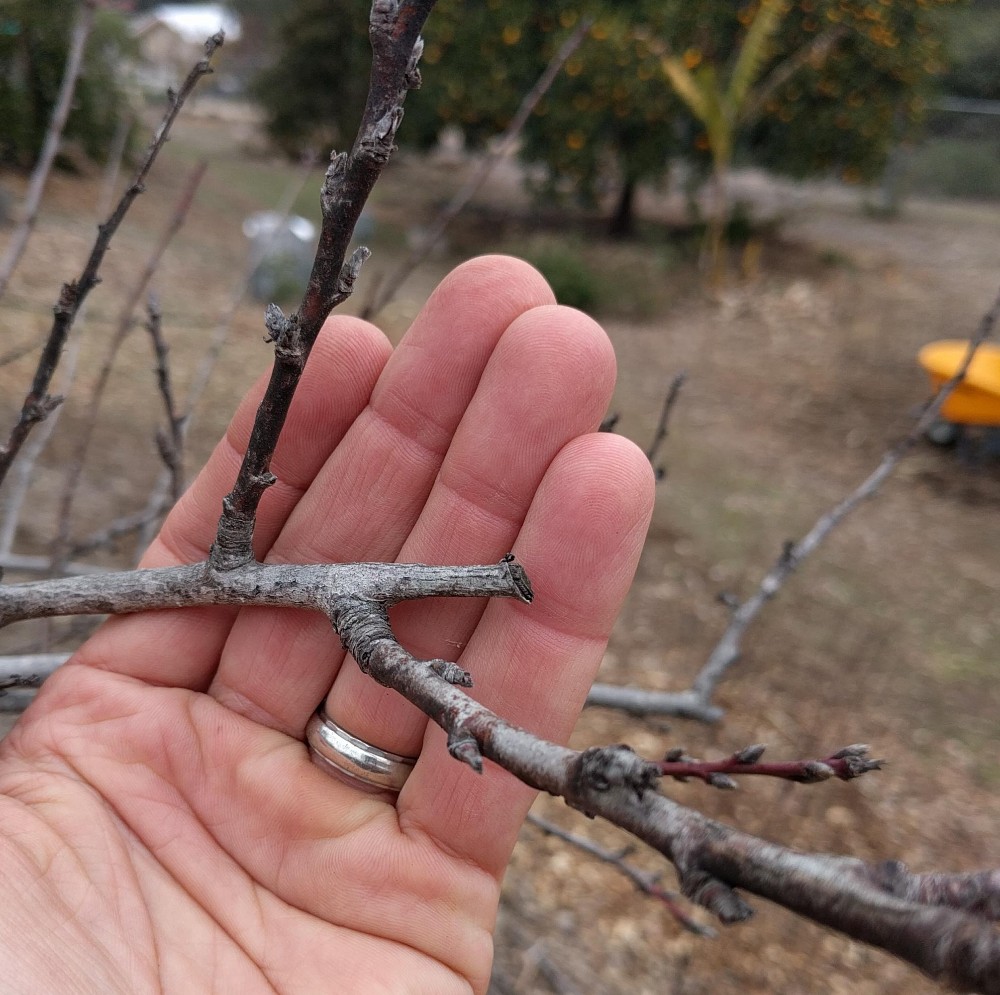
Another way to shorten a branch is by cutting it back to a smaller branch that is growing in a desired direction. Here you want to cut to just above the little branch, not damaging its little collar.
Note that if the smaller branch is too small, however, it will not become the new growing point and may die back. A rule of thumb is that the smaller branch must be at least one third the size of the larger branch.
That’s it, that’s where to cut a branch on a deciduous fruit tree: Cut just above — not into — a collar, bud, or branch, preferrably leaving no stubs. If you do, you get a graceful, healthy, and harvest-friendly branch architecture.
Have a look at your trees and note their reactions to the cuts you have made in the past. I’ve tried to be clear and accurate in what I said and showed here, but nothing beats personal observation. I really encourage you to take a few minutes to do this. Whenever I do I gain more confidence for future pruning.
Other posts and resources about pruning deciduous fruit trees
Here are a few posts I’ve written about other aspects of pruning deciduous fruit trees that you may like to check out:
Don’t cut off the fruiting wood: Pruning lesson number one
Think about sunshine when pruning deciduous fruit trees
My best advice on pruning deciduous fruit trees: Keep them small
Should you prune a bare-root fruit tree?
Summer pruning deciduous fruit trees
And here are some links to my favorite resources about the topic of pruning deciduous fruit trees in general:
— The Home Orchard is the best book with a chapter on the subject. Find it at your library. See it here on Amazon. Read my review here.
— This document is essentially a summary of the pruning chapter of The Home Orchard.
— An excellent video of Chuck Ingels talking pruning is here. Skip to 36 minutes in for the pruning section.
— Chuck Ingels, an advisor with the University of California, also has a slideshow full of helpful photos about training and pruning fruit trees here.
Happy pruning!
All of my Yard Posts are listed HERE


Excellent content – Thanks!
Thanks, Greg! I was just looking at my apple tree today, thinking about where I need to prune!
Great website Greg I really enjoy your content. These pruning articles are super helpful. I was thinking of planting some pluots and possibly a pluerry. Was wondering if you had any recommendations as far as varieties. I live up by canyon lake so my weather get a bit warmer then yours. Thanks in advance and keep up the great work
Hi Grant,
Thanks! I just can’t get enough pluots. They do wonderfully in my yard, and I suspect they would do great in yours near Canyon Lake. I say this mainly because pluots can take the heat. You remember how hot last summer was? My pluots didn’t blink.
My favorite pluot varieties so far are Dapple Dandy and Flavor Grenade. Dapple Dandy has a beautiful mottled flesh inside and a rich sweetness whereas Flavor Grenade verges on being too sweet yet still is always crisp. Both are very productive in my yard as well as in the yards of others I know. If you prefer crisp fruit, go with Flavor Grenade. If you don’t like ultra sweet fruit, go with Dapple Dandy.
That being said, these pluots require a pollenizer so you can’t plant just one. I have a nice combination of Burgundy plum, Dapple Dandy pluot, and Flavor Grenade pluot. They pollenize one another very well, the Burgundy plum is ready to eat in mid July, then it’s on to Dapple Dandy starting in late July or early August, and then Flavor Grenade starts in August and can hang on the tree into September. I love this combination.
I’ve never grown nor tasted a pluerry, I’m sorry to say. I’m very tempted to plant a Sweet Treat though since I’ve heard good things about it. Sweet Treat can also be pollenized by Burgundy plum, according to its wholesale grower Dave Wilson.
Thanks for the input. Going to plant some pluots soon. Have you ever heard of anyone successfully growing avocados up in canyon lake? I’ve walked all over the community in search of a successful avocado tree but have yet to find one.
Grant
Hi Grant,
Can’t say I know of avocado trees in Canyon Lake because I’ve never been to that particular spot. But I’ve been all around. I have friends and relatives who live or have lived in Temecula, Elsinore, Corona, Menifee, Hemet. I’d bet that you can successfully grow an avocado tree there.
It’s a little hotter and drier than avocados like in the summer, and it can get too cold on some winter nights. But it’s not much different from where I am in Ramona. It will likely just take a little extra effort, especially in the first couple years of the tree’s life. That’s my guess, unless your yard is in a bad frost pocket or something unfortunate like that.