
I love the efficiency of drip irrigation, but its inflexibility can be frustrating. Learning to kink my drip irrigation tubes in various ways has, however, relieved some of this frustration and added versatility into my system.
Let me explain and illustrate with two examples in my yard today.
Vegetables: carrots
This bed of carrots was ready to be harvested, but I didn’t want to harvest them all at once. I only wanted to harvest around a dozen carrots at a time.
The bed is watered with a drip irrigation tube. If I harvest a section and continue to water the remaining carrots, I’ll be wasting water on the harvested section, as the drips would then go into rootless dirt. How to avoid this?
I do have a shut-off valve for the line on this bed so I could turn it off and switch to handwatering the remaining carrots, but that is time consuming.
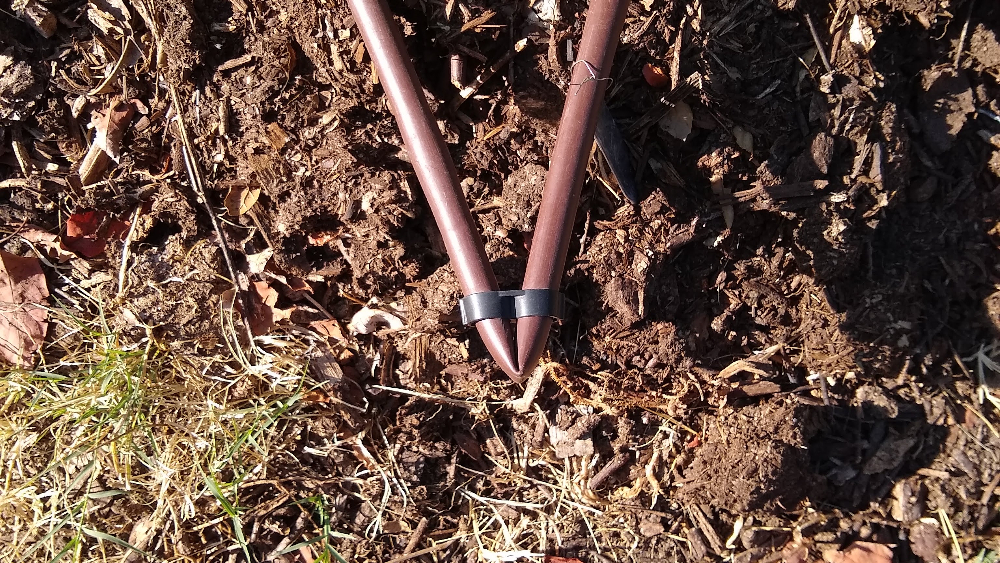
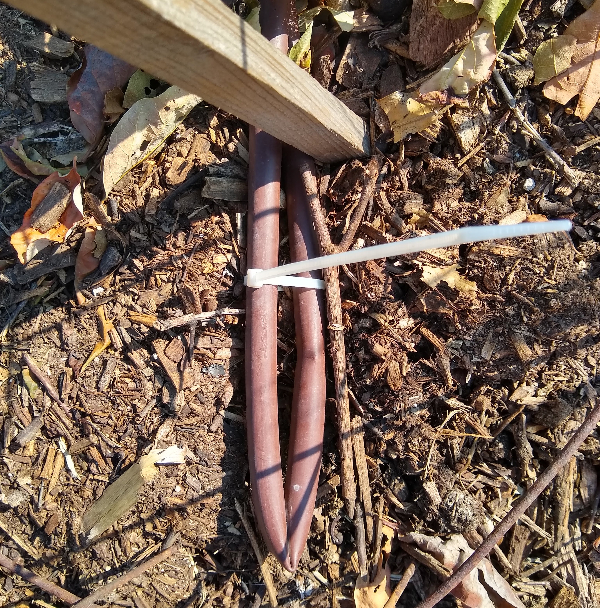
Rather, what I did was harvest a section at the far end of the bed first and then shorten the drip tube by kinking it.

I used a segment of half-inch drip tubing to slide over the kink and hold it in place. This stops the water flow at the kink, and now I can continue to use the same drip irrigation on the remaining carrots. As I harvest more I can slide the half-inch tubing off and rekink wherever necessary. This kinking does not damage the line.
Fruit trees: mango
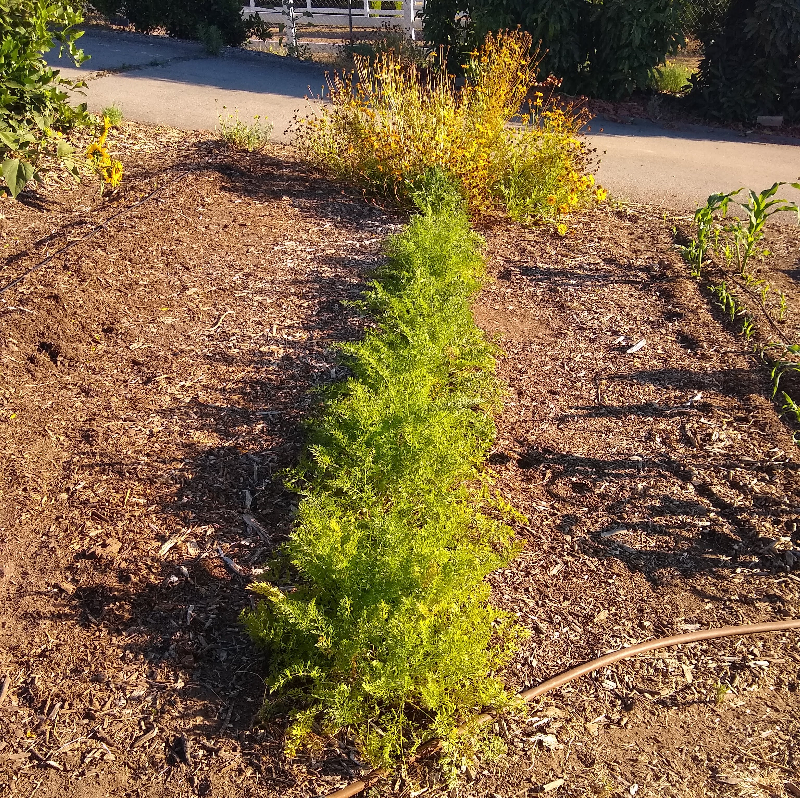
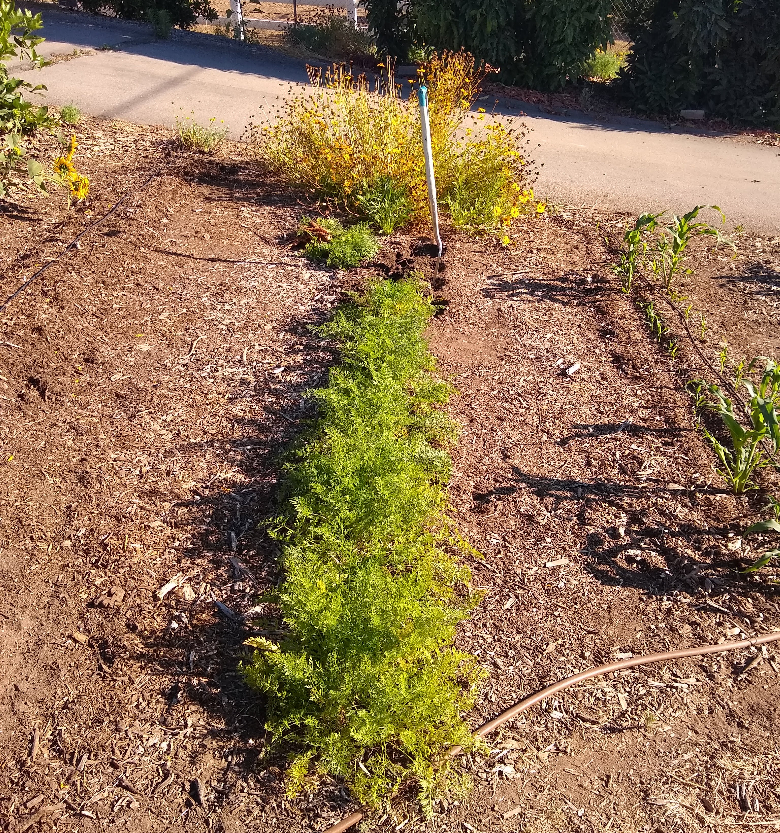
Here is a second use of kinking drip tubing to save time and water. I planted this mango in April.
I installed a drip irrigation line on it with three emitters spaced six inches apart. I estimated that this would apply sufficient water until the tree doubles in size, which might happen by the end of the year if I’m lucky. At that point, I could add another section of tubing with more emitters, but what I did instead is easier:
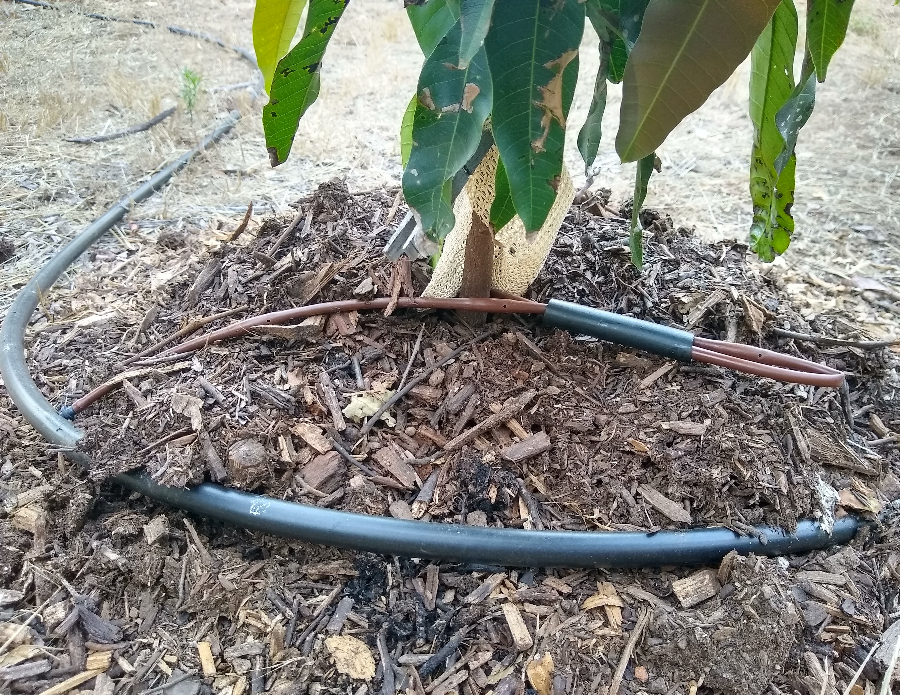
I installed the drip irrigation line at a length that included six emitters (twice as many as necessary at planting time), and then I kinked the line after three emitters. Once the tree is big enough to need more water, I will unkink the line and rekink it behind the fourth or fifth emitter. No cutting or tools or additional parts required.
This has become my routine way of installing drip irrigation on newly planted fruit trees over the past few years, and it has worked out well as the trees have gained in size and needed more water.
Note that it works just as well when using half-inch tubing. If kinking a half-inch tube, I use a zip tie or nursery tape rather than a figure eight to hold the kink because they are easier to slide off than figure eights.
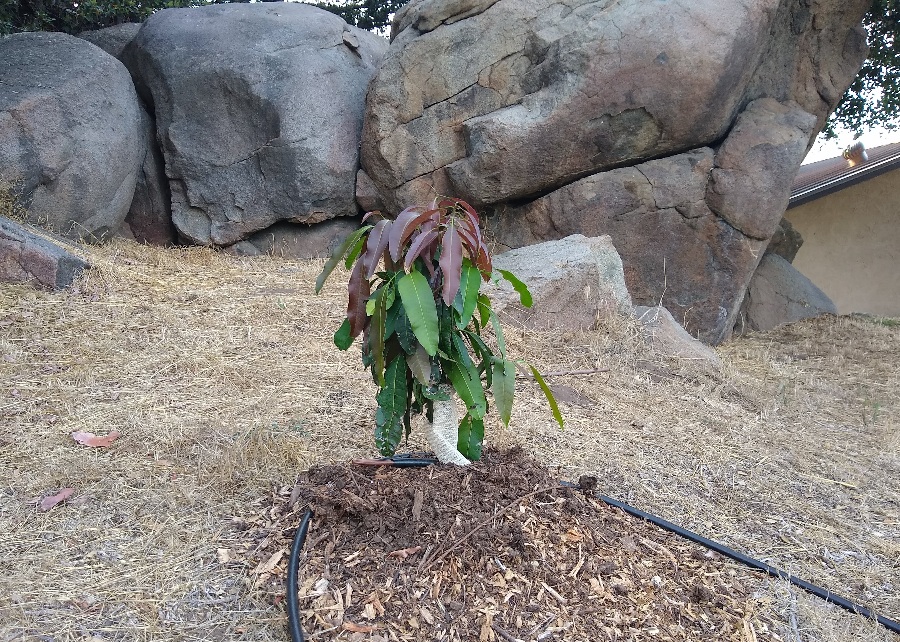
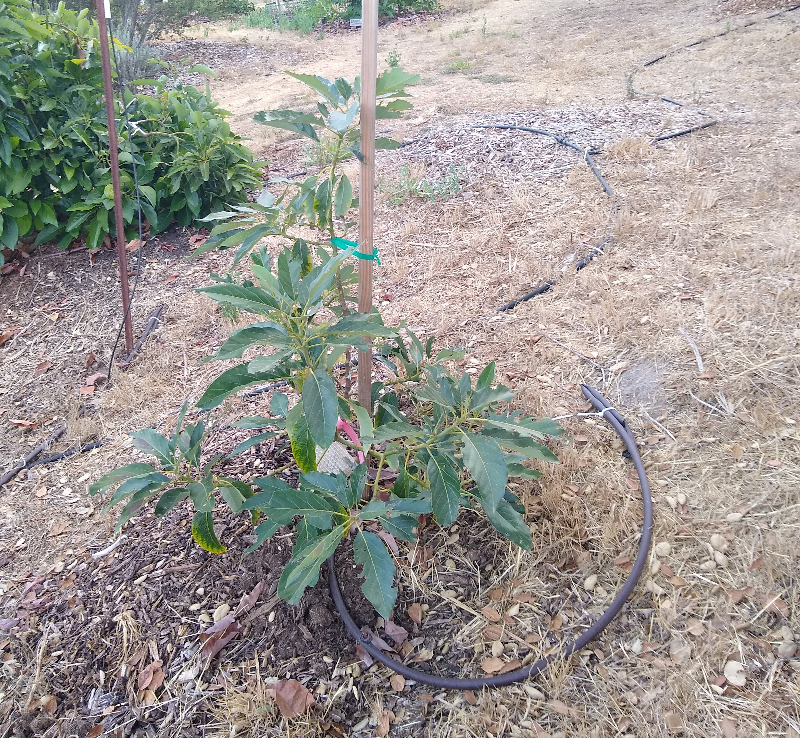
When using button emitters rather than tubing with inline emitters, I prefer to include extra tube at planting time but waiting to add extra button emitters until the tree has grown big enough to need them. For example, here is a young avocado being watered with button emitters on a half-inch tube.

And here you can see the extra tube I have included at planting time so that as the tree grows, I can punch in new emitters as necessary.
Do you have other ways of making drip irrigation on vegetables and fruit trees more flexible while retaining efficiency? Please share.
Here are some more posts on drip irrigation:
Installing drip irrigation for a vegetable garden
How long to run drip irrigation on vegetables
Watering fruit trees with drip irrigation
Drip and micro-sprinkler irrigation troubleshooting guide
The easiest automatic irrigation
All of my Yard Posts are listed HERE
Your support keeps my posts coming and the ads away. (Notice that there are no ads on this website? Makes for easy reading, right?) Learn about ways to support HERE


Hello Greg,
Are you using the 1-inch drip line for your trunk and half-inch drip line for the offshoots around your trees? I am currently using 1/2 and 1/4 inch.
Hi Ken,
I also use 1/2 inch for the feeder/lateral lines and 1/4 inch for the lines with drippers (such as on the mango above).
But on some trees, especially large ones, I use 1/2-inch drip lines (with inline or button emitters). When the line is long or there are many emitters, as there might be on a large tree, a 1/2-inch line is better because it has less friction due to the wider diameter so the emitters drip water more uniformly.
I sometimes put two rings around a tree, but I put a valve between them and close it until the tree grows. I recommend the compression fittings or the ones with a nut that tightens down around the tube. The barb fittings aren’t trustworthy, especially for valves where water’s pushing on it.
Hi Jessica,
That’s a smart set-up.
I’ve found that some barbed fittings work well if they are made by the same manufacturer and properly matched with the diameter of the tube. For example, Netafim barbed fittings hold well for me when attached to Netafim tube of the right diameter.
But mixing manufacturers and diameters is a recipe for the parts popping out, especially when the weather is hot and the tubes become pliable, although I have overcome this in some situations by covering the tubes and fittings with mulch to keep them cooler.
In general, I also use compression or nut fittings now if I’m mixing manufacturers or diameters. (Unfortunately, I do a lot of this mixing because I like to trial new materials.)
That’s so helpful to know about Netafim barb fittings being trustworthy– I’m expanding my irrigation this summer, and I usually use the techline CV for trees.
I have been asking and looking around for 3/4″ irrigation tubing valves. No one had any. I was at Lowes in Murrieta this week and then have such a thing now: $1.06 each.
I can select trees (mostly) on one line for water or not: ie: I have some citrus on a long line with some summer fruit, I can close the deciduous lines in the winter while keeping the citrus open for winter watering.
Works for me.
This is brilliant. I have shut-off valves also but wasn’t sure what to do if I wanted to stop part of the line. Thanks for sharing!
I use Vari-Jets 90º sprays from Antelco a lot.
They have an integrated valve and one can adjust the coverage and flow, it’s very handy.
However, I have to admit that my fruit trees and the various avos are only 3-4 years old.
Once they become older and wider, I’ll switch to Vari-Rotor Spray mini sprinkler also from Antelco with an integrated valve.
Hi Vasco,
I like that plan. I also use those Antelco mini sprinklers (with and without the integrated valves) on some of my trees and find that they are well made. Hope all is well for you in Portugal.
Hi Greg,
It’s been almost 3 years since I started to put avo trees into the dirt. Hass – 3 years old, Reed – one year old, Pinkerton – one year old, Fuerte – two years old and Bacon – one year old. Two of each.
A few struggles with some of them, one of the 3 years old Hass didn’t make it through the summer of 2021, along with it died a Reed.
I’m not sure what could had cause it, watering with 90º Vari-Jet sprays from Antelco was the very same for all of them. I suspected gophers but after a lot of digging around and weeding, I noticed that there were tunnels all over the places, but the other trees seemed to not bother…
Fall 2021, I planted another patch of trees; this time I went with 4 of each, one year old, variety: Lamb Hass; Pinkerton; Fuerte; Reed; Bacon and Hass J2.
Again a few trees didn’t make it. A Reed and two of the Hass J2 needed to be replaced.
But beside these losses, trees were doing fine, no issues with the heat 43.7 ºC (110.7 ºF) in July 2022 nor the frost that reached -2.3 ºC (28 ºF) for a couple of hours in January 2022.
March 2023 father frost hit hard, a few nights with 0 ºC (32 ºF) to -3.1 ºC (26.5 ºF) after midnight to well after sunrise around 9:00h.
• The Reeds; Lambs and Hass / Hass J2 were hit hardest, just one of each survived. The older Lambs both carried 3 big avos, died.
• Pinkerton: 3 survived, 3 died.
• Hass: 2 survived, 1 died.
• Fuerte: 5 survived, 2 died.
• Bacon: no loss.
So, everything you discussed, applies…
Keep the trees well-watered before heat and frost.
Protect the trees when the frost occurs over a longer period, i.e., more than 2-3h at dawn.
Trees carrying fruits are more prone to weather conditions.
No flowering or almost no flowering (Bacons had some but no fruitlets) the year after the frost.
Planting older trees don’t guarantee you better results. They struggle in the heat, root ball size vs foliage…
Funny enough, all but one grew suckers over the last months. I’ll try to graft the same variety on the suckers.
Not all was a waste of time! It showed me that the rootstocks can withstand harsh conditions…
Vasco
Very interesting, Vasco. Thanks for the report. I hadn’t known that you dealt with such cold. I know one other avocado grower in Portugal near Porto, but he doesn’t seem to deal with much cold at his place. I hope you can graft some of those suckers and make use of the surviving root systems.
Hi Greg,
Porto is located at the Douro River delta and more or less at the shore. Any spot farther inland from the city is much colder than ours.
I’m being around in our area for more than 25 years and didn’t experience such cold.
Neighbors told me that they don’t remember of such a long cold snap.
Bad luck for sure, 1 or 2 years more and losses wouldn’t mind.
Vasco